Windows Azure and Cloud Computing Posts for 1/20/2012+
| A compendium of Windows Azure, Service Bus, EAI & EDI Access Control, Connect, SQL Azure Database, and other cloud-computing articles. |

• Updated 1/20/2012 with new articles marked •.
Note: This post is updated daily or more frequently, depending on the availability of new articles in the following sections:
- Windows Azure Blob, Drive, Table, Queue, Hadoop and Numerics Services
- SQL Azure Database, Federations and Reporting
- Marketplace DataMarket, Social Analytics and OData
- Windows Azure Access Control, Service Bus, and Workflow
- Windows Azure VM Role, Virtual Network, Connect, RDP and CDN
- Live Windows Azure Apps, APIs, Tools and Test Harnesses
- Visual Studio LightSwitch and Entity Framework v4+
- Windows Azure Infrastructure and DevOps
- Windows Azure Platform Appliance (WAPA), Hyper-V and Private/Hybrid Clouds
- Cloud Security and Governance
- Cloud Computing Events
- Other Cloud Computing Platforms and Services
Azure Blob, Drive, Table, Queue, Numerics and Hadoop Services
• Ronnie Hoogerwerf (@rhoogerw) described Using Data in a 1/20/2012 post to the Microsoft Codename “Cloud Numerics” blog:
This post contains the following topics:
- Working with Arrays
- Loading Distributed Data from a File
- Creating Distributed Arrays from Azure Blobs
- Accessing Data with LINQ
Working with Arrays
You can create either dense n-dimensional arrays or distributed dense n-dimensional arrays using Microsoft codename “Cloud Numerics” lab.
Creating Arrays
You can create dense arrays with Numerics.Local. For example:
using local = Microsoft.Numerics.Local;
var a = local.NumericDenseArrayFactory.

CreateFromSystemArray<double>( new double [,] { {-0.5, 1.0},
                                                { 0.5, 1.0} } );
Creating Distributed Arrays
You can create distributed dense arrays with Numerics.Distributed. For example:
using dist = Microsoft.Numerics.Distributed;
var c = new dist.NumericDenseArray<double>(a); // Explicit distributed data creation
Casting Arrays
You can cast from a distributed array to a local array. For example:
var d = c.ToLocalArray(); // Implict distributed data recastYou can also assign local data to distributed data. For example:
var a = local.NumericDenseArrayFactory.CreateFromSystemArray<double>( new double [,]
                                                                    { {-0.5, 1.0},
                                                                      { 0.5, 1.0} } );
dist.NumericDenseArray<double> c = a; // Assignment with backend distributed data
Loading Distributed Data from a File
The “Cloud Numerics” lab provides an interface you can implement for loading data from a file.
The steps to loading distributed data from a file are:
1. Create a class that returns an object that conforms to the Numerics.Distributed.IO.IParallelReader interface or else use or modify the Distributed.IO.CSVLoader class provided in the Cloud Numerics lab distribution.
2. Use the Distributed.IO.Loader.LoadData() method to load your data into a distributed dense array.
For more details, see the blog post titled Using the IParallelReader Interface.
Creating Distributed Arrays from Azure Blobs
For more information on Windows Azure Blob storage, navigate to the following Getting Started page http://www.microsoft.com/windowsazure/learn/get-started/
Creating Serial IO from Blobs
using System;
using System.Collections.Generic;
using System.Linq;
using System.Text;
using Microsoft.WindowsAzure.StorageClient;
using msnl = Microsoft.Numerics.Local;
using msnd = Microsoft.Numerics.Distributed;

namespace ExampleWithSerialIO
{
    class Program
    {
        // Sample blobs that hold matrices of random numbers as binary data
        static string accountName = @"https://cloudnumericslab.blob.core.windows.net/";

        // 1000-by-1000 matrix
        static string blobAddress=  @”https://cloudnumericslab.blob.core.windows.net/arraycollection/mediummatrix”;

        // Method to read blob data and convert it into local NumericDenseArray of doubles
        public static msnl.NumericDenseArray<double> ReadBlob()
        {
            long i,j;

            // Get reference to blob
            var blobClient = new CloudBlobClient(accountName);
            var blob = blobClient.GetBlobReference(blobAddress);

            // Read number of rows and columns from blob metadata
            blob.FetchAttributes();
            long rows = Convert.ToInt64(blob.Metadata["dimension0"]);
            long columns = Convert.ToInt64(blob.Metadata["dimension1"]);

            // Convert blob binary data to local NumericDenseArray
            var outArray = msnl.NumericDenseArrayFactory.Create<double>(new long[] { rows, columns });
            var blobData = blob.DownloadByteArray();
            for (i = 0; i < rows; i++)
            {
                for (j = 0; j < columns; j++)
                {
                    outArray[i, j] = BitConverter.ToDouble(blobData, (int)(i * columns + j) * 8);
                }
            }
            return outArray;
        }

        static void Main()
        {
            // Initialize runtime
            Microsoft.Numerics.NumericsRuntime.Initialize();

            // Read data and implicitly cast to distributed array
            msnd.NumericDenseArray<double> data = ReadBlob();

            // Compute mean of dataset
            var mean = Microsoft.Numerics.Statistics.Descriptive.Mean(data);

            // Write result. When running on Windows Azure cluster,
            // the output is available in job output
            Console.WriteLine("Mean of data: {0}", mean);

            // Shut down runtime
            Microsoft.Numerics.NumericsRuntime.Shutdown();

        }
    }
}
Creating Distributed IO from Blobs
using System;
using System.Linq;
using msnl = Microsoft.Numerics.Local;
using msnd = Microsoft.Numerics.Distributed;
using Microsoft.Numerics;
using Microsoft.WindowsAzure;
using Microsoft.WindowsAzure.StorageClient;

// A example method for reading an array from blob storage
// Each blob contains a piece of 2-D array

namespace AzureArrayReader
{
    [Serializable()]
    public class AzureArrayReader : msnd.IO.IParallelReader<double>
    {
        private string accountName;
        private string containerName;

        public AzureArrayReader(string accountName,string containerName)
        {
            this.accountName = accountName;
            this.containerName = containerName;
        }

        // Assign blobs to MPI ranks
        public object[] ComputeAssignment(int nranks)
        {
            Object[] blobs = new Object[nranks];

            var blobClient = new CloudBlobClient(accountName);
            var matrixContainer = blobClient.GetContainerReference(containerName);
            var blobCount = matrixContainer.ListBlobs().Count();
            int maxBlobsPerRank = (int)Math.Ceiling((double)blobCount / (double)nranks);
            int currentBlob = 0;
            for (int i = 0; i < nranks; i++)
            {
                int step = Math.Max(0,
                                    Math.Min(maxBlobsPerRank,
                                    blobCount - currentBlob) );
                blobs[i] = new int[] { currentBlob, step };
                currentBlob = currentBlob + step;
            }
            return (object[])blobs;
        }

        // Assume pieces are concatenated along column dimension
        public int DistributedDimension
        {
            get { return 1; }
            set { }
        }

        // Read data from blobs
        public msnl.NumericDenseArray<double> ReadWorker(Object assignment)
        {
            var blobClient = new CloudBlobClient(accountName);
            var matrixContainer = blobClient.GetContainerReference(containerName);
            int[] blobs = (int[])assignment;
            long i, j, k;
            msnl.NumericDenseArray<double> outArray;
            var firstBlob = matrixContainer.GetBlockBlobReference("slab0");
            firstBlob.FetchAttributes();
            long rows = Convert.ToInt64(firstBlob.Metadata["dimension0"]);
            long[] columnsPerSlab = new long[blobs[1]];
            if (blobs[1] > 0)
            {
                // Get blob metadata, validate that each piece has equal number of rows
                for (i = 0; i < blobs[1]; i++)
                {
                    var matrixBlob = matrixContainer.GetBlockBlobReference(
                                                    "slab" + (blobs[0] + i).ToString());
                    matrixBlob.FetchAttributes();
                    if (Convert.ToInt64(matrixBlob.Metadata["dimension0"]) != rows)
                    {
                        throw new System.IO.InvalidDataException("Invalid slab shape");
                    }
                    columnsPerSlab[i] =
                    Convert.ToInt64(matrixBlob.Metadata["dimension1"]);
                }

                // Construct output array
                outArray =
                msnl.NumericDenseArrayFactory.Create<double>(
                                             new long[] { rows, columnsPerSlab.Sum() } );

                // Read data
                long columnCounter = 0;
                for (i = 0; i < blobs[1]; i++)
                {
                    var matrixBlob =
                    matrixContainer.GetBlobReference("slab" + (blobs[0] + i).ToString());
                    var blobData = matrixBlob.DownloadByteArray();
                    for (j = 0; j < columnsPerSlab[i]; j++)
                    {
                        for (k = 0; k < rows; k++)
                        {
                            outArray[k, columnCounter] =
                            BitConverter.ToDouble(blobData, (int)(j * rows + k) * 8);
                        }
                        columnCounter = columnCounter + 1;
                    }
                }
            }
            else
            {
                // If a rank was assigned zero blobs, return empty array
                outArray =
                msnl.NumericDenseArrayFactory.Create<double>( new long[] {rows, 0 });
            }
            return outArray;
        }
    }
}
Accessing Data with LINQ
This section provides the following examples of how to use the C# LINQ extensions to access array data.
- Extracting Selected Data by Index
- Filtering out NaN Values
Extracting Selected Data by Index
using System;
using System.Collections.Generic;
using System.Linq;
using System.Text;
using Microsoft.Numerics;
using Microsoft.Numerics.Local;

namespace HowToRecipes
{
    class LINQtoNDAExtractExample
    {
        public static void Run()
        {
            // Create Numeric Dense Array
            var numbers = NumericDenseArrayFactory.CreateFromSystemArray<int>(
                          new int[] { 1, 2, 3, 4, 5, 6 });
            // Set indexes of start and end of the part to be extracted
            int idxStart = 1;
            int idxEnd = 4;

            Console.WriteLine("All numbers: {0}", numbers);
            Console.WriteLine("Start index: {0}, End index {1}", idxStart, idxEnd);

            // Extract
            NumericDenseArray<int> outArray =
            NumericDenseArrayFactory.CreateFromSystemArray<int>(
                                      numbers
                                     .Where((x, i) => (i >= idxStart && i <= idxEnd))
                                     .ToArray());

            Console.WriteLine("Extracted array: {0}", outArray);
        }
    }
}
Filtering out NaN Values
using System;
using System.Linq;
using System.Collections;
using System.Collections.Generic;
using Microsoft.Numerics;
using Microsoft.Numerics.Local;

namespace HowToRecipes
{
    class LINQtoNDATrimNaNsExample
    {
        public static void Run()
        {
            // Create Numeric dense array with NaNs
            var sampleNan = NumericDenseArrayFactory.CreateFromSystemArray<double>(
                new double[] { double.NaN, 1.0, 2.0, 3.0, double.NaN, 4.0, 5.0, 6.0 }
                );
            Console.WriteLine("Array with NaNs: {0}", sampleNan);

            // Trim NaN
            var cleanedNDA = NumericDenseArrayFactory.CreateFromSystemArray<double>(
                sampleNan
                .Where(x => (!double.IsNaN(x)))
                .ToArray());

            Console.WriteLine("Trimmed array: {0}", cleanedNDA);
        }
    }
}

The default “Cloud Numerics” C# project performs a Cholesky decomposition on a 50 x 50 element array. Stay tuned for my forthcoming Getting Acquainted with Microsoft Codename “Cloud Numerics” post.
• Avkash Chauhan (@avkashchauhan) posted Understanding Map/Reduce job in Apache Hadoop on Windows Azure (A Reverse Approach) on 1/20/2012:
When you run [a] Map/Reduce job in [a] Hadoop cluster on Windows Azure, you will get an aggregated progress and log directly on portal, so you can see what is happening with your job. This log is different [than] what [you] see when you check individual job status in the datanode[. I]nstead this log gives you cumulative details about how the job was started and how it was completed.
2012-01-20 22:27:37,646 [main] INFO org.apache.pig.Main - Logging error messages to: c:\apps\dist\bin\pig_1327098457646.log
2012-01-20 22:27:38,036 [main] INFO org.apache.pig.backend.hadoop.executionengine.HExecutionEngine - Connecting to hadoop file system at: hdfs://10.114.178.123:9000
2012-01-20 22:27:38,443 [main] INFO org.apache.pig.backend.hadoop.executionengine.HExecutionEngine - Connecting to map-reduce job tracker at: 10.114.178.123:9010
2012-01-20 22:27:38,661 [main] INFO org.apache.pig.tools.pigstats.ScriptState - Pig features used in the script: ORDER_BY,LIMIT,NATIVE
2012-01-20 22:27:38,661 [main] INFO org.apache.pig.backend.hadoop.executionengine.HExecutionEngine - pig.usenewlogicalplan is set to true. New logical plan will be used.
2012-01-20 22:27:40,286 [main] INFO org.apache.pig.backend.hadoop.executionengine.HExecutionEngine - (Name: q2: Store(asv://hadoop/outjan20:org.apache.pig.builtin.PigStorage) - scope-12 Operator Key: scope-12)
2012-01-20 22:27:40,302 [main] INFO org.apache.pig.backend.hadoop.executionengine.mapReduceLayer.MRCompiler - File concatenation threshold: 100 optimistic? false
2012-01-20 22:27:40,380 [main] INFO org.apache.pig.backend.hadoop.executionengine.mapReduceLayer.MultiQueryOptimizer - MR plan size before optimization: 5
2012-01-20 22:27:40,380 [main] INFO org.apache.pig.backend.hadoop.executionengine.mapReduceLayer.MultiQueryOptimizer - MR plan size after optimization: 5
2012-01-20 22:27:40,489 [main] INFO org.apache.pig.tools.pigstats.ScriptState - Pig script settings are added to the job
2012-01-20 22:27:40,505 [main] INFO org.apache.pig.backend.hadoop.executionengine.mapReduceLayer.JobControlCompiler - mapred.job.reduce.markreset.buffer.percent is not set, set to default 0.3
At this point verification related with your jobs are completed, and now the job can be sent to Job queue. If you have had any issue related with your data source or where you are going to store the results, you could not have come here.. reaching here means the verification is done map/reduce job is pushed in queue:
2012-01-20 22:27:41,724 [main] INFO org.apache.pig.backend.hadoop.executionengine.mapReduceLayer.JobControlCompiler - Setting up single store job
2012-01-20 22:27:41,755 [main] INFO org.apache.pig.backend.hadoop.executionengine.mapReduceLayer.MapReduceLauncher - 1 map-reduce job(s) waiting for submission.
2012-01-20 22:27:42,255 [main] INFO org.apache.pig.backend.hadoop.executionengine.mapReduceLayer.MapReduceLauncher - 0% complete
Depend on your input(s), at this point the data from the data source is ready to process:
2012-01-20 22:27:43,771 [Thread-4] INFO org.apache.hadoop.mapreduce.lib.input.FileInputFormat - Total input paths to process : 1
2012-01-20 22:27:43,771 [Thread-4] INFO org.apache.pig.backend.hadoop.executionengine.util.MapRedUtil - Total input paths to process : 1
2012-01-20 22:27:43,802 [Thread-4] INFO org.apache.pig.backend.hadoop.executionengine.util.MapRedUtil - Total input paths (combined) to process : 1
At this point the input data source was processed and can be used later and Hadoop Job ID is associated with your job. If you look for this job ID inside you will see get more info about the tasks associated with this Job:
http://<datanode_ipaddress>:50030/jobdetailshistory.jsp?*
2012-01-20 22:27:44,771 [main] INFO org.apache.pig.backend.hadoop.executionengine.mapReduceLayer.MapReduceLauncher - HadoopJobId: job_201201202036_0012
2012-01-20 22:27:44,771 [main] INFO org.apache.pig.backend.hadoop.executionengine.mapReduceLayer.MapReduceLauncher - More information at: http://10.114.178.123:50030/jobdetails.jsp?jobid=job_201201202036_0012
2012-01-20 22:28:18,286 [main] INFO org.apache.pig.backend.hadoop.executionengine.mapReduceLayer.MapReduceLauncher - 10% complete
2012-01-20 22:28:30,286 [main] INFO org.apache.pig.backend.hadoop.executionengine.mapReduceLayer.MapReduceLauncher - 20% complete
2012-01-20 22:28:35,130 [main] INFO org.apache.hadoop.mapreduce.lib.input.FileInputFormat - Total input paths to process : 1
At this point A new Job is being processed:
2012-01-20 22:28:35,473 [main] INFO org.apache.hadoop.mapred.JobClient - Running job: job_201201202036_0013
2012-01-20 22:28:36,473 [main] INFO org.apache.hadoop.mapred.JobClient - map 0% reduce 0%
2012-01-20 22:29:04,489 [main] INFO org.apache.hadoop.mapred.JobClient - map 100% reduce 0%
2012-01-20 22:29:25,489 [main] INFO org.apache.hadoop.mapred.JobClient - map 100% reduce 100%
2012-01-20 22:29:36,489 [main] INFO org.apache.hadoop.mapred.JobClient - Job complete: job_201201202036_0013
After the Job is completed, here are the Job details which are same as what you would find at cluster:
Visit: http://hadoop.apache.org/mapreduce/docs/current/api/org/apache/hadoop/mapreduce/JobCounter.html to learn more about Job counter.

<Return to section navigation list>
SQL Azure Database, Federations and Reporting
• Benjamin Guinebertière explained SQL Azure: create a login that has only access to one database | SQL Azure: créer un login qui n’a accès qu’à une base de données in a 1/20/2012 post. From the English version:
You have a SQL Azure Server. You can access the databases thru the administrator login you specified while creating the SQL Azure Server.
In the SQL Azure server, you have the following databases:
- master
- DB001
- DB002
You would like to create a SQL Azure login that has fully access to DB001 but no access to the other databases.
Here is how to do that.
In the Windows Azure management portal, select the master database and click manage.
connect with the SQL Azure Administrator
Create the new login by entering the following statement in a new Query:
create login DB001Admin with password = 'IYtfidgu18';
go(replace IYtfidgu18 by a password you choose)
then click Runcreate login DB001Admin with password = 'IYtfidgu18';
go
Close the browser tab and go back to the Windows Azure management portal. Select DB001 database, click manage
connect with the SQL Azure Server admin login (the same you used to connect to master) and create a new query
type the following statement:
CREATE USER DB001Admin
FOR LOGIN DB001Admin
WITH DEFAULT_SCHEMA = dbo
GO-- Add user to the database owner role
EXEC sp_addrolemember N'db_owner', N'DB001Admin'
GOand Run the query
DB001Admin with a password of IYtfidgu18 (or whatever you chose) is now a valid login for DB001 database, and only that database.
PS: with contained databases, there might also be ways to have database users fully defined in the database, but this is not the case yet in SQL Azure


• Brian Swan (@brian_swan) described Using SQL Azure Federations via PHP in a 1/18/2012 post to the [Windows Azure’s] Silver Lining blog:
Among the December updates to the Windows Azure platform was the introduction of SQL Azure Federations. In a nutshell, SQL Azure Federations introduces an abstraction layer for the sharding of SQL Azure databases. The value in federations lies in your ability to have elastic scalability of the database layer of your application (to match the elastic scalability of the rest of your application when it’s running in the cloud). And, one nice thing about the way federations work is that nearly everything can be done with simple SQL commands. Of course, that means that using SQL Azure Federations via PHP should be easy. So in this post, I’ll introduce you to SQL Azure federations by showing you how to use them via PHP.
Note that I’ll use the SQL Server Drivers for PHP to connect to SQL Azure. You can download the drivers here:
http://www.microsoft.com/download/en/details.aspx?id=20098. The documentation for the drivers is here: http://msdn.microsoft.com/en-us/library/ee229547(SQL.10).aspx.Create a SQL Azure Server
Creating a SQL Azure server is the only step you can’t do via PHP, and I can’t do any better than this article, Getting Started: Create your SQL Azure Server and Database, for showing you how to do it.( Just do Task 1 though…I’ll walk you through Task 2 (Creating a Database) using PHP.) Make note of the 10-character server ID and the user/password for your server…you’ll need that info in the code below.
Create a Database
You can create a SQL Azure database through the developer portal (as shown in the tutorial linked to above), but you can also do it via PHP. Here’s how to do it (I think most of this code speaks for itself, but I’ll add some comments afterwards):
$serverName = "tcp:SERVERID.database.windows.net, 1433";$connectionOptions = array("Database" => "master", "UID" => "USER@SERVERID", "PWD" => "PASSWORD");$conn = sqlsrv_connect($serverName, $connectionOptions);if($conn === false)die(print_r(sqlsrv_errors(), true));elseecho "Connected via sqlsrv!<br />";// Create database (be sure to connect to master)$sql = "CREATE DATABASE SalesDB";$stmt = sqlsrv_query($conn, $sql);if($stmt === false)die(print_r(sqlsrv_errors(), true));elseecho "SalesDB database created!<br />";I think the important things to point out in the code above are the connection details. Notice the $serverName specifies both the protocol (tcp) and the port (1433). The SERVERID is the 10-character name of your SQL Azure server, which you need as part of the server name (SERVERID.database.windows.net) and as part of your user name (USER@SERVERID) in the $connectionOptions array. Also note that I’m connecting to the master database. Beyond that, creating a SQL Azure database is the same as creating a SQL Server database.
If you want to verify that the SalesDB was, in fact, created, you can do that by logging into the developer portal, selecting Database, and clicking on your server. This is what you should see:
Create a Federation
The next step is to create a SQL Azure Federation. What exactly is a Federation? Full details are here, but the short description is a that a Federation is a database object that manages much of the complexity that usually comes with implementing sharding. Creating a Federation is straightforward…notice that all the “magic” is in the SQL:
$serverName = "tcp:SERVERID.database.windows.net, 1433";$connectionOptions = array("Database" => "SalesDB", "UID" => "USER@SERVERID", "PWD" => "PASSWORD");$conn = sqlsrv_connect($serverName, $connectionOptions);if($conn === false)die(print_r(sqlsrv_errors(), true));elseecho "Connected via sqlsrv!<br />";// Create federation Orders_Federation (be sure to connect to SalesDB)$sql = "CREATE FEDERATION Orders_Federation (CustId INT RANGE)";$stmt = sqlsrv_query($conn, $sql);if($stmt === false)die(print_r(sqlsrv_errors()));elseecho "Orders_Federation created!<br />";Note that I’m specifying SalesDB as the database in my $conectionOptions.
The CustId in the $sql string defines a federation distribution key, which determines the distribution of data to partitions within the federation. The federation distribution key must be an INT, BIGINT, UNIQUEIDENTIFIER, or VARBINARY (up to 900 bytes). RANGE in the query specifies the type of partitioning. For more detailed information, see CREATE FEDERATION.
View Federation Members
Executing the query above creates your first federation member (think “first shard”). So you now have your root database (SalesDB) and one federation member, whose name is opaque (which is the point in Federations…you don’t need to know the names of the federated databases). However, you can get information about the member by executing this code (with the same connection code as in the example above):
$sql = "SELECT federation_id,member_id,distribution_name,CAST(range_low AS INT) AS range_low,CAST(range_high AS INT) AS range_highFROM sys.federation_member_distributions";$stmt = sqlsrv_query($conn, $sql);if($stmt === false)die(print_r(sqlsrv_errors()));else{echo "Federation members retrieved!<br />";while($row = sqlsrv_fetch_array($stmt, SQLSRV_FETCH_ASSOC)){echo "<pre>";print_r($row);echo "</pre>";}}This will become more interesting when we split a federation (details below). I’ll come back to this later.
Create Federated Tables
The next step is to create tables in our root database and federation members. The following code connects to our federation object and does this. Be sure to read the notes that follow the example:
$serverName = "tcp:SERVERID.database.windows.net, 1433";$connectionOptions = array("Database" => "SalesDB", "UID" => "USER@SERVERID", "PWD" => "PASSWORD", "MultipleActiveResultSets" => false);$conn = sqlsrv_connect($serverName, $connectionOptions);if($conn === false)die(print_r(sqlsrv_errors(), true));elseecho "Connected via sqlsrv!<br />";// Create tables$sql1 = "USE FEDERATION Orders_Federation (CustId = 0) WITH RESET, FILTERING = OFF;";$stmt = sqlsrv_query($conn, $sql1);if($stmt === false)die(print_r(sqlsrv_errors()));elseecho "Connected to Orders_Federation!<br />";$sql2 = "-- Create Products tableCREATE TABLE Products(ProductID int NOT NULL,SupplierID int NOT NULL,ProductName nvarchar(50) NOT NULL,Price decimal(12,2) NOT NULL,PRIMARY KEY(ProductId) )-- Create Customers tableCREATE TABLE Customers(CustomerID int NOT NULL,CompanyName nvarchar(50) NOT NULL,FirstName nvarchar(50),LastName nvarchar(50),PRIMARY KEY (CustomerId) )FEDERATED ON (CustId = CustomerID)-- Create Orders tablecreate table Orders(CustomerId int NOT NULL,OrderId int NOT NULL,OrderDate datetime,PRIMARY KEY (OrderId, CustomerId))FEDERATED ON (CustId = CustomerId)-- Create OrderItems tableCREATE TABLE OrderItems(CustomerID int NOT NULL,OrderID int NOT NULL,ProductID int NOT NULL,Quantity int NOT NULL,PRIMARY KEY (OrderId, CustomerId, ProductId) )FEDERATED ON (CustId = CustomerId)";$stmt = sqlsrv_query($conn, $sql2);if($stmt === false)die(print_r(sqlsrv_errors()));elseecho "Tables created!<br />";Notes on the code snippet above:
- Note that in the $connectionOptions array MultipleActiveResultSets is turned off. This is necessary to execute the query.
- Two queries are executed. The first one connects to our federation and the second one creates the tables. Trying to execute both of these queries as a single batch will result in an error (USE FEDERATION cannot be part of a batch query).
- The CustId = 0 in the USE FEDERATION query connects us to the federation member containing CustId = 0. This is only syntactically necessary here.
- Because the Products table is created without the FEDERATED ON clause, it is created in the root database and not in the federation members. (In this example, I expect my other tables to grow, hence they are federated. I don’t expect my products to grow so fast as to require federation).
Insert Data
Once we have created a federation object and a federation member, inserting data is almost exactly the same as it is for SQL Server. The only difference is that we need to connect to a federation member first. (Note #2 above applies to this code example also.)
$sql1 = "USE FEDERATION Orders_Federation (CustId = 0) WITH RESET, FILTERING = OFF;";$stmt = sqlsrv_query($conn, $sql1);if($stmt === false)die(print_r(sqlsrv_errors()));elseecho "Connected to Orders_Federation!<br />";$sql2 = "INSERT INTO Products (ProductID, SupplierID, ProductName, Price)VALUES ( 386, 1001, 'Titanium Extension Bracket Left Hand', 5.25 )INSERT INTO Products (ProductID, SupplierID, ProductName, Price)VALUES ( 387, 1001, 'Titanium Extension Bracket Right Hand', 5.25 )INSERT INTO Products (ProductID, SupplierID, ProductName, Price)VALUES ( 388, 1001, 'Fusion Generator Module 5 kV', 10.50 )INSERT INTO Products (ProductID, SupplierID, ProductName, Price)VALUES ( 389, 1001, 'Bypass Filter 400 MHz Low Pass', 10.50 )INSERT INTO Customers (CustomerID, CompanyName, FirstName, LastName)VALUES (10, 'Van Nuys', 'Catherine', 'Abel')INSERT INTO Customers (CustomerID, CompanyName, FirstName, LastName)VALUES (20, 'Abercrombie', 'Kim', 'Branch')INSERT INTO Customers (CustomerID, CompanyName, FirstName, LastName)VALUES (30, 'Contoso', 'Frances', 'Adams')INSERT INTO Customers (CustomerID, CompanyName, FirstName, LastName)VALUES (40, 'A. Datum Corporation', 'Mark', 'Harrington')INSERT INTO Customers (CustomerID, CompanyName, FirstName, LastName)VALUES (50, 'Adventure Works', 'Keith', 'Harris')INSERT INTO Customers (CustomerID, CompanyName, FirstName, LastName)VALUES (60, 'Alpine Ski House', 'Wilson', 'Pais')INSERT INTO Customers (CustomerID, CompanyName, FirstName, LastName)VALUES (70, 'Baldwin Museum of Science', 'Roger', 'Harui')INSERT INTO Customers (CustomerID, CompanyName, FirstName, LastName)VALUES (80, 'Blue Yonder Airlines', 'Pilar', 'Pinilla')INSERT INTO Customers (CustomerID, CompanyName, FirstName, LastName)VALUES (90, 'City Power & Light', 'Kari', 'Hensien')INSERT INTO Customers (CustomerID, CompanyName, FirstName, LastName)VALUES (100, 'Coho Winery', 'Peter', 'Brehm')DECLARE @orderId INTDECLARE @customerId INTSET @orderId = 10SELECT @customerId = CustomerId FROM Customers WHERE LastName = 'Hensien' and FirstName = 'Kari'INSERT INTO Orders (CustomerId, OrderId, OrderDate)VALUES (@customerId, @orderId, GetDate())INSERT INTO OrderItems (CustomerID, OrderID, ProductID, Quantity)VALUES (@customerId, @orderId, 388, 4)SET @orderId = 20SELECT @customerId = CustomerId FROM Customers WHERE LastName = 'Harui' and FirstName = 'Roger'INSERT INTO Orders (CustomerId, OrderId, OrderDate)VALUES (@customerId, @orderId, GetDate())INSERT INTO OrderItems (CustomerID, OrderID, ProductID, Quantity)VALUES (@customerId, @orderId, 389, 2)SET @orderId = 30SELECT @customerId = CustomerId FROM Customers WHERE LastName = 'Brehm' and FirstName = 'Peter'INSERT INTO Orders (CustomerId, OrderId, OrderDate)VALUES (@customerId, @orderId, GetDate())INSERT INTO OrderItems (CustomerID, OrderID, ProductID, Quantity)VALUES (@customerId, @orderId, 387, 3)SET @orderId = 40SELECT @customerId = CustomerId FROM Customers WHERE LastName = 'Pais' and FirstName = 'Wilson'INSERT INTO Orders (CustomerId, OrderId, OrderDate)VALUES (@customerId, @orderId, GetDate())INSERT INTO OrderItems (CustomerID, OrderID, ProductID, Quantity)VALUES (@customerId, @orderId, 388, 1)";$stmt2 = sqlsrv_query($conn, $sql2);if($stmt2 === false)die(print_r(sqlsrv_errors()));elseecho "Data inserted. <br />";The connection code for the above example is the same as in the Creating Federated Tables section.
Split a Federation
Here is where the value of SQL Azure Federations really begins to show. Now that my first federation member is beginning to fill up with data, I can execute a query that will create a second federation member and move data from the first member to the second. In the example below, I move all data with CustId >= 60 to the second federation:
// Split federation member$sql = "ALTER FEDERATION Orders_Federation SPLIT AT (CustID = 60)";$stmt = sqlsrv_query($conn, $sql);if($stmt === false)die(print_r(sqlsrv_errors()));elseecho "Federation split!<br />";The split takes a few minutes to complete. If you wait a few minutes after executing the query, then execute the query in the View Federation Members section above, you should see something like this:
As you can see, our federation now has two members. The first member contains data with CustId’s that go from the bottom of the INT range up to (but not including) 60, and the second member contains CustId’s >= 60. As our data grows, we can issue more split commands to federate our data across more members.
Inserting Data After a Split
A logical question to ask after we’ve split a federation is “How do I insert data into my federated tables?” And the answer is fairly simple: Generate a new distribution key, connect to the appropriate federation member, and insert. Fortunately, connecting to the appropriate federation member is easy: just specify CustId = (new Id) in the USE FEDERATION query. So, adding a new customer, order and order item with CustId = 55 might look something like this:
$sql1 = "USE FEDERATION Orders_Federation (CustId = 55) WITH RESET, FILTERING = OFF;";$stmt = sqlsrv_query($conn, $sql1);if($stmt === false)die(print_r(sqlsrv_errors()));elseecho "Connected to Orders_Federation!<br />";$params2 = array(55, 37);$sql2 = "DECLARE @customerId INTSET @customerId = ?INSERT INTO Customers (CustomerID, CompanyName, FirstName, LastName)VALUES (@customerId, 'Microsoft', 'Swan', 'Brian')DECLARE @orderId INTSET @orderId = ?INSERT INTO Orders (CustomerId, OrderId, OrderDate)VALUES (@customerId, @orderId, GetDate())INSERT INTO OrderItems (CustomerID, OrderID, ProductID, Quantity)VALUES (@customerId, @orderId, 389, 1)";$stmt2 = sqlsrv_query($conn, $sql2, $params2);if($stmt2 === false)die(print_r(sqlsrv_errors()));elseecho "Data inserted. <br />";To get that data back, see the Query a Federation Member with Filtering ON section below.
As you can see, choosing a federation distribution key that can be randomly generated is important to making sure that data is evenly distributed across federation members.
Note: The USE FEDERATION statement does not support the use of parameters.
Query a Federation Member with Filtering OFF
To retrieve data, we (again) connect to a federation member. To determine which member we connect to, we specify a value for the federation distribution key. In the example below, CustId = 0 is specified in the USE FEDERATION query, so we are connected to the member that has the range containing CustId 0. Because FILTERING = OFF in the query, all data from the federation member is returned (i.e. the data is not filtered by the specified CustId). in this case, all data from the Customers table is returned from the specified federation member:
// Query federation member$sql1 = "USE FEDERATION Orders_Federation (CustId = 0) WITH RESET, FILTERING = OFF;";$stmt1 = sqlsrv_query($conn, $sql1);if($stmt1 === false)die(print_r(sqlsrv_errors()));elseecho "Connected to Orders_Federation!<br />";$sql2 = "SELECT * FROM Customers";$stmt2 = sqlsrv_query($conn, $sql2);if($stmt2 === false)die(print_r(sqlsrv_errors()));elseecho "Data retrieved. <br />";while($row = sqlsrv_fetch_array($stmt2, SQLSRV_FETCH_ASSOC)){echo "<pre>";print_r($row);echo "</pre>";}The connection code for this example is the same as in the Creating Federated Tablesexample.
Query a Federation Member with Filtering ON
In this example, I’ll connect to the second federation member by specifying a CustId that falls into the range for that member. I will also set FILTERING = ON when connecting to the federation member. This will filter the returned data by the specified CustId, so we’ll get back only the data related to CustId = 90. (If we set FILTERING = OFF, we’d get back all data from the federation member).
$serverName = "tcp:SERVERID.database.windows.net, 1433";$connectionOptions = array("Database" => "SalesDB", "UID" => "USER@SERVERID", "PWD" => "PASSWORD", "MultipleActiveResultSets" => false, "ReturnDatesAsStrings" => true);$conn = sqlsrv_connect($serverName, $connectionOptions);if($conn === false)die(print_r(sqlsrv_errors(), true));elseecho "Connected via sqlsrv!<br />";$sql1 = "USE FEDERATION Orders_Federation (CustId = 90) WITH RESET, FILTERING = ON;";$stmt1 = sqlsrv_query($conn, $sql1);if($stmt1 === false)die(print_r(sqlsrv_errors()));elseecho "Connected to Orders_Federation!<br />";$sql2 = "SELECT * FROM Customers;SELECT * FROM Orders;SELECT * FROM OrderItems;";$stmt2 = sqlsrv_query($conn, $sql2);if($stmt2 === false)die(print_r(sqlsrv_errors()));elseecho "Data retrieved. <br />";do{while($row = sqlsrv_fetch_array($stmt2, SQLSRV_FETCH_ASSOC)){echo "<pre>";print_r($row);echo "</pre>";}}while(sqlsrv_next_result($stmt2));Note that I changed the connection code slightly: ReturnDatesAsStrings is set to true in the $connectionOptions.
Here is the output:
Additional Notes
One potential shortcoming of the current implementation of SQL Azure Federations is the lack of an easy way to scale back your federation members. As you can see, it is easy to add federation members and distribute data to them, but it is not currently easy to consolidate data into fewer federation members. The SQL Azure team is looking at ways to make scaling back as easy as it is to scale out.
Additional Resources
- Getting Started with PHP and SQL Azure
- Introduction to Fan Out Queries
- http://blogs.msdn.com/b/cbiyikoglu/
- Transact-SQL Reference (SQL Azure Database)
That’s it for now...just an introduction to SQL Azure Federations, really. To get a deeper look, check out some of the Additional Resources above.


<Return to section navigation list>
MarketPlace DataMarket, Social Analytics and OData
No significant articles today.
<Return to section navigation list>
Windows Azure Access Control, Service Bus and Workflow
Thirumalai Muniswamy continued his series with Implementing Azure AppFabric Service Bus - Part 4 on 1/20/2012:
This continuation post of Implementing Azure AppFabric Service Bus series. Look at the end of this post for other parts.
The next step on Implementing Azure App Fabric Service Bus is to configure the service be Auto Start enabled. Before going for the steps, we required to know what Auto Start feature is and why it required to be configured for Service Bus.
In the previous step, we had developed WCF service and did required configuration for exposing to public using Service Bus. After the service ready for exposing to public, we ran the service application from Visual Studio. The service gets connected with Service Bus and register the public endpoints on it. So we are able to access the public endpoints after that.
But if the system or IIS server restarted, we required to open the application run the service for exposing again and the service must be connected with the Service Bus all the times for any communication.Windows Server AppFabric is another Microsoft release which is a great way of improving a platform for providing better application infrastructure. Currently it comes with two parts
- App Fabric Hosting Service – Making it easier to run and manage services created with WCF and/or WF.
- App Fabric Cashing Service – Used for cashing the resources which are frequently accessed by the applications and speed up the resource availability.
As explained in Post 1, we required Windows Server App Fabric Hosting Service for auto starting the WCF Service in the on-premise when the system, IIS starts. So it will get connected with the Service Bus automatically and make TCP connection for further communications.
To know more about Windows Server App Fabric, use the below url
http://msdn.microsoft.com/en-us/windowsserver/ee695849To install the Windows Server App Fabric in the system, use the below url.
http://www.microsoft.com/download/en/details.aspx?id=15848Below are the steps for configuring Auto Start feature for WCF Service created in previous step.
Step 1: Open the IIS Manager using Start-> Run -> Inetmgr -> OK.
Step 2: Select the WCF Service virtual directory name (DotNetTwitterSOPService) under Default Web Site which required configuring Auto-Start features.
Step 3: Click Configure… under Manage WCF and WF Services section in Action panel.
The system will open Configure WCF and WF for Application window.
Step 4: Select the Auto-Start tab in the left side and select the Custom option. As defined information with each option, selecting Custom option enables to start particular services instead of all the services under the WCF Service application.
Note: If you happy to start all the services in the WCF service application, you can select Enable and skip steps 5 to 10. Enable option will start all the services under the application.
Step 5: Click Apply. It will popup and information regarding all the existing services will be recycled. Press Yes.
Step 6: Press OK in the Configure WCF and WF for Application window.
Step 7: Select the virtual directory (DotNetTwitterSOPService) of service under Default Web Site and double click the Services option from the App Fabric section (middle panel of the screen).
Step 8: IIS Manger will show list of services under the service application we are configuring (DotNetTwitterSOPService).
Note: Currently we are developed only one service (CustomerService), so we are getting only one service in the list. You can view the information of the service by double click the service in the list and select the General tab.
Below is the screen shot of two services I made in another sample WCF application. (just for demo)
Step 9: Double click a service from the list you required to configure the Auto-Start feature and select the Auto-Start tab.
Step 10: Check the Enable check box and click OK.
Step 11: Restart the IIS Server. You can do by selecting the IIS Server and selecting Restart command from Manage Server section of Action panel or using iisreset command from command window.
Now after you close the WCF application from Visual Studio, Restart the IIS Server, Restart the system – the WCF service will start automatically with IIS starts. So the public endpoint will be accessible once the service comes up.
Note: When the system or IIS Server is down, the service will not be exposed and will not be accessible in public.The other links on Implementing Azure AppFabric Service Bus:
- Implementing Azure AppFabric Service Bus - Part 1
- Implementing Azure AppFabric Service Bus - Part 2
- Implementing Azure AppFabric Service Bus - Part 3
- Implementing Azure AppFabric Service Bus - Part 4


<Return to section navigation list>
Windows Azure VM Role, Virtual Network, Connect, RDP and CDN
No significant articles today.
<Return to section navigation list>
Live Windows Azure Apps, APIs, Tools and Test Harnesses
• HPC Wire asserted New cloud rendering service available in collaboration with GreenButton in an introduction to its Pixar Launches RenderMan On Demand press release of 1/20/2012:
Pixar Animation Studios today launched a new cloud rendering service called "RenderMan On Demand." Developed in collaboration with pioneering cloud services provider GreenButton, this service is now available on Microsoft's Windows Azure with Linux availability following later in 2012. "RenderMan On Demand" offers nearly instantaneous burst rendering access to hundreds and even thousands of additional cores, enabling artists and studios to deliver the highest-quality cinematic imagery with unprecedented economy and efficiency. [Emphasis added.]
"We were investigating a private cloud solution but seeing the RenderMan solution from Pixar and GreenButton was great timing and is perfect for any of our RenderMan projects." said Darren Hyland, Head of R&D at Brown Bag Films. "From a speed and cost perspective, the cloud service is much more appealing than those we've used in the past" said Simon Sangar, Senior VFX Artist at Bradley and Montgomery. "The turnaround time is much faster due to the speed of RenderMan and also the robustness of the system."
"Working within a tight deadline has always been difficult especially when rendering animation at the very last minute," said Nicolas Chaverou, Golaem Crowd Project Manager. "In spite of the time difference, the process was very straightforward, asset upload and distribution on the Cloud, and 54 minutes of Cloud Rendering later it was in a wrap instead of the 20 days it would have otherwise required. Magic! In addition, GreenButton provided great support including feedback about improving our pipeline."
Availability
RenderMan On Demand is accessible through renderman.greenbutton.com. Pricing is based on the cloud computing industry metric of a CPU core hour, consisting of RenderMan license(s), computer (core) processing charges, and GreenButton managed service fees for one hour (or part thereof) and may vary depending on performance requirements. For further details about pricing and any other questions concerning Pixar's RenderMan, contact rendermansales@pixar.com or visit www.pixar.com.
About Pixar Animation Studios
Pixar Animation Studios, a wholly owned subsidiary of The Walt Disney Company, is an Academy Award®-winning film studio with world-renowned technical, creative and production capabilities in the art of computer animation. Creator of some of the most successful and beloved animated films of all time, including "Toy Story," "Monsters, Inc.," "Finding Nemo," "The Incredibles," "Ratatouille," "WALL•E," "Up" and "Toy Story 3." The Northern California studio has won 29 Academy Awards and its twelve films have grossed more than $6.5 billion at the worldwide box office to date. Pixar's latest film, "Cars 2," opened on June 24, 2011 and their next adventure, "Brave," takes aim at theaters on June 22, 2012.
About GreenButton
GreenButton is an award winning global software company that specializes in high performance cloud computing. The company provides a cloud platform for development and delivery of software and services that enable independent software vendors (ISVs) to move to the cloud and for their users to access cloud resources. GreenButton is Microsoft's 2011 Global winner for Windows Azure and 2011 ISV Partner of the Year. The company is dually headquartered in Wellington New Zealand, and Palo Alto, Calif., with a sales office in Seattle. For more information, visit www.greenbutton.com.

• Dhananjay Kumar (@debug_mode) described Creating [a] Hello World Windows Azure Node.js Web Application on 1/21/2012:
Node.js is enjoying much popularity and Glenn Block is helping us to bring it on Windows Azure. In this tutorial, I will walkthrough step by step to create your first Windows Azure Node.js Web Application. I have divided this tutorial in three parts as installing required SDK, creating Web Application and then publishing to Windows Azure portal. Purpose of this tutorial is to help you in setting up environment and publishing. In further tutorials we will dig deeper.
Install Windows Azure SDK for Node.JS
To start with Node.JS on Windows Azure you need to install Windows Azure SDK for Node.JS. You can Get Windows Azure SDK for Node.JS from here. You need to install it from Web Installer. You will get below dialog box to install Windows Azure SDK for Node.JS
By this step SDK has been installed on your machine.
Create Node Application
To create Node application, click on Start and then select Windows Azure PowerShell for Node.JS. Run this as administrator
On command prompt create a Node directory in C drive as below,
After creating Node directory you need to create a solution. You can create solution as below,
I have created a solution called MyApplication. You can see files created inside the solution is as below,
There are four files created. If you are coming from Windows Azure background, you must be aware of other three files than deploymentSettings.json file. deploymentSettings.json file stores local setting for Windows Azure PowerShell deployment cmdlets.
Next you need to add a WebRole to the solution. To add WebRole execute below PowerShell command. If you don’t provide any name then by default WebRole name would be WebRole1. However I am providing name as WebRoleForNodeJS
Now if you list files created inside WebRoleForNodeJS , you will find configuration files and a JS file.
Most important file is server.js. This file contains starter code for Node.JS. You need to add codes in this file. Go ahead and open this file in NotePad. As of now, I am leaving default code created by the tool.
Server.js
var http = require('http');
var port = process.env.port || 1337;
http.createServer(function (req, res) {
res.writeHead(200, { 'Content-Type': 'text/plain' });
res.end('Hello NodeJS from Debugmode\n');
}).listen(port);
Run Locally on Windows Azure Emulator
To run it locally, go ahead and execute below PS command to start Windows Azure Emulator.
You can see is running in emulator as below,
Publish to Windows Azure Portal
To publish it to Windows Azure portal, first you need to take Publish Setting. You can take that as below,
You will be redirected to live login page. Sign in to download Publish Setting file. After login you should able to download PublishSetting file. Download file inside Node folder you created in previous steps.
Next you need to import PublishSetting file as below,
Note : Publishsettings file only needs to be imported once on the machine to set it up. You do not need to do that each time you create a service.
After importing PublishSetting file, you can publish to Windows Azure portal as below,
In above command name is the unique name and location is one of the Windows Azure Data center. After successfully publish operation , you should able to see Node.js running on Windows Azure portal.
This is what all required to create first application. In further post I will discuss much deeper on the same. I hope this post is useful. Thanks for reading


<Return to section navigation list>
Visual Studio LightSwitch and Entity Framework 4.1+
• Jan Van der Haegen (@janvanderhaegen) described MyBizz Portal: The smallest LightSwitch application you have ever seen in a 1/20/2012 post:
In case you haven’t already heared, CodeProject is organizing a LightSwitch Star Contest. You can submit your own application/extension and take a chance to win some really nice prices.
This weekend, I’m going to try to allocate most of my time into the submission of “MyBizz Portal”, a (secret) LightSwitch application that I wrote over the last couple of months. My aim is to rank as high as possible in the category “Most Groundbreaking LightSwitch Application”, with an application that has one screen, a blank shell, the default LightSwitch theme and a single Silverlight Custom UserControl, so probably the smallest LightSwitch application you have ever seen.
It also uses over 235 different entities…
Want to see how that all makes sence? Then keep an eye on my blog, twitter or the CodeProject home site…


Beth Massi (@bethmassi) explained Using Different Edit Screens Based on Record Types (Table Inheritance) in a 1/20/2012 post:
I had a reader ask a question this week on how to use Visual Studio LightSwitch to open different Edit Detail screens based on the “type” of record. This is a very common thing to do especially for data models that use table inheritance (or sub-tables). For instance say we are building an application for a pet store to manage their inventory of animals. We need to collect shared properties of all the animals in an Animal table but we also want to set up table inheritance to Fish, Cat and Dog tables which collect specific properties of those types of animals. When a user selects an animal on a search screen, we need to display a screen that lets them work with the correct data from the specific table. LightSwitch provides a “Show as Link” on labels which automatically opens up the default details screen for that entity, but in our case we could have multiple screens. There are also a few techniques you need to know when dealing with these types of relationships in LightSwitch, particularly around the insert pipeline. In this post I will show you how you can achieve this functionality.
Create The Data Model
First let’s start by creating a simple inheritance data model for the pet store. We will build an Animal table that collects general properties of any animal in the store. Then we will build Cat, Dog and Fish tables to collect specific properties of those types of animals. The relationship between the Animal table and the others will be a ‘one to zero or one’ relationship.
For this example, the Animal table has two required properties, Name and Type. Type is a Choice List with the static values “Cat”, “Dog”, “Fish” to correspond to the type of record the animal is. We will use this to drive what records are inserted into which specific table as well as use it to determine which screens to display.
Next, create the Cat, Dog and Fish tables to collect properties specific to these types of animals.
Finally, set up the relationships from Animal to these tables as a “one to zero or one” relationship with a delete behavior of “Cascade Delete”.
Our data model now looks like this.
Create the Screens
Next we’ll need to enter new animals into the system. Create a New Data Screen and select Animal as the screen data. When you do this, LightSwitch will include all the one-to-one related tables as fields on the screen. However, we only want to require the user to enter the general Animal properties on this screen. Once they save, we will direct them to the correct Cat, Dog or Fish detail screen. So first delete all the items in the content tree of the Screen Designer except for Name and Type.
Next, create an Edit Details Screen and select the Animal screen data again. Name the screen CatDetail and uncheck “Use as Default Details Screen”.
Again you will see that LightSwitch reads these special relationships and adds all the fields from all four tables to the screen. We will need to make some changes. First, change the “Type” from an Auto Complete box to a Label. Once the user has entered the type of animal on the New Data screen, it cannot be changed. Next, delete all the fields related to Dog and Fish from the screen.
Repeat the same process to create the DogDetail and FishDetail screens, removing the fields from the screen that do not belong.
Finally, add a Search Data Screen and select the Animal as the screen data again. Select the “Name” content item and in the properties window uncheck “Show as Link”.
Instead of using the built-in “Show as Link” functionality, we need to create our own command. We can put commands anywhere on the screen and we can show them as buttons or links. (For more information see: “I Command You!” - LightSwitch Screen Commands Tips & Tricks) For instance we could put an edit button on the screen command bar, the grid command bar, or even in the row itself. Let’s add a command into the row itself.
Right-click on the Data Grid Row Command Bar in the content tree and select “Add Button…”. Create a new method called “Edit”.
We want to show the command as a link instead of a button so select the button in the content tree and change it to a link.
Write the Code
Now we need to write some code to pull this all together. Right-click on the button we just created and select “Edit Execute Code” to open the code editor. Here we will check what type of animal we have to open the corresponding screen.
Private Sub Edit_Execute()
    If Me.Animals.SelectedItem IsNot Nothing Then
        Select Case Me.Animals.SelectedItem.Type
            Case "Cat"
                Me.Application.ShowCatDetail(Me.Animals.SelectedItem.Id)
            Case "Dog"
                Me.Application.ShowDogDetail(Me.Animals.SelectedItem.Id)
            Case "Fish"
                Me.Application.ShowFishDetail(Me.Animals.SelectedItem.Id)
        End Select
    End If
End Sub
Next we need to write similar code on the New Data screen so that it opens the correct detail screen after the user saves a new animal record. Open the CreateNewAnimal screen and in the upper right drop down the “Write Code” button and select the CreateNewAnimal_Saved method. First comment out the call to ShowDefaultScreen and then write code to determine which screen we need to show instead:
Private Sub CreateNewAnimal_Saved()
    Me.Close(False)
    'Application.Current.ShowDefaultScreen(Me.AnimalProperty)

    Select Case Me.AnimalProperty.Type
        Case "Cat"
            Me.Application.ShowCatDetail(Me.AnimalProperty.Id)
        Case "Dog"
            Me.Application.ShowDogDetail(Me.AnimalProperty.Id)
        Case "Fish"
            Me.Application.ShowFishDetail(Me.AnimalProperty.Id)
    End Select
End Sub
Finally, we need to implement a business rule on Animal in the save pipeline. This rule is important so that a new record is added to the correct table based on the animal’s type. That way after the user saves the CreateNewAnimal screen, a record will be written to the correct table and the detail screen will open and allow the user to edit the specific fields in the Cat, Dog or Fish table. Double-click on Animals in the Solution Explorer under the Data Sources/ApplicationData node to open the Data Designer. Drop down the Write Code button and select the Animals_Inserting method and write this code:
Private Sub Animals_Inserting(entity As Animal)
    Select Case entity.Type
        Case "Cat"
            If entity.Cat Is Nothing Then
                entity.Cat = New Cat()
            End If
        Case "Dog"
            If entity.Dog Is Nothing Then
                entity.Dog = New Dog()
            End If
        Case "Fish"
            If entity.Fish Is Nothing Then
                entity.Fish = New Fish()
            End If
    End Select
End Sub
Run it!
Enter new animals on the Create New Animal screen and when you click Save, the correct detail screen will open allowing you to enter more specific details based on the type of animal.
On our search screen, we can click the Edit link on any of the rows and it will open to the correct details screen as well.
Wrap Up
I hope this post answered the reader’s question on how to open different detail screens depending on the record’s type. All it takes is implementing your own command. I also touched on one to one relationships and how to set up basic table inheritance. I encourage you to experiment more with this type of relationship. They come in particularly handy when you need to extend external data sources with additional properties or when you need to set up inheritance hierarchies. The trick is to get a record inserted into the right table when you insert the master / parent record. I’ll expand on a couple other techniques in a future post.


Return to section navigation list>
Windows Azure Infrastructure and DevOps
Scott Guthrie (@scottgu) described Getting Started with Windows Azure in a 1/20/2012 post:
This is the second in a series of posts I’m doing on Windows Azure – which is Microsoft’s Cloud Computing Platform.
In today’s post I’m going to cover how to sign-up and get started with Windows Azure using a no-obligation 3 month free trial offer. This free trial costs nothing and doesn’t obligate you to buy anything at the end of it. It provides an easy way to try out and get started with Windows Azure.
Windows Azure Website
The http://www.windowsazure.com web-site provides everything you need to get started with Windows Azure – including overview content, developer tutorials and documentation, account management, and more:
On the www.windowsazure.com home page, as well as in the top-right hand corner of every page of the site, is a “free trial” link. Clicking it will take you to a sign-up page that enables you to quickly register a new account and get started with Windows Azure:
The free trial provides everything you need to get started with Windows Azure.
Three Month Free Trial Offer
We recently refreshed our Windows Azure free trial offer to make sign-up easier, ensure it is always risk/obligation free, and enable more services with it. You can click the “Sign up now” button above to register and have an active Windows Azure subscription ready to use in under 2 minutes.
What the Free Trial Provides
The free trial offer allows you to build and run applications on Windows Azure at no cost (and with no obligation to buy or pay anything at the end of the three month free trial). It includes a number of compute, database and storage services that you can use to build your applications. Some of the resources include:
I’ll cover more about what “750 small compute hours per month” means in a future post – but essentially it means that you have enough hours to continually run an application you build in a virtual server – dedicated and isolated just to you – on Windows Azure each month (there are 744 hours in a 31 day month: 24 hours x 31 days = 744).
The trial also includes a 1GB SQL Azure Database that you can store data within. SQL Azure Databases run on dedicated servers we manage and cluster (for high availability and scale-out). This means you don’t need to worry about installing, managing, or running your own database servers (which makes life easier). The trial also includes 20GB of high availability storage that you can use to store blobs, queues and non-relational tables.
What is Required to Sign-up for a Trial
When you click the “Sign up Now” button on the free-trial page you’ll walk-through a sign-up wizard that will ask you to provide three things:
- The Windows LiveID account you want to use to use to sign-in and manage your account
- A mobile phone number where we can send (via SMS) a verification code for you to enter
- A credit card
We use the last two items for proof of identity. The credit card is not billed and during the free trial you’ll have a spending limit set to $0.
Free and No Risk
Spending limits are a new feature we added to Windows Azure last month, and ensure that you never have to worry about accidentally going over the resources included in a free offer and being charged. If you end up building an application that exhausts the monthly amounts included in the free trial before the month ends, and you have a spending limit set to $0, then we will by default disable the application for the remainder of the month (leaving your data in read-only mode) until the next month starts. This ensures you are never billed anything during the free trial.
You can optionally turn off the spending limit feature if you want to go beyond what the free trial provides (and pay for the incremental resources on top of what is provided in the trial) – but by default the spending limit is on (and set to $0) when you sign-up for a free trial to ensure that you never inadvertently get charged anything. This provides a no-risk way to evaluate Windows Azure. You can learn more about the spending limit feature here.
Tracking Usage
You can easily track what resources you’ve used on Windows Azure by clicking the “Account” tab of the www.windowsazure.com web-site. This is another new feature we added to Windows Azure last month, and it allows customers (both free trial and paid) to easily see what resources they’ve used and how much it is costing them. You can download the usage data as either a CSV data file (which you can open in Excel or other tools), or visualize the usage data within the browser:
You can also use the account tab to easily change payment methods (both to setup a new credit card or to switch to invoice-based billing), create new subscriptions, as well as optionally cancel subscriptions.
What if you don’t want to use Windows Azure at the end of the trial?
There is no obligation to use Windows Azure (nor buy anything) at the end of the three month free trial. So if at the end of it you aren’t ready to buy anything (or just want to hold off a few more months) there is no obligation to pay anything. At any point during the free trial you can also click the “account” tab of the www.windowsazure.com website and explicitly cancel your subscription.
Summary
The above post covers how to quickly sign-up for a subscription with Windows Azure. Its easy to do – and takes less than 2 minutes to complete. Once you are signed up you can build and deploy high-scale cloud applications. In future posts we’ll look at the steps to do this, and some of the cool features and options that Windows Azure enables for you.
Hope this helps,
Scott
P.S. In addition to blogging, I use Twitter to-do quick posts and share links. My Twitter handle is: @scottgu


It’s good to see “The Gu” blogging regularly again.
David Linthicum (@davidlinthicum) asserted “Although most in enterprise IT are getting smarter about cloud computing, they continue to get some basic assumptions wrong” in a deck for his 4 cloud myths that won't go away article of 1/20/2011 for InfoWorld’s Cloud Computing blog:
You would think that rank-and-file IT staffers and leaders would understand the advantages and disadvantages of cloud computing by now. However, the misconceptions continue to show up, some of which are disconcerting. Here are a few of the most common:
If I use public clouds, I give up security. This one is tossed at me about once a day, and I've addressed it in this blog many times. The fact is, when you use public clouds, you do not necessarily put data and processes at a security risk. The degree of risk comes down to your planning and the use of the right technologies -- just as it does in an on-premises deployment.
Cloud computing will put my job at risk. Chances are, if you're worried about the use of some technology taking your job, you're already at risk. In reality, cloud computing won't displace many jobs in enterprise IT, but IT roles and responsibilities will change over time.
Cloud computing is an all-or-nothing proposition. Not really. You can move to cloud-based systems, such as storage and compute services, as needed, both intersystem and intrasystem. Moreover, you can move in a fine-grained manner, shifting only certain system components, such as user interface processing or storage, and leaving the remainder on premises. You do have to consider the colocation of data for data-process-intensive system components.
Cloud computing requires a complete replacement of the enterprise network. This is true only if your existing network is awful and needs replacement anyway or if you plan to keep most of the data in the cloud, with the data processing occurring within the firewall (a bad architectural call). Other than that, bandwidth is typically not an issue. However, bandwidth does need to be considered and monitored, as it is a core component to the overall business systems that use cloud platforms.

Sreedhar Kajeepeta wrote Strategy: Windows Azure: Clear Enterprise View for InformationWeek::Reports, who posted it on 1/19/2012:
Azure, Microsoft's cloud infrastructure for Windows developers and Web programmers, is a little more than a year old--and a lot has already changed since the platform's early days. It can be easy to get lost in the many different uses of the terms "Azure" and "fabric," not to mention PaaS and IaaS, but a more standardized taxonomy and nomenclature are making things more clear.
This report aligns Azure with popular enterprise architecture models in order to provide a sense of Azure’s scope and value for enterprise IT.
Table of Contents
- 3 Author’s Bio
- 4 Executive Summary
- 5 Azure: Cutting Through the Fog for a Clear Enterprise View
- 5 Azure Components
- 5 Figure 1: Windows Azure Platform
- 7 Call to Action
- 7 Development Logistics
- 8 Azure in the Real World
- 9 Azure in PaaS Perspective
- 9 Azure’s Future
- 11 Related Reports
About the Author
Sreedhar Kajeepeta is Global VP & CTO of Technology Consulting for GBS at CSC. CSC’s consulting groups across North/South Americas, Europe, Asia, and Australia specialize in Cloud Computing, Social Networking for the Enterprise, SOA, Enterprise Transformation, Big Data, Data Warehousing and Business Intelligence/Analytics, Cyber Security ,and Application Consulting (Open Source, JEE, and .Net).
Sreedhar is based in Farmington Hills, MI, and can be reached at skajeepeta@csc.com
<Return to section navigation list>
Windows Azure Platform Appliance (WAPA), Hyper-V and Private/Hybrid Clouds
• Symon Perriman (@SymonPerriman) described Free Microsoft Private Cloud Training in a 1/20/2012 post:
Are you ready for the Microsoft Private Cloud?
On February 21 & 22 Microsoft Learning is running a 2-day virtual training event to help the world learn about the upcoming enhancements with the Creating & Managing a Private Cloud with System Center 2012 Jump Start.
It is 100% free and open to the public, so register now!
Event Overview
Adopting this exciting new computing paradigm provides a whole new landscape of technology and career direction for IT professionals. Microsoft Learning and the Microsoft System Center 2012 team have partnered to bring you an exciting opportunity to learn what you need to know to deploy, manage and maintain Microsoft’s private cloud solution. Leveraging the popular Jump Start virtual classroom approach, the industry’s most gifted cloud experts will show attendees why this new private cloud solution, based on System Center 2012 and Windows Server, has garnered so much attention. Presenters include Symon Perriman, Sean Christensen, Adam Hall, Kenon Owens, Prabu Rambadran & Chris Van Wesep and there will be a live Q&A during the event.
Event Agenda
Day 1: Deployment & Configuration (Feb. 21)
- Part 1: Understanding the Microsoft Private Cloud
- Part 2: Deploying the Infrastructure Components
- Part 3: Deploying the Private Cloud Infrastructure
- Part 4: Deploying the Service Layer
- Part 5: Deploying the Applications & VMs
Day 2: Management & Operations (Feb. 22)
- Part 6: Managing the Infrastructure Components
- Part 7: Managing the Private Cloud Infrastructure
- Part 8: Managing the Service Layer
- Part 9: Managing the Applications & VMs
Jump Start Overview
This accelerated Jump Start sponsored by Microsoft Learning is tailored for IT professionals familiar with Windows Server technologies, Hyper-V virtualization, and the System Center management solutions. The course is designed to provide a fast-paced and technical understanding of how and why Microsoft’s approach to the private cloud delivers scalability, security, flexibility and control. Here are few unique benefits of this course:
- Students have the opportunity to learn from and interact with the industry’s best cloud technologists!
- This high-energy, demo-rich learning experience will help IT Professionals understand why Microsoft private cloud solutions are making a splash in the industry.
- Students will see with their own eyes how Windows Server 2008 R2 and System Center 2012 work together to provide the best combination of security and scale.
- Information-packed agenda! Day one of this two-day online course will focus on designing and deploying the right solutions for your organization, while day two will provide an in-depth look at the tools available to help monitor, secure and control the operational aspects of a private cloud.

<Return to section navigation list>
Cloud Security and Governance
• Robert Westervelt (@rwestervelt) posted PCI in the cloud: Segmentation, security compliance is possible, experts say to the TechTarget’s SearchCloudSecurity.com blog on 1/20/2012:
Merchants interested in outsourcing their payment processes or looking to reduce internal architecture complexities have been turning to cloud providers, but experts caution that no matter where the credit card data resides, the merchant ultimately is fully responsible for safeguarding the information and maintaining cloud PCI DSS compliance.
The PCI Security Standards Council has made it clear in its virtualization guidance document that turning over payment processes to cloud service providers can result in a reduction in PCI scope. While there are benefits, there are also important caveats that should be heeded when reaching out to a provider, experts say.
Compliance is based on the service being delivered, said Michael Dahn, director of threat and vulnerability management at PricewaterhouseCoopers. The merchant has to know the responsibilities of the cloud service provider and understand who is doing the maintenance, monitoring and other security processes protecting the data, he said.
“You may approach a vendor that offers cloud services and they may have been validated as a PCI-compliant provider, but putting your payment systems in their environment does not make you compliant,” Dahn said.
Cloud computing platforms such as Amazon Web Services and Verizon’s Computing as a Service (CaaS) have been validated as PCI DSS compliant, meaning their internal systems have been validated by an independent Quality Security Assessor. Both providers make it clear that the merchant will be responsible for securing data stored and maintained on those platforms.
It’s important for security professionals to understand that there is no one-size-fits-all approach to PCI compliance in the cloud, Dahn said. Organizations that choose to outsource their payment systems are both large and small. Their risk tolerances vary and often the size and maturity of the merchants using a cloud provider are also mixed. Among the similarities is the use of point-to-point encryption and tokenization technologies to ensure security within the cloud environment. Tokenization is also growing in popularity because merchants can completely wipe sensitive credit card data from systems, but maintain business analytics.
In a tip on PCI compliance in the cloud, Ed Moyle, a senior security strategist at Savvis and founding partner of consultancy Security Curve, said merchants can take steps early on to avoid potential pitfalls. PCI DSS compliance and cloud computing doesn’t have to be a scary proposition, Moyle said.
It’s vital that the merchant understands what will be moving to the cloud and gain a better picture of what the scope will look like. It is easier from a governance standpoint if the merchant maintains direct control of the cardholder environment, he said.
Chenxi Wang, vice president and principle analyst at Cambridge, Mass.-based Forrester Research Inc., said she does not believe there are any major issues that haven’t been addressed by the PCI Council. Recent guidance on virtualization and point-to-point encryption have helped most merchants better understand and address the challenges.
Cloud providers gaining PCI DSS compliant validation is also helping reduce some of the confusion with gaining compliance in the cloud, Wang said. The cloud provider’s job is to provide documentation on how they meet important security controls, Wang said. In addition to Amazon Web Services and Verizon, Web content giant Akamai runs a PCI DSS validated tokenization service. Visa provides a list of dozens of PCI-validated service providers (.pdf).
“There are many merchants that have been using cloud services for their payment processes for a long time,” Wang said. “While merchants are ultimately responsible, there’s shared responsibility with the cloud provider.”
Related Topics:PCI DSS Requirements for Cloud Computing, VIEW ALL TAGS

Full disclosure: I’m a paid contributor to TechTartet’s SearchCloudComputing.com, a sister publication to SearchCloudSecurity.com.
Lori MacVittie (@lmacvittie) asserted The focus on bandwidth and traffic continue to distract from the real problems with traditional inbound protections … in an introduction to her The Fundamental Problem with Traditional Inbound Protection 1/20/2012 essay for F5’s DevCentral blog:
The past year brought us many stories focusing on successful attacks on organizations for a wide variety of reasons. Why an organization was targeted was not nearly as important as the result: failure to prevent an outage. While the volume of traffic often seen by these organizations was in itself impressive, it was not the always the volume of traffic that led to the outage, but rather what that traffic was designed to do: consume resources.
It’s a story we’ve heard before, particularly with respect to web and application servers. We know that over-consumption of resources impairs performance and, ultimately, causes outages. But what was perhaps new to many last year was that it wasn’t just servers that were falling to an overwhelming number of connections, it was the very protections put in place to detect and prevent such attacks – stateful firewalls.
Firewalls are the most traditional of inbound protection for data centers. Initially designed to simply prevent unauthorized access via specific ports, they have evolved to a level that includes the ability to perform limited packet inspection and make decisions based on the data within them. While this has been helpful in preventing a growing variety of attacks, they have remained unable to move laterally across protocols and understand expected and acceptable behavior within the context of a request, which results in a failure to recognize an attack. This is because modern application layer attacks look and smell to traditional inbound protection devices like legitimate requests. They are simply unable to parse behavior in its appropriate context and make the determination that the intention behind the request is malicious.
A recent InfoWorld article presented a five-point list regarding how to deny DDoS attacks. The author and his referenced expert Neal Quinn, VP of operations at Prolexic, accurately identify the root cause of the inability of traditional inbound protection to thoroughly mitigate DDoS attacks:
But the most difficult challenge has been DDoS attackers' increasing sophistication as they've moved from targeting Layers 3 and 4 (routing and transport) to Layer 7 (the application layer). They've learned, for example, how to determine which elements comprise a victim's most popular Web page, honing in on which ones take the most time to load and have the least amount of redundancy.
"Attackers are now spending a much longer period of time researching their targets and the applications they are running, trying to figure out where they can cause the most pain with a particular application," Quinn said. "For example, they may do reconnaissance to figure out what URL post will cause the most resource-consuming Web page refresh."
Unfortunately the five-point list describing the strategy and tactics to “deny DDOS attacks” completely ignores this difficult challenge, offering no advice on how to mitigate “the most difficult challenge".” While the advice to ensure enough compute resources tangentially touches upon the answer, the list is a traditional response that does not address the rising Layer 7 challenge.
CONNECTIONS not THROUGHPUT
To understand how to mitigate the rising layer 7 security challenge one must first understand the two core reasons traditional inbound security solutions are unlikely to mitigate these attacks. First is a failure to recognize an application layer attack for what it is. This failure cascades into the second reason traditional inbound security solutions fail: connection capacity.
Not bandwidth, connections. A million TCP connections can easily topple most modern firewalls today and yet the bandwidth involved could be miniscule compared to the gigabits of capacity many organizations have at their disposal. It isn’t about bandwidth anymore, it’s about connections. This is why the advice to ramp up compute processing power and memory is partially on target – because memory is imperative in maintaining massive session (connection) tables on infrastructure as traffic flows to and from targeted services.
Because traditional inbound protection devices are unable to recognize the malicious intent of these legitimate-appearing requests, they must maintain the connection. When combined with the need to maintain connections for all legitimate traffic, these malicious requests can quickly push a traditional device beyond its meager connection limitations. When that occurs, the results are disastrous. Performance, of course, suffers unacceptable degradation. One can only hope that is the only impact, for far more often the device simply fails, completely disrupting all services.
To complete the aforementioned list of “how to deny a DDoS attack”, it is necessary to implement a security solution at the perimeter of the network that is both able to detect and thus deny malicious requests and which has the connection capacity necessary to withstand the combined volume of legitimate and malicious requests. This solution must reside at the edge of the network, lest a less capable device be overwhelmed. This is because when it comes to perimeter security, the default is a serial strategy – nothing gets past a failed security device. If that security device is at the edge of the network, as is the case with traditional inbound security solutions like stateful firewalls, then all services residing topologically behind that device will fail should the firewall fall.
This is by design. One does not want unfettered access to services and applications. No perimeter protection, no access. It’s a sound strategy, but one that needs to employ a perimeter device capable of withstanding even the most diverse of attacks.
Traditional inbound security is too constrained in terms of connection capacity to maintain its position on the front lines. A more capable, intelligent security solution is required – one able to provide traditional inbound security protections as well as recognizing the malicious intent of more modern, application layer attacks.


Joe Panettieri (@joepanettieri) reported SSAE 16 Audits Gain Momentum With Cloud Data Center Providers in a 1/19/2012 post to the TalkinCloud blog:
When it comes to cloud computing data center audits, everyone seems to be jumping on the SSAE 16 bandwagon. Indeed, SSAE 16 is a relatively new audit standard that essentially replaces the aging SAS 70 standard. Scan the market and you’ll find numerous cloud computing companies and cloud services providers announcing SSAE 16 compliance since January 1, 2012. The big question: Will SSAE 16 really give customers peace of mind as they evaluate cloud data center partners?
Companies that have made SSAE 16 compliance announcements so far in January 2012 include:
- 1102 Grand, which offers colocation facilities in Kansas City.
- Agile-1, which provides managed services for workforce solutions.
- CoreXchange, which has multiple Dallas data centers.
- ePlus Inc., an IT service provider that has close relationships with HP, Cisco, VMware, NetApp, Microsoft, Symantec, IBM and Lenovo.
- KineticD, which offers cloud backup and disaster recovery services for small and midsized businesses (SMBs).
- Lucernex Technologies, which offers cloud-based real estate software applications.
- OneNeck IT Services, the IT outsourcing specialist and managed services provider in Arizona.
- Open Access Technology International Inc. (OATI), which develops smart grid solutions for the energy industry.
- Skytap Inc., which develops self-service cloud automation solutions.
- ViaWest, one of the largest privately-held data center, cloud and managed services providers in North America.
- Windstream Hosted Solutions, which said more than a dozen of its U.S. data centers comply with SSAE 16.
Potential SSAE 16 Benefits
Generally speaking, SSAE 16 audits cover a lengthy list of requirements. But the SSAE 16 Resource Center points to five key benefits of an audit, noting that SSAE 16 ensures data centers have:
- sufficient data and power redundancy;
- appropriate physical security (security guards, biometric scanning, video cameras, etc.);
- monitors for excessive temperature fluctuations;
- timely alert tracking and reviews; and
- proper fire and water detection (and protection) systems.
SSAE 16 Problems and Limitations?
That list above sounds very promising. But SSAE 16 audits have their share of critics. In a recent editorial, Online Tech COO and President Mike Klein pointed out a range of potential problems with SSAE 16, alleging that the standard has set back the audit industry by 20 years. Klein’s company focuses on colocation services, managed services and private cloud services.
I can’t endorse or refute the value of SSAE 16 audits, since I have no direct experience with the audits. But I will say this: A growing list of data center providers are jumping on the SSAE 16 audit bandwagon. End-customers could be the long-term winners. But the biggest short-term winners are the folks performing all the audits.
Read More About This Topic

<Return to section navigation list>
Cloud Computing Events
No significant articles today.
<Return to section navigation list>
Other Cloud Computing Platforms and Services
• Jeff Barr (@jeffbarr) reported AWS Toolkits for Eclipse and Visual Studio Now Support DynamoDB in a 1/20/2012 post:
The AWS Toolkit for Eclipse and and the AWS Toolkit for Visual Studio now support Amazon DynamoDB.You can create tables, insert and edit data, initiate table scans, and more.
Here are some screen shots from the AWS Toolkit for Visual Studio.
Create a table:
Edit a multi-valued attribute:
Set up a table scan:
The AWS Toolkit for Visual Studio also contains the latest and greatest version of the AWS SDK for .NET. This version of the SDK includes support for Amazon DynamoDB, in the form of the Amazon.DynamoDB.DocumentModel and Amazon.DynamoDB.TableModel classes and namespaces. More information about the updates to the SDK can be found in the release notes.
Similarly, the AWS Toolkit for Eclipse contains the latest and greatest version of the AWS SDK for Java. This SDK also includes support for Amazon DynamoDB, Per the release notes, you can use the AmazonDynamoDBClient object to send requests directly to Amazon DynamoDB, or you can use the high-level API in the AWS SDK for Java to annotate your Java objects and automatically map them into Amazon DynamoDB.

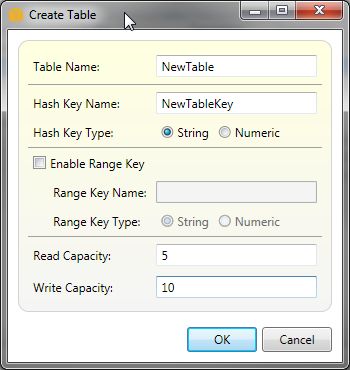
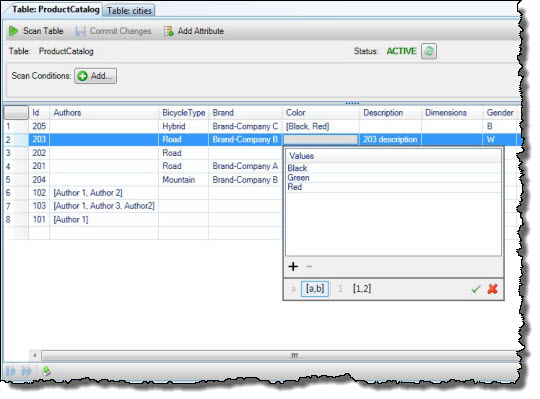
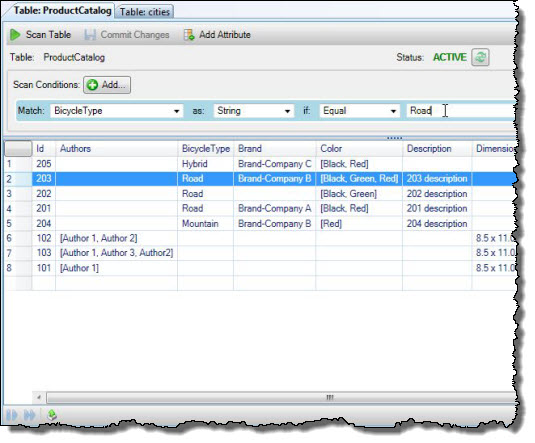

Scott M. Fulton, III (@SMFulton3) reported PentOS "Just Add Water" Private Cloud Released, Dell Signs On as Partner on 1/20/2012:
The creator of the Piston Enterprise Operating System, or PentOS, was lauded for his contributions in helping to create cloud computing itself, through the pioneering NASA Nebula project. There, NASA first demonstrated how to fit a data center cluster in an ordinary shipping container, proving the space program can still produce benefits today.
But last year, Joshua McKenty one-upped himself. He fit an almost entirely self-provisioning cloud operating system for a common rack of servers, onto a USB thumb drive. You plug the thumb device into a PC, edit maybe three lines of a text configuration file, save it, unplug it, plug it into the main server in the rack, and turn it on.
In a very clever demonstration video (above), McKenty demonstrates what I call the "Just Add Water" nature of the configuration process. On Wednesday, Piston Cloud's PentOS - the first commercial implementation of OpenStack, born from NASA Nebula - emerged from public beta into general availability. In addition came news that Dell has signed on as a provider of Piston Cloud-certified hardware. (I remember the hoops Dell's predecessor, PCs Limited, had to jump through to become DOS-certified.)
On the first birthday of Piston Cloud's existence, in an effort to share news as to the progress of its efforts toward the goal of world domination, company officials have provided via Twitter this detailed glimpse of its own progress chart, shown here as originally depicted through the medium of frosting.


Jeff Barr (@jeffbarr) reported Identity Federation [Extended] to the AWS Management Console in a 1/20/2012 post:
In August, we announced that AWS Identity and Access Management (IAM)
added support for Identity Federation. This enabled customers to use their existing identities (e.g. users) to securely access AWS APIs and resources using IAM's fine-grained access controls, without the need to create an IAM user for each identity.
Today we are announcing that we have extended IAM’s Identity Federation functionality to also enable federated users to access the AWS Management Console. This allows you to enable your employees to sign in once to your corporate directory, and then use the AWS Management Console without having to sign in to AWS, providing single sign-on access to AWS.
In my previous post on the topic of Identity Federation, I discussed how you could setup an identity broker, which calls our Security Token Service (STS), requesting temporary security credentials to provide your users access to AWS. You explicitly specify the permissions that these temporary credentials give your users, as well as control the amount of time (1 to 36 hours) these credentials are valid for. Well, these same temporary security credentials can now also be used to access the AWS Management Console.
Here's the basic flow:
User signs in to the enterprise network with their enterprise credentials.

User browses to an internal site and clicks on Sign in to AWS Management Console.Page calls identity broker. Identity broker validates access rights and provides temporary security credentials which includes the user's permissions to access AWS. The page includes these temporary security credentials as part of the sign-in request to AWS.
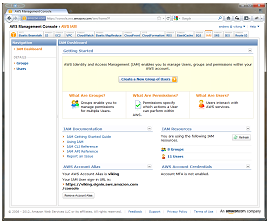
User is logged in to the AWS Management Console with the appropriate IAM policy.If you have already built an identity broker, perhaps using our sample application, to enable Identity Federation to AWS service APIs for users in your enterprise directory, you’re already most of the way there. All you need to do is implement an internal web page with redirect links to the AWS Management Console, and include the temporary security credentials as part of the sign in request. Below is some simple Ruby code sample that shows how to do just that (just replace the highlighed items with your own identifiers and URLs):
require 'rubygems'
require 'json'
require 'open-uri'
require 'cgi'
require 'aws-sdk'
# The temporary credentials will normally come from your identity
# broker, but for simplicity we create them in place
sts = AWS::STS.new(:access_key_id => "*** Your AWS Access Key ID ***",
:secret_access_key => "*** Your AWS Secret Access Key ***")
# A sample policy for accessing SNS in the console.
policy = AWS::STS::Policy.new
policy.allow(:actions => "sns:*",:resources => :any)
session = sts.new_federated_session(
"UserName",
:policy => policy,
:duration => 3600)
# The issuer parameter specifies your internal sign-in
# page, for example https://mysignin.internal.mycompany.com/.
# The console parameter specifies the URL to the destination tab of the
# AWS Management Console. This example goes to the sns console.
# The signin parameter is the URL to send the request to.
issuer_url = "https://mysignin.internal.mycompany.com/"
console_url = "https://console.aws.amazon.com/sns"
signin_url = "https://signin.aws.amazon.com/federation"
# Create the signin token using temporary credentials,
# including the Access Key ID, Secret Access Key, and security token.
session_json = {
:sessionId => session.credentials[:access_key_id],
:sessionKey => session.credentials[:secret_access_key],
:sessionToken => session.credentials[:session_token]
}.to_json
get_signin_token_url = signin_url + "?Action=getSigninToken&SessionType=json&Session=" + CGI.escape(session_json)
returned_content = URI.parse(get_signin_token_url).read
signin_token = JSON.parse(returned_content)['SigninToken']
signin_token_param = "&SigninToken=" + CGI.escape(signin_token)
# The issuer parameter is optional, but recommended. Use it to direct users
# to your sign-in page when their session expires.
issuer_param = "&Issuer=" + CGI.escape(issuer_url)
destination_param = "&Destination=" + CGI.escape(console_url)
login_url = signin_url + "?Action=login" + signin_token_param + issuer_param + destination_param
You can control the user name displayed in the upper right corner of the AWS Management Console when your user logs in. You can also optionally provide an "Issuer" URL when signing your users in. This URL will then be displayed to the user when their credentials expire, so they can re-authenticate with your identity system before continuing to use the AWS Console.
The following services support Identity Federation to the AWS Management Console today: Amazon EC2, Amazon S3, Amazon SNS, Amazon SQS, Amazon VPC, Amazon CloudFront, Amazon Route 53, Amazon CloudWatch, Amazon RDS, Amazon ElastiCache, Amazon SES and IAM. We'll of course be adding support for additional service consoles over time (the busy Amazon DynamoDB team is already working on it!).


<Return to section navigation list>


0 comments:
Post a Comment