Windows Azure and Cloud Computing Posts for 8/22/2012+
| A compendium of Windows Azure, Service Bus, EAI & EDI, Access Control, Connect, SQL Azure Database, and other cloud-computing articles. |

• Updated 8/24/2012 with new articles marked •.
Note: This post is updated daily or more frequently, depending on the availability of new articles in the following sections:
- Windows Azure Blob, Drive, Table, Queue and Hadoop Services
- SQL Azure Database, Federations and Reporting
- Marketplace DataMarket, Cloud Numerics, Big Data and OData
- Windows Azure Service Bus, Access Control, Caching, Active Directory, and Workflow
- Windows Azure Virtual Machines, Virtual Networks, Web Sites, Connect, RDP and CDN
- Live Windows Azure Apps, APIs, Tools and Test Harnesses
- Visual Studio LightSwitch and Entity Framework v4+
- Windows Azure Infrastructure and DevOps
- Windows Azure Platform Appliance (WAPA), Hyper-V and Private/Hybrid Clouds
- Cloud Security and Governance
- Cloud Computing Events
- Other Cloud Computing Platforms and Services
Azure Blob, Drive, Table, Queue and Hadoop Services
• Mike Wheatley described Facebook’s Secret Project To Contain It’s Big Data in an 8/24/2012 post to the DevOpsANGLE blog:
The amount of big data that Facebook handles never ceases to amaze. At a subdued press conference this week, attended by only a few reporters, the social media giant revealed a whole host of impressive stats about its data operations.
As thing stand right now, its system processes something close to 500+ terabytes of data and 2.5 billion pieces of content every single day. This includes more than 300 million new photos uploaded each day, plus a staggering 2.7 billion likes every 24 hours!
Such a voluminous amount of data means that Facebook is presented with some unique challenges, one of the biggest of them being how to create server clusters that can operate as a single entity even when they’re located in different parts of the globe.
At this week’s press conference, Facebook gave us some details on their latest infrastructure project, which they’ve codename “Project Prism”.
Jay Parikh, Facebook’s Vice President of Engineering kicked off by speaking about the huge importance that the social media company placed in the project:
“Big data really is about having insights and making an impact on your business. If you aren’t taking advantage of the data you’re collecting, then you just have a pile of data, you don’t have big data.”
Parikh explained that ‘taking advantage’ of data was something that had to be done in a matter of minutes, so that Facebook would be able to instantly understand user reactions and respond to them in something close to real time.
“With 950 million users, every problem is a big data problem, and one of the biggest challenges… is with MapReduce,” added Parikh.
For those who don’t know, MapReduce is one of the most widely-used implementations of Apache Hadoop, a model for processing large data sets using distributed computing and clusters of servers that was created by Facebook in conjunction with Yahoo. To begin with, MapReduce was the perfect system for Facebook to be able to handle the massive quantities of big data it handles, but as its mountain of data grew exponentially each year, it became clear that it was no permanent solution.
“As we got more data and servers over the years, we said, ‘Oh, crap, this isn’t going to fit in our data center. We’re running out of space,’” said Parikh.
“One of the big limitations in Hadoop today is, for the whole thing to work, the servers have to be next to each other. They can’t be geographically dispersed… The whole thing comes crashing to a halt.”
Project Prism has been designed to overcome this challenge. Essentially, the idea is that it will Facebook to take apart its monolithic storage warehouse and scatter it across different locations, whilst still maintaining a single view of all of its data.
“Prism basically institutes namespaces, allowing anyone to access the data regardless of where the data actually resides. … We can move the warehouses around, and we get a lot more flexibility and aren’t bound by the amount of power we can wire up to a single cluster in a data center,” Parikh explained.
Admittedly, Facebook are being kind of vague about how it all works; for now, their engineers are still trying to document the project, although they have promised to publish an engineering blog post about how it all works at a later date. We know one thing though – Facebook will likely make Project Prism open source soon enough.
“Given the other things we’ve done, we want to open source this stuff. These are the next scaling challenges other folks are going to face,” concluded Parikh.
And few can argue with that.
Wenming Ye (@wenmingye) posted Hadoop On WindowsAzure Updated on 8/22/2012:
HadoopOnAzure allows a user to run Hadoop on Microsoft Windows Azure as a service. It is currently in private CTP with very limited capacity, and by invitation only. You may attempt to sign up at https://connect.microsoft.com/SQLServer/Survey/Survey.aspx?SurveyID=13697
To get a feel of what the service currently looks like, please take a look at these learning resources on WindowsAzure.com that I have authored a few months ago. I would also love to get your feedback on addition content you are interested in for learning about Hadoop.
- Hadoop on Windows Azure Tutorials
- Introduction to Hadoop on Windows Azure
- Running Hadoop Jobs on Windows Azure and Analyzing the
Data with the Excel Hive Add-In- Hadoop on Windows Azure - Working With Data
- Analyzing Twitter Movie Data with Hive (additional source at: https://github.com/wenming/BigDataSamples/tree/master/twittersample)
- Simple Recommendation Engine using Apache Mahout
- Additional Learning Resources
I have also given talks at techEd this year, one of the sessions discusses the use scenarios for big data and Hadoop. (samples at https://github.com/wenming/BigDataSamples)
- TechEd Talk Video: Learn Big Data Application Development on Windows Azure
Now, onto the announcement by Henry Zhang on our engineering team today [link added]:
We just updated the Hadoop on Azure site with SU3 bits. Please see below for a list of changes.
If you create a new cluster now, you will be running on the 1.01 Hadoop core bits. We now provide access to the cluster dashboard on the master node directly for you to manage your cluster and schedule jobs. You can simply go to https://<clustername>.cloudapp.net, type in the cluster user name/password you created the cluster with and log in. You will find a familiar experience in the cluster dashboard as before. You will also find preview bits of the Powershell cmdlets and C# SDK for job submission to your Azure cluster. Both tool kits can be downloaded in the 'Download' tab while you are on your cluster. Feedback will be highly welcome!
SU3: Publicly Visible Improvements
- Hadoop core revved from 0.20.203.1 to 1.0.1 on Azure
- Hadoop on Azure dashboard running on cluster master node, accessible via .cloudapp.net">.cloudapp.net">.cloudapp.net">.cloudapp.net">.cloudapp.net">.cloudapp.net">.cloudapp.net">.cloudapp.net">https://<clustername>.cloudapp.net
- REST APIs for hadoop job submission, progress inquery, kill job (no web UI or remote desktop needed) (check out the download link on your cluster)
- Powershell Cmdlet and C# SDK support (SDK 1.0 + Cmdlets are available on the download page for your cluster)
- Same familiar job submission experience in the web UI with dashboard backed up by the REST API in the background


I wasn’t able to find the preceding two download links when clicking the Downloads tile. Here’s a capture of the new URL-accessible dashboard for an OakLeaf Systems cluster:

<Return to section navigation list>
SQL Azure Database, Federations and Reporting
Gregory Leake posted Announcing Enhancements to SQL Data Sync in Windows Azure to the Windows Azure blog on 8/22/2012:
We are happy to announce new service updates for the SQL Data Sync service which are now operational in all Windows Azure data centers. The past two service updates (June and August) have brought the following enhancements to the preview in addition to general reliability improvements:
- Added support for spatial data types including geography and geometry.
- Added ability for user to cancel a data synchronization in progress.
- Enhanced overall performance on initial provisioning and sync tasks
- Enhanced sync performance between on-premises databases and Windows Azure SQL Databases
SQL Data Sync enables creating and scheduling regular synchronizations between Windows Azure SQL Database and either SQL Server or other SQL Databases. You can read more about SQL Data Sync on MSDN. We have also published SQL Data Sync Best Practices on MSDN.
The team is hard at work on future updates as we march towards General Availability, and we really appreciate your feedback to date! Please keep the feedback coming and use the Windows Azure SQL Database Forum to ask questions or get assistance with issues. Have a feature you’d like to see in SQL Data Sync? Be sure to vote on features you’d like to see added or updated using the Feature Voting Forum.
Iain Hunter (@hunt3ri) described SQL Azure - Disaster Recovery in an 8/21/2012 post:
In this post I look at how to set up some tooling to help implement a Disaster Recovery plan for your SQL Azure database.
Fundamentals
Thus you want to make sure everything is automated, and you want to hear about it if anything goes wrong.
It’s worth pointing out that every SQL Azure instance is mirrored twice, therefore it is highly unlikely you’re going to suffer an actual outage or data loss from unexpected downtime. So what we’re doing here is creating a backup in-case someone inadvertently deletes the Customers table. Of course it never hurts to have a backup under your pillow (so to speak) if it’s going to help you get to sleep at night.
Tooling
Tools you will need:
- Azure Import Export Service Client v 1.6
- Azure Storage Explorer
- Server or PC to set up the scheduled task
Exporting your SQL Azure DB
The first thing we’re going to do is to export your SQL Azure DB to a blob file. The blob file can be used to import your backup into a new DB in the event of disaster.
- If you haven’t already got one, create a new Azure Storage account. It’s a good idea to create this in a different location from your SQL Azure DB, so in the event of a catastropic data-centre melt-down your backup will be located far away. Eg if your database is in North-Europe setup your Storage Account in East-Asia.
- Now fire-up Azure Storage Explorer and connect to your new storage account. Create a new private container for sticking the backups in. If you don’t create a container you can’t actually save anything into your storage account
- Now we can configure Azure Import Export Client to download your DB into your newly created storage account. This is a command line util which is ideal for automating but for now we’ll just run manually. Run the following, editing for your specific account details:
- Important – Make sure you the BLOBURL argument correctly specifies your container name, ie -BLOBURL http://iainsbackups.blob.core.windows.net/dbbackups/MyDb_120820.bacpac
- If all has gone well you want to see something like below. Note – this command simply kicks off the backup process it may take some time before your backup file is complete, you can actually monitor the backup jobs on the portal if you want.
Importing your SQL Azure DB
A DR plan is of little use if you don’t test your backup, so we want to ensure that our backup file can actually be used to create a rescue DB from. So lets import our .bacpac file to see if we can recreate our DB and connect our app to it.
- We basically reverse the process. This time create a new empty SQL Azure DB
- Now we can configure Azure Import Export Service to import our .bacpac file as follows:
- If it works as expected we should see
- Now you want to connect your app to your DB to ensure it works as expected.
Automating your backups
Now we’ve proven we can export and import our db we want to make sure the process happens automatically so we can forget about it. The easiest way of doing that is to create a simple powershell script that runs the above commands for us, and then schedule it on the task manager.
Here’s a basic script that will run the Import/Export service for us, you can tailor as you see fit. Note that I’m creating a timestamped backup file so we should get a new file every day
Now we have the script we can call it from the task scheduler, I created a Basic Task to run every night at 23:30, to call our script we can just run powershell from the schedular, as so:
Important - You will have to set your powershell executionpolicy to Remotesigned or the script won’t run when called.
Next Steps
So that’s it we’re backing up our Azure DB and storing in Blob storage all for the cost of a few pennies. Next we might want to create a more sophisticated script/program that would email us in event of failure, or tidy up old backups – I’ll leave it up to you
Useful Links
http://msdn.microsoft.com/en-us/library/windowsazure/383f0cb9-0647-4e67-985d-e88369ef0508


<Return to section navigation list>
Marketplace DataMarket, Cloud Numerics, Big Data and OData
• Dan English (@denglishbi) reported Excel Graduates to a Complete and Powerful Self-Service BI Tool in an 8/24/2012 post to the Microsoft Business Intelligence blog:
Today we have a guest post from Microsoft SQL Server MVP Dan English. Dan shares a walkthrough using Power View in Excel 2013. You can find him on twitter @denglishbi and follow his blog at http://denglishbi.wordpress.com/.
It’s been an exciting year for Microsoft’s self-service reporting tool Power View – the feature officially released with SQL Server 2012 in March, and just this last month Power View was integrated into Excel 2013 through the Office 2013 Preview release. With the Excel integration, everyone that uses Excel will be able to create insightful and highly interactive reports that can easily be explored. Let’s take a quick walkthrough of this new capability included in Excel 2013 and explore new features along the way.
Getting Started
In order to take advantage of this new feature, download the Office Professional Plus Preview that can be found here. The only other item required is Silverlight, and if you don’t already have it installed, you will be prompted to do so once you try and use the new Power View report option.
Before we start using Power View, we need some data to work with, so let’s go grab some. For this demonstration I am going to a set of data from the US government that is free to download and explore: A general raw data set, and since the school season is right around the corner, a school-related dataset titled National School Lunch Assistance Program Participation and Meals Served Data. The data is available in an Excel format and after a bit of manipulation and consolidation – basically unpivoting the data provided, cleaning up some blank records and formatting data values – I came up with a table of data that we can start to work with.
Creating Reports
Now without doing anything with my data, I first need to switch over to the Insert tab in the Ribbon and click on the Power View button in the Reports section.
As I mentioned previously, Power View does require Silverlight, so you will be prompted and provided an option to download and install Silverlight 5 if you haven’t already. After this is downloaded and installed, we can click the Reload button and see what we have to work with.
Now we can start exploring the data, look for anomalies, and see if there are any trends.
When we first add items from the Power View Fields area onto the canvas area they will start out in a table layout. You can alter the format of the numeric data and change the layout into other visualizations such as charts. After doing that we end up with a report that looks like this:
As you can see, the numbers have been steadily increasing since 2007 (the fiscal year starts in October). One thing that we spot when comparing the overall totals by state/territory is that Georgia has a fairly high meals served ranking versus the number of participants.
Performing Analysis
We can quickly create another report and filter down to see the data just for Georgia. After we create a new Power View report worksheet we can then add a filter for Georgia in the Filters area and then copy and paste items over from the first report.
Now we can see what was going on specific to Georgia – over the past few years the number of meals served is decreasing.
How about we take the data, map it out, and see what we have for last year?
We can see that California, Texas, and New York served the most meals last year. The east coast of the country seems to have more activity than the central, as well.
Conclusion
So far we have only scratched the surface as to what we could do with this data. We haven’t even gone into Power Pivot yet, but we have been working with a model (and yes, that model does reside in Power Pivot inside Excel). The data that we have been using could easily be related to other sources and we could go into Power Pivot and start to add additional measures or key performance indicators (KPIs) to determine the Average Meals per Participant, Total Cost, or the Year-over-Year Growth values and percentages. The sky is the limit with what we can do with the data, and amazingly we are able to do all of this inside Microsoft Excel. Now we can perform analysis on our desktop and share this with others and it is only a few clicks away!
Resources
For more information about Power View and Microsoft Business Intelligence you can check out the following:
- Visualizing Data with Microsoft Power View (book)
- Power View Overview
- What’s new in Power View in Excel 2013
- Sean Boon’s Blog (great series on Olympic data)
- Microsoft BI (web site)
- Microsoft BI Blogs (consolidated list)
- Dan English, Microsoft SQL Server MVP, Principal BI Consultant at Superior Consulting Services, LLC.


Bought a copy of Dan’s book from Amazon.
• Paul Miller (@PaulMiller) posted Data Markets, revisited on 8/24/2012:
Earlier this year, I conducted a series of podcasts with some of the leading lights in the Data Market business.
We delved into the things that differentiated them from one another, and we searched for the areas of commonality that might provide some boundaries to the rather fluid concept of a market for a non-rival good like data. Through ten separate conversations, I had opportunities to talk with old friends and acquaintances, and to explore the ideas of people whom I had previously only admired from afar.
Some of the insights from that process have now been written up in a report for GigaOM Pro; Data Markets: In search of new business models.
As the blurb states,
From information on U.S. census returns to the location of every Starbucks in Canada, the demand for data to support decision making is increasing. Fittingly, a number of new data markets have emerged in the past few years that provide access to this data.
A wide range of companies exists in this space, and often there are more differences than similarities in the various products on offer, not to mention the many different financial models. This report describes the basics of a data market, explores the ways in which various companies are beginning to position their offerings, and looks for evidence that there is sufficient demand for this market segment to prove sustainable.
GigaOM Pro reports are only available to subscribers. If you aren’t (yet!) a subscriber and want to read this report, you can sign up for a week’s free trial access to the site.


Full disclosure: I’m a registered GigaOm analyst.
Julie Lerman (@julielerman) reported You can now start building WinRT apps with OData in an 8/23/2012 post:
Many devs have been waiting for a toolkit so they can consume OData from [Metro] “Windows Store” apps they are building. The Release Candidate of these tools is now on the download center:
WCF Data Services Tools for Windows Store Apps RC:
“The WCF Data Services Tools for Windows Store Apps installer extends the Add Service Reference experience with client-side OData support for Windows Store Apps in Visual Studio 2012.”
http://www.microsoft.com/en-us/download/details.aspx?id=30714
Mark Stafford from the OData team has written two blog posts that walk you through using the tooling and creating a WinRT (aka Windows Store) app:

Julie = Lucy? Check out the OData 101 series below:
The WCF Data Services Team (formerly the Astoria Team) continued their series with OData 101: Building our first OData-based Windows Store app (Part 2) on 8/23/2012:
ODataBindable, SampleDataItem and SampleDataGroup
In the walkthrough, we repurposed SampleDataSource.cs with some code from this gist. In that gist, ODataBindable, SampleDataItem and SampleDataGroup were all stock classes from the project template (ODataBindable was renamed from SampleDataCommon, but otherwise the classes are exactly the same).
ExtensionMethods
The extension methods class contains two simple extension methods. Each of these extension methods uses the Task-based Asynchronous Pattern (TAP) to allow the SampleDataSource to execute an OData query without blocking the UI.
For instance, the following code uses the very handy Task.Factory.FromAsync method to implement TAP:
public static async Task<IEnumerable<T>> ExecuteAsync<T>(this DataServiceQuery<T> query)
{
    return await Task.Factory.FromAsync<IEnumerable<T>>(query.BeginExecute(null, null), query.EndExecute);
}
SampleDataSource
The SampleDataSource class has a significant amount of overlap with the stock implementation. The changes I made were to bring it just a bit closer to the Singleton pattern and the implementation of two important methods.
Search
The Search method is an extremely simplistic implementation of search. In this case it literally just does an in-memory search of the loaded movies. It is very easy to imagine passing the search term through to a .Where() clause, and I encourage you to do so in your own implementation. In this case I was trying to keep the code as simple as possible.
public static IEnumerable<SampleDataItem> Search(string searchString)
{
	var regex = new Regex(searchString, RegexOptions.CultureInvariant | RegexOptions.IgnoreCase | RegexOptions.IgnorePatternWhitespace);
	return Instance.AllGroups
	    .SelectMany(g => g.Items)
	    .Where(m => regex.IsMatch(m.Title) || regex.IsMatch(m.Subtitle))
		.Distinct(new SampleDataItemComparer());
}
LoadMovies
The LoadMovies method is where the more interesting code exists.
public static async void LoadMovies()
{
    IEnumerable<Title> titles = await ((DataServiceQuery<Title>)Context.Titles
        .Expand("Genres,AudioFormats,AudioFormats/Language,Awards,Cast")
        .Where(t => t.Rating == "PG")
        .OrderByDescending(t => t.ReleaseYear)
        .Take(300)).ExecuteAsync();

    foreach (Title title in titles)
    {
        foreach (Genre netflixGenre in title.Genres)
        {
            SampleDataGroup genre = GetGroup(netflixGenre.Name);
            if (genre == null)
            {
                genre = new SampleDataGroup(netflixGenre.Name, netflixGenre.Name, String.Empty, title.BoxArt.LargeUrl, String.Empty);
                Instance.AllGroups.Add(genre);
            }
            var content = new StringBuilder();
            // Write additional things to content here if you want them to display in the item detail.
            genre.Items.Add(new SampleDataItem(title.Id, title.Name, String.Format("{0}\r\n\r\n{1} ({2})", title.Synopsis, title.Rating, title.ReleaseYear), title.BoxArt.HighDefinitionUrl ?? title.BoxArt.LargeUrl, "Description", content.ToString()));
        }
    }
}
The first and most interesting thing we do is to use the TAP pattern again to asynchronously get 300 (Take) recent (OrderByDescending) PG-rated (Where) movies back from Netflix. The rest of the code is simply constructing SimpleDataItems and SimpleDataGroups from the entities that were returned in the OData feed.
SearchResultsPage
Finally, we have just a bit of calling code in SearchResultsPage. When a user searches from the Win+F experience, the LoadState method is called first, enabling us to intercept what was searched for. In our case, the stock implementation is okay aside from the fact that we don’t any additional quotes embedded, so we’ll modify the line that puts the value into the DefaultViewModel to not append quotes:
this.DefaultViewModel["QueryText"] = queryText;When the filter actually changes, we want to pass the call through to our implementation of search, which we can do with the stock implementation of Filter_SelectionChanged:
void Filter_SelectionChanged(object sender, SelectionChangedEventArgs e)
{
    // Determine what filter was selected
    var selectedFilter = e.AddedItems.FirstOrDefault() as Filter;
    if (selectedFilter != null)
    {
        // Mirror the results into the corresponding Filter object to allow the
        // RadioButton representation used when not snapped to reflect the change
        selectedFilter.Active = true;

        // TODO: Respond to the change in active filter by setting this.DefaultViewModel["Results"]
        //       to a collection of items with bindable Image, Title, Subtitle, and Description properties
        var searchValue = (string)this.DefaultViewModel["QueryText"];
        this.DefaultViewModel["Results"] = new List<SampleDataItem>(SampleDataSource.Search(searchValue));

        // Ensure results are found
        object results;
        ICollection resultsCollection;
        if (this.DefaultViewModel.TryGetValue("Results", out results) &&
            (resultsCollection = results as ICollection) != null &&
            resultsCollection.Count != 0)
        {
            VisualStateManager.GoToState(this, "ResultsFound", true);
            return;
        }
    }

    // Display informational text when there are no search results.
    VisualStateManager.GoToState(this, "NoResultsFound", true);
}
Item_Clicked
Optionally, you can implement an event handler that will cause the page to navigate to the selected item by copying similar code from GroupedItemsPage.xaml.cs. The event binding will also need to be added to the resultsGridView in XAML. You can see this code in the published sample.
The WCF Data Services Team (formerly the Astoria Team) began a series with OData 101: Building our first OData-based Windows Store app (Part 1) on 8/23/2012:
Because there’s a lot of details to talk about in this blog post, we’ll walk through the actual steps to get the application functional first, and we’ll walk through some of the code in a subsequent post.
Before you get started, you should ensure that you have an RTM version of Visual Studio 2012 and have downloaded and installed the WCF Data Services Tools for Windows Store Apps.
1. Let’s start by creating a new Windows Store Grid App using C#/XAML. Name the application OData.WindowsStore.NetflixDemo:
2. [Optional]: Open the Package.appxmanifest and assign a friendly name to the Display name. This will make an impact when we get around to adding the search contract:
3. [Optional]: Update the AppName in App.xaml to a friendly name. This value will be displayed when the application is launched.
3. [Optional]: Replace the images in the Assets folder with the images from the sample project.
4. Build and launch your project. You should see something like the following:
5. Now it’s time to add the OData part of the application. Right-click on your project in the Solution Explorer and select Add Service Reference…:
6. Enter the URL for the Netflix OData service in the Address bar and click Go. Set the Namespace of the service reference to Netflix:
(Note: If you have not yet installed the tooling for consuming OData services in Windows Store apps, you will be prompted with a message such as the one above. You will need to download and install the tools referenced in the link to continue.)
7. Replace the contents of SampleDataSource.cs from the DataModel folder. This data source provides sample data for bootstrapping Windows Store apps; we will replace it with a data source that gets real data from Netflix. This is the code that we will walk through in the subsequent blog post. For now, let’s just copy and paste the code from this gist.
8. Add a Search Contract to the application. This will allows us to integrate with the Win+F experience. Name the Search Contract SearchResultsPage.xaml:
9. Modify line 58 of SearchResultsPage.xaml.cs so that it doesn’t embed quotes around the queryText:
10. Insert the following two lines at line 81 of SearchResultsPage.xaml.cs to retrieve search results:
(Note: The gist also includes the code for SearchResultsPage.xaml.cs if you would rather replace the entire contents of the file.)
11. Launch the application and try it out. Note that it will take a few seconds to load the images upon application launch. Also, your first search attempt may not return any results. Obviously if this were a real-world application, you would want to deal with both of these issues.
So that’s it – we have now built an application that consumes and displays movies from the Netflix OData feed in the new Windows UI. In the next blog post, we’ll dig into the code to see how it works.


Glenn Gailey (@ggailey777) explained OData Client for Windows Store Apps in an 8/23/2012 post:
I’m happy to announce that OData client support for Windows Store apps (“formerly Metro apps”) in Windows 8 RTM has been released. This didn’t actually get chained into Visual Studio 2012 like it was in the pre-release, but it may be even easier to use in the new incarnation:
Despite the somewhat confusing title, this installation supports the RTM version of Windows 8 and Visual Studio 2012. I have heard that there could be tweaks to the installer behavior itself, but that the client library itself shouldn’t change, since Win8 is done and shipped.
In this version of support for Windows Store apps, the client library is actually obtained from NuGet.org by the new tool, which is integrated with Visual Studio 2012 so that Add Service Reference will work again, as you would expect it to. Without this package installed, Visual Studio gives you a cryptic message about the service not being valid, because it’s looking for a WSDL and not the data service definition. This client supports all versions of the OData protocol.
For an overview of how this client works in Visual Studio 2012, see the post OData 101: Building our first OData-based Windows Store app (Part 1).
If you are jazzed about writing Windows Store apps…stay tuned. Next week, I am going to be able to talk about some very cool stuff that I have been working on that will be great for folks who are trying to figure out what to do with data for their Windows Store app users.

Wade Wegner (@WadeWegner) described Generating C# Classes from JSON in an 8/22/2012 post:
I’ve long advocated using JSON when building mobile and cloud applications. If nothing else, the payload size makes it extremely efficient when transferred over the wire – take a look at the size of the same information formatted as OData, REST-XML, and lastly JSON:
Despite the use of JSON – and great frameworks like JSON.NET and SimpleJson – I always struggled with creating my C# classes when working with an existing web service that returned JSON. It can take a long time to create these C# classes correctly, and often time I’d take a lazy approach and either use the JObject or an IDictionary such that I didn’t have to have a C# class – something like:
var json = (IDictionary<string, object>)SimpleJson.DeserializeObject(data);Yesterday I stumbled upon a tool that makes this SO amazingly easy. In many ways I’m bothered by the fact that it’s taken me so long to find it – has this been one of the best kept secrets on the Internet or did I just miss it?
This website is as simple as it is powerful. Simply paste your JSON into the textbox, click Generate, and voilà you have C# objects!
Take a look. Here’s some JSON returned back from the Untappd API:
{
  "meta": {
    "code": 200,
    "response_time": {
      "time": 0.109,
      "measure": "seconds"
    }
  },
  "notifications": [],
  "response": {
    "pagination": {
      "next_url": "http://api.untappd.com/v4/thepub?max_id=11697698",
      "max_id": 11697698,
      "since_url": "http://api.untappd.com/v4/thepub?min_id=11697724"
    },
    "checkins": {
      "count": 2,
      "items": [
        {
          "checkin_id": 11697724,
          "created_at": "Wed, 22 Aug 2012 12:56:41 +0000",
          "checkin_comment": "",
          "user": {
            "uid": 205218,
            "user_name": "asiahobo",
            "first_name": "Bum",
            "last_name": "",
            "location": "",
            "url": "0",
            "relationship": null,
            "bio": "0",
            "user_avatar": "https://untappd.s3.amazonaws.com/profile/7d21ba831edb33341b98f86e09795ed7_thumb.jpg",
            "contact": {
              "twitter": "asiahobo",
              "foursquare": 31652652
            }
          },
          "beer": {
            "bid": 9652,
            "beer_name": "Maredsous 8° Brune",
            "beer_label": "https://untappd.s3.amazonaws.com/site/beer_logos/beer-maredsous.jpg",
            "beer_style": "Belgian Dubbel",
            "auth_rating": 0,
            "wish_list": false
          },
          "brewery": {
            "brewery_id": 6,
            "brewery_name": "Abbaye de Maredsous (Duvel Moortgat)",
            "brewery_label": "https://untappd.s3.amazonaws.com/site/brewery_logos/brewery-AbbayedeMaredsousDuvelMoortgat_6.jpeg",
            "country_name": "Belgium",
            "contact": {
              "twitter": "",
              "facebook": "www.facebook.com/pages/Abbaye-De-Maredsous/208016262548587fine",
              "url": "www.maredsous.be/"
            },
            "location": {
              "brewery_city": "",
              "brewery_state": "Denée",
              "lat": 50.3044,
              "lng": 4.77149
            }
          },
          "venue": [],
          "comments": {
            "count": 0,
            "items": []
          },
          "toasts": {
            "count": 0,
            "auth_toast": null,
            "items": []
          },
          "media": {
            "count": 0,
            "items": []
          }
        },
        {
          "checkin_id": 11697723,
          "created_at": "Wed, 22 Aug 2012 12:56:35 +0000",
          "checkin_comment": "",
          "user": {
            "uid": 137722,
            "user_name": "Mjoepp",
            "first_name": "Christoffer",
            "last_name": "",
            "location": "Linköping",
            "url": "",
            "relationship": null,
            "bio": "",
            "user_avatar": "http://gravatar.com/avatar/f1672535a7caa3bd686267257d33c588?size=100&d=https%3A%2F%2Funtappd.s3.amazonaws.com%2Fsite%2Fassets%2Fimages%2Fdefault_avatar.jpg",
            "contact": {
              "foursquare": 25958771
            }
          },
          "beer": {
            "bid": 12145,
            "beer_name": "Chocolate",
            "beer_label": "https://untappd.s3.amazonaws.com/site/beer_logos/beer-ChocolatePorter_12145.jpeg",
            "beer_style": "English Porter",
            "auth_rating": 0,
            "wish_list": false
          },
          "brewery": {
            "brewery_id": 844,
            "brewery_name": "Meantime Brewing Company",
            "brewery_label": "https://untappd.s3.amazonaws.com/site/brewery_logos/brewery-MeantimeBrewingCompanyLimited_844.jpeg",
            "country_name": "England",
            "contact": {
              "twitter": "MeantimeBrewing",
              "facebook": "http://www.facebook.com/meantimebrewing",
              "url": "http://www.meantimebrewing.com"
            },
            "location": {
              "brewery_city": "London",
              "brewery_state": "",
              "lat": 51.5081,
              "lng": -0.128005
            }
          },
          "venue": [],
          "comments": {
            "count": 0,
            "items": []
          },
          "toasts": {
            "count": 0,
            "auth_toast": null,
            "items": []
          },
          "media": {
            "count": 0,
            "items": []
          }
        }
      ]
    }
  }
}
I’m sad to admit that, in the past, I’d like create my C# objects by hand and then either conform to the JSON or map between the two. It requires a TON of time and is extremely error prone. With http://json2csharp.com/ all I do is paste this into the textbox and click Generate. I’ll get the following output:
public class ResponseTime
{
    public double time { get; set; }
    public string measure { get; set; }
}

public class Meta
{
    public int code { get; set; }
    public ResponseTime response_time { get; set; }
}

public class Pagination
{
    public string next_url { get; set; }
    public int max_id { get; set; }
    public string since_url { get; set; }
}

public class Contact
{
    public string twitter { get; set; }
    public int foursquare { get; set; }
}

public class User
{
    public int uid { get; set; }
    public string user_name { get; set; }
    public string first_name { get; set; }
    public string last_name { get; set; }
    public string location { get; set; }
    public string url { get; set; }
    public object relationship { get; set; }
    public string bio { get; set; }
    public string user_avatar { get; set; }
    public Contact contact { get; set; }
}

public class Beer
{
    public int bid { get; set; }
    public string beer_name { get; set; }
    public string beer_label { get; set; }
    public string beer_style { get; set; }
    public int auth_rating { get; set; }
    public bool wish_list { get; set; }
}

public class Contact2
{
    public string twitter { get; set; }
    public string facebook { get; set; }
    public string url { get; set; }
}

public class Location
{
    public string brewery_city { get; set; }
    public string brewery_state { get; set; }
    public double lat { get; set; }
    public double lng { get; set; }
}

public class Brewery
{
    public int brewery_id { get; set; }
    public string brewery_name { get; set; }
    public string brewery_label { get; set; }
    public string country_name { get; set; }
    public Contact2 contact { get; set; }
    public Location location { get; set; }
}

public class Comments
{
    public int count { get; set; }
    public List<object> items { get; set; }
}

public class Toasts
{
    public int count { get; set; }
    public object auth_toast { get; set; }
    public List<object> items { get; set; }
}

public class Media
{
    public int count { get; set; }
    public List<object> items { get; set; }
}

public class Item
{
    public int checkin_id { get; set; }
    public string created_at { get; set; }
    public string checkin_comment { get; set; }
    public User user { get; set; }
    public Beer beer { get; set; }
    public Brewery brewery { get; set; }
    public List<object> venue { get; set; }
    public Comments comments { get; set; }
    public Toasts toasts { get; set; }
    public Media media { get; set; }
}

public class Checkins
{
    public int count { get; set; }
    public List<Item> items { get; set; }
}

public class Response
{
    public Pagination pagination { get; set; }
    public Checkins checkins { get; set; }
}

public class RootObject
{
    public Meta meta { get; set; }
    public List<object> notifications { get; set; }
    public Response response { get; set; }
}
Pretty amazing! Now, note that it’s not perfect – there’s both a Contact and Contact2 class, but that’s easy to fix by merging the two and updating references. I’ll gladly perform this little bit of cleanup given the hours this tool just saved me.
Now that I have these classes, it’s really easy to use JSON.NET to load them with data.
RootObject publicFeed = new RootObject();

using (StreamReader reader = new StreamReader(response.GetResponseStream()))
{
    data = reader.ReadToEnd();

    publicFeed = JsonConvert.DeserializeObject<RootObject>(data);
}
Now it’s a simple matter of using my RootObject within my applications.
I feel like I may be the last person to have heard of this tool, in which case I’m both embarrassed and bitter – couldn’t you all have told me about this years ago?


The SD Times NewsWire (@sdtimes) reported Big Data is big driver for cloud development, new Evans Data survey of developers shows on 8/21/2012:
Over half of all developers (55.4%) active in development for Cloud platforms say that the need to manage large data sets that cannot be handled on traditional database systems (Big Data) is a major driver in getting their organizations to use Cloud services, according to Evans Data’s recently released survey of over 400 developers developing for or in the Cloud. Big Data, or large, unstructured data sets that may measure in petabytes, exabytes, or beyond, promises to provide new insights to businesses and is an ideal candidate for the Cloud where scalability and infrastructure are featured.
In addition, the most important components for implementing services that allow for management of Big Data are integration tools, cited by over sixty percent of developers working with
Big Data in the Cloud. Security tools, were the next most commonly cited components for Big Data in the Cloud.
“Cloud service providers have to realize the need to provide specific tools to developers in their Cloud environments,” said Janel Garvin, CEO of Evans Data, “and those tools should include ones designed to handle Big Data, as the scalability and cost effectiveness of the Cloud paradigm are particularly cogent when related to Big Data.”The Cloud Development Survey is a worldwide survey conducted twice a year amongst developers actively developing for the Cloud, in the Cloud, or both. It includes topics such as: Cloud adoption and targeting, Development tools in the Cloud, Big Data and Database Technology, Cloud Security and Governance, Cloud Clients, Private Cloud, Public Cloud and more.
See complete Table of Contents here:
http://www.evansdata.com/reports/viewRelease.php?reportID=27.
Read more: http://sdt.bz/36886#ixzz24UHkqwko


Windows Azure Service Bus, Access Control Services, Caching, Active Directory and Workflow
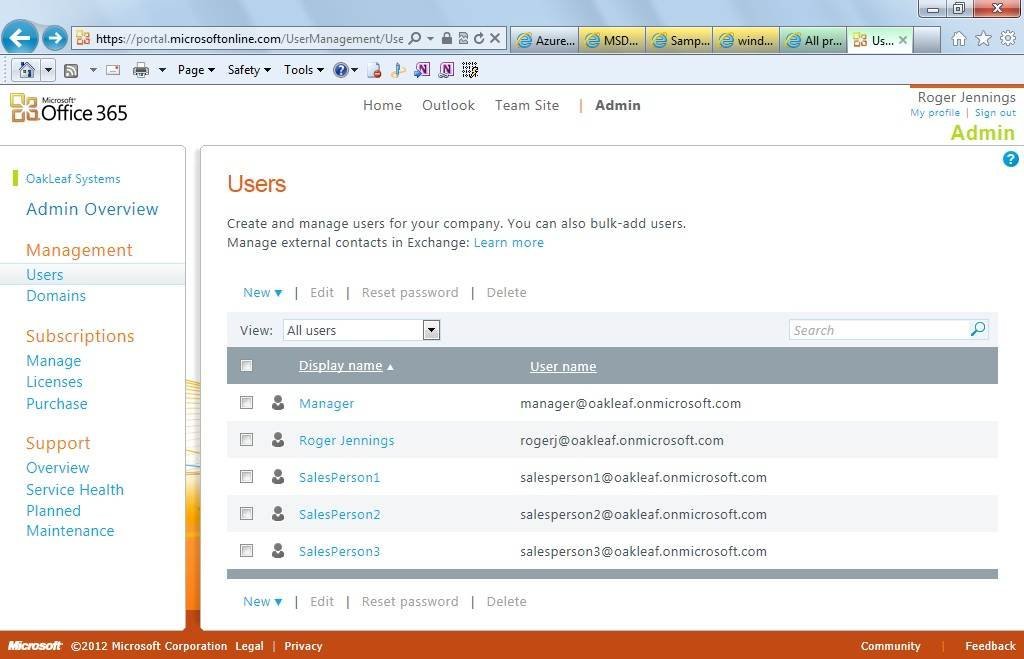
• My (@rogerjenn) Windows Azure Active Directory enables single sign-on with cloud apps post of 8/24/2012 for TechTarget’s SearchCloudComputing.com begins:
Microsoft’s Windows Azure Active Directory (WAAD) Developer Preview provides simple user authentication and authorization for Windows Azure cloud services. The preview delivers online demonstrations of Web single sign-on (SSO) services for multi-tenanted Windows Azure .NET, Java and PHP applications, and programmatic access to WAAD objects with a RESTful graph API and OData v3.0.
The preview extends the choice of IPs to include WAAD, the cloud-based IP for Office 365, Dynamics CRM Online and Windows InTune. It gives Windows Azure developers the ability to synchronize and federate with an organization’s on-premises Active Directory.
Figure 1. The Users page of the Office 365 Administrative portal enables adding detailed user accounts to an organization’s domain, oakleaf.onmicrosoft.com for this example.
Traditionally, developers provided authentication for ASP.NET Web applications with claims-based identity through Windows Azure Access Control Services (WA-ACS), formerly Windows Azure AppFabric Access Control Services.
According to Microsoft, WA-ACS integrates with Windows Identity Foundation (WIF); supports Web identity providers (IPs) including Windows Live ID, Google, Yahoo and Facebook; supports Active Directory Federation Services (AD FS) 2.0; and provides programmatic access to ACS settings through an Open Data Protocol (OData)-based management service. A management portal also enables administrative access to ACS settings.
Running online Windows Azure Active Directory demos
Taking full advantage the preview’s two online demonstration apps requires an Office 365 subscription with a few sample users (Figure 1). Members of the Microsoft Partner Network get 25 free Office 365 Enterprise licenses from the Microsoft Cloud Essentials benefit; others can subscribe to an Office 365 plan for as little as $6.00 per month. According to online documentation, the WAAD team plans to add a dedicated management portal to the final version to avoid reliance on Office 365 subscriptions. Note: The preview does not support Windows 8, so you’ll need to use Windows 7 or Windows Server 2008 R2 for the demo.
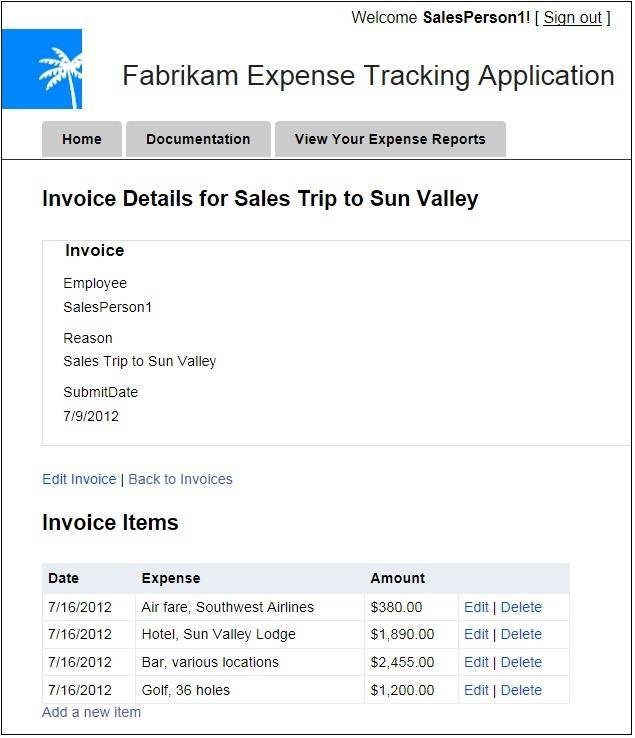
Figure 2. Use the Fabrikam demo to add or edit detail items of an expense report.
The preview also requires users to download an updated Microsoft Online Services Module for Windows PowerShell v1.0 for 32-bit or 64-bit systems. You’ll also need to download and save a prebuilt PowerShell authorization script, which you execute to extract the application’s identifier (Application Principal ID), as well as the tenant identifier (Company ID) for the subscribing organization.
The Fabrikam Expense report demo is a tool used to show interactive cloud Web apps to prospective Windows Azure users (Figure 2). The preview also includes open source code developers can download from GitHub and use under an Apache 2.0 license. Working with the source code in Visual Studio 2010 or later requires the Windows Azure SDK 1.7, MVC3 Framework, WIF runtime and SDK, as well as Windows Communication Framework (WCF) Data Services 5.0 for OData v3 and .NET 4.0 or higher. With a bit of tweaking, this ASP.NET MVC3 app could manage expense reports for small- and medium-sized companies. …

and concludes with “Traversing Office 365 AD with OData queries.”
Full disclosure: I’m a paid contributor to TechTarget’s SearchCloudComputing.com blog.
Manfred Steyer (@ManfredSteyer) reported on 8/24/2012 publication of his EAI and EDI in the Cloud: Prospects of Azure Service Bus EAI & EDI – Part I article in Service Technology Magazine’s August 2012 issue:
Abstract: This is the first article in a two-part series that discusses how in the future, the EAI features of Azure Service Bus will offer the transformation and routing of messages to integrated systems on a pay-per-use basis while maintaining its usual high availability. Moreover, standards like EDIFACT and X12 will also be supported in the same way as the integration into local systems via relaying.
Introduction
It is always advisable to install CTPs on a test system, such as a virtual machine. With regard to the CTP in question, special attention must be paid to documented installation requirements and dependencies, otherwise the setup routine may not be performed successfully.
Message Transformations Using Maps
If two systems that are to be connected expect messages in different formats, these must be transformed, which can be done using maps rather than programming. A map assigns elements of a message definition to its counter pieces in another message definition. Thereby, an XML schema is to be given for the source message and for the target message. Fig. 1 depicts a map which maps the elements of the PlaceOrder message to elements of the the SendOrder message. The last three elements are not mapped 1:1 to the respective elements of the target schema, but serve as an access parameter for a String Concatenate (symbol labeled A+B) type map operation. As the name suggests, this operation brings different values together in a string. In the present case, this string is assigned to the ShipTo field. A number of other map operators are to be found in the Toolbox.
This particular map may be used when a client who generates a PlaceOrder type message is meant to communicate with a service expecting a SendOrder type message. For the sake of completeness, Fig. 2 depicts another map mapping the response of SendOrder to the response belonging to PlaceOrder.
Figure 1 – Converting a request.
Figure 2 – Converting a response.
Connecting Systems Using Bridges
Bridges help to connect two heterogeneous systems. A distinction is made between one-way bridges and two-way bridges. In the case of a one-way bridge, the application only sends a message to the recipient, whilst when a two-way bridge is used, the application sends a message to the recipient and the recipient sends a response back. Bridges can be used to validate, enrich and transform messages using maps.
Fig. 3 displays a bridge configuration which was set up using the drag-and-drop function in Visual Studio. A two-way bridge is used here which routes the received messages to a service. Being a two-way bridge, it does not ignore the response message of this service. To define via which address the bridge should be accessible later on, the desired value is entered in the properties window under Relative Address. The complete address is composed of the combination of the chosen Azure namespace (see below) and this relative address.
The service in this example is a SOAP service connected through a relay binding. This means that the service is performed locally and registers with the service bus when booting up. The service bus assigns a public address to the service and from then on any and all messages sent to this address are routed to the service. Therefore, the service bus uses the connection which was initially set up by the local service thereby rendering the entire process firewall-safe.
Figure 3 – Bridge configuration.
The SOAP message to be sent to the service must have a SOAP action header so it knows with which service operation to associate the message. This can be created in Visual Studio using the Route Action function which is offered to connect the bridge to the service. Fig. 4 shows the dialog connected with this property. The Property (Read From) section defines where the value to be used can be obtained. Either a dropdown list with so-called context variables (Property Name) or a textbox in which an expression can be entered are to be selected.
In this particular case the latter is used; we will, however, look at context variables later on. That is why the desired value, SendOrder, is in this textbox. But as the textbox expects to receive an expression, SendOrder must be entered in inverted commas showing that it is a string.
The Destination (Write To) section is used to clarify how the value which has previously been defined should be used. The Type option defines if the value is to be assigned to an HTTP header or a SOAP header. The name of this header must be entered into the Identifier field. In the given example, the SOAP header Action is addressed.
Figure 4 – Defining a route action.
In addition to this, a Filter property (Fig. 5) is offered by the connection between the bridge and the service. It defines under which circumstances the message should be routed from the bridge to the service. As the bridge is only connected to one single service in the present case, the MatchAll option was chosen.
Figure 5 – Definition of a filter.
As well as the relaying service used in this example, other types of message recipients can also be configured. An overview thereof is given in the Toolbox (Fig. 6). The elements given under On-Premise LOBs offer the possibility to send messages directly to a local system (an "on-premise line-of-business-system"). Here, relaying is complemented by LOB adapters which are to be installed locally and originate from the BizTalk Server universe. An example for this is given further below. In the Route-Destinations section the Toolbox offers elements which are also able to address public services (One-Way External Service Endpoint and Two-Way External Service Endpoint). In addition, messages can be sent to a queue or a topic.
Figure 6 – Elements needed when setting up a bridge configuration.


Manfred continues with
- Connecting Bridges
- Configuring Relay Bindings
- Sending Data to a Bridge
- Making the Local Service Available Via Relay Binding
sections and concludes:
The second article in this two-part series goes over the following topics: enriching data in a bridge, enriching data in maps, EDI and communication via flat files with the TPM Portal, support for flat files, using the Flat File Schema Wizard, retrieving data via FTP, tracking, importing XML schemas from WSDL, and the conclusion to this article.
References
- [REF-1] Azure Service Bus CTP http://www.microsoft.com/en-us/download/details.aspx?id=17691
- [REF-2] Labs Portal, http://www.microsoft.com/download/en/details.aspx?displaylang=en&id=17691
- [REF-3] TPM-Portal, https://edi.appfabriclabs.com
- [REF-4] NuGet, http://nuget.codeplex.com/
- [REF-5] LOB-Adapter http://www.microsoft.com/biztalk/en/us/adapter-pack.aspx
Jonathan Allen described A Microsoft Branded Service Bus without BizTalk in an 8/23/2012 post to the InfoQ blog:
For quite some time now BizTalk has been essentially on life support. Being both very complex and very expensive, it was never a particularly popular product. None the less, many companies used it because they trust the Microsoft name and actually do need some sort of enterprise service bus. Seeing this gap, Microsoft has created a new product called Microsoft Service Bus 1.0 for Windows Server.
The primary communication protocols are Net.TCP and REST over HTTP. Net.TCP is a binary format that is designed for high performance communication between WCF clients and servers. For non-.NET applications, REST over HTTP is the preferred protocol.
A Service Bus installation would normally have a set of message brokers. Each message broker in turn contains one or more message containers. The message container hosts the actual queues, topics, and subscriptions. Each container is backed by its own database for persistence. When a new queue, topic, or subscription is created a load balancer determines which container to put it in. After that, the queue, topic, or subscription cannot be moved. However, the container itself can be moved to another server during a failover or for load balancing scenario.
[Note:] If a messaging broker NT service crashes or recycles, or in the event of a complete node recycle/shutdown, the associated message containers that were placed in this broker instance before the crash are automatically moved to other machines in the farm. The message containers continue to service requests with a small interruption in the case of failover.
Windows Fabric provides the “core logic necessary for high availability, farm and cluster formation, and load balancing across machines in the farm.” It is important to note that this alone isn’t enough for actual high availability. The SQL Server databases will also need to be mirrored, clustered, or replicated in some fashion to ensure they too will survive hardware failure.
Service Bus 1.0 for Windows Server is currently available as a beta [since 7/16/2012].

Leandro Boffi (@leandroboffi) described an ADFS WS-Trust client for Node.js on 8/23/2012:
Joining two of my favorite topics, Node.js and Identity Federation I’ve created a very simple and minimalist WS-Trust client for Node.js, this module allows you to request a security token from ADFS using WS-Trust protocol.
Installation
$ npm install wstrust-clientHow to use it
var trustClient = require('wstrust-client');

trustClient.requestSecurityToken({
    scope: 'https://yourapp.com',
    username: 'Your Username Here',
    password: 'Your Password Here',
    endpoint: 'https://your-ws-trust-endpoint-address-here'
}, function (rstr) {

    // Access the token and enjoy it!
    var rawToken = rstr.token;

    console.log(rawToken);

}, function (error) {

    // Error Callback
    console.log(error)

});
Remember that if you are using ADFS, the endpoint that you need to use is: /adfs/services/trust/13/UsernameMixed.

Leandro Boffi (@leandroboffi) posted Windows Azure Access Control Service Management Client for Node.js on 8/22/2012:
During the last months I’ve been working a lot with Node.js, I really like it. I’m building something huge, but I’ll talk about that later, the reason for this post is share with you a Node.js module in which I’m working on: a Windows Azure Access Control Service (recently renamed to Windows Azure Active Directory) management client for node.js.
You can find it on my github: https://github.com/leandrob/node-acs-cli
Installation
$ npm install acs-cliHow to use it….
var ManagementClient = require('acs-cli');

var client = new ManagementClient('[acsNamespace]', '[acs-management-key]');

client
        .from('RelyingParties')
        .top(2)
        .query(function (err, res) {
            ///res...
        });

<Return to section navigation list>
Windows Azure Virtual Machines, Virtual Networks, Web Sites, Connect, RDP and CDN
• Nick Harris (@cloudnick) interviewed Michael Washam (@MWashamMS) in CloudCover Episode 88 - Tips and Tricks for Windows Azure Virtual Machines and Virtual Networks on 8/24/2012:
In this episode Nick is joined by Michael Washam who demonstrates a variety of tips and tricks for Windows Azure IaaS scenarios. Michael shows how to configure a site-to-site virtual network using Windows Azure Virtual Networks and a Cisco ASA 5505. Additionally, he shows how to setup a web farm with content synchronization using Windows Azure Virtual Machines and Web Deploy. Finally, you will see how to use the connect button in the Windows Azure management portal to remote desktop into a Linux virtual machine.
In the News:
- Windows Azure Media Services and the London 2012 Olympics
- Calling the Windows Azure Service Management API from Python
- Windows Azure Training Kit Update Released – August 2012
- iOS and Windows Azure Communication using SignalR
- Windows Azure Community News Roundup (Edition #32)
- Publishing and Synchronizing Web Farms using Windows Azure Virtual Machines
In the Tip of the Week, we discuss a blog post by Brady Gaster that shows how clean log files in Windows Azure Web Sites and walkthrough Mingfei Yan's Blog on Windows Azure Media Services.
See my Configuring a Windows Azure Virtual Network with a Cisco ASA 5505-BUN-K9 Adaptive Security Appliance preview of 6/21/2012 for more details about the Adaptive Security Appliance.
Michael Washam (@MWashamMS) described Deploying certificates with Windows Azure Virtual Machines and PowerShell in an 8/23/2012 post:
A common question around using the Windows Azure PowerShell cmdlets is how to deploy certificates with VMs? In this post I’ve put together two samples on how to do this on Windows and Linux VMs.
Windows VM Example
Linux VM Example
Select-AzureSubscription mysub

$service = 'yourservicename1'
$location = 'West US'

## Cloud Service must already exist
New-AzureService -ServiceName $service -Location $location

## Add Certificate to the store on the cloud service (.cer or .pfx with -Password)
Add-AzureCertificate -CertToDeploy 'D:\User-Data\development\Azure Samples\mlwdevcert.cer' -ServiceName $service

## Create a certificate in the users home directory
$sshkey = New-AzureSSHKey -PublicKey -Fingerprint D7BECD4D63EBAF86023BB4F1A5FBF5C2C924902A -Path '/home/mwasham/.ssh/authorized_keys'

New-AzureVMConfig -ImageName 'CANONICAL__Canonical-Ubuntu-12-04-amd64-server-20120528.1.3-en-us-30GB.vhd' -InstanceSize 'Small' -Name 'linuxwithcert' |
	Add-AzureProvisioningConfig -Linux -LinuxUser 'mwasham' -Password 'somepass@1' -SSHPublicKeys $sshKey |
	New-AzureVM -ServiceName $service
Note: The -Certificates and -SSHPublicKeys parameters are arrays so they can accept multiple certificates.
-SSHPublicKeys $sshKey1,$sshKey2For Linux there is also the -SSHKeyPairs parameter for passing a key pair instead of just the public key. -Certificates can handle both types on Windows.
<Return to section navigation list>
Live Windows Azure Apps, APIs, Tools and Test Harnesses
• Bruno Terkaly (@brunoterkaly) explained How To Take Photographs From Windows 8 Applications And Automatically Upload Them To The Cloud–Part 1 of 6 in an 8/25/2012 post:
Introduction
This post will provide techniques that you can use to take and automatically upload photographs from Windows 8 applications.
- The techniques presented can be used to upload practically anything to the cloud.
- PDFs, Videos, Word Documents, Web Pages, JavaScript js files, etc
- Nick Harris did a great job delivering this content (and more) at TechEd North America and Europe. You can read more here: http://www.nickharris.net/
- Windows 8 is a connected operating system.
- It has been from the ground up to interface with the web and networking in general.
- Storing Photographs in the Cloud
- The Windows Azure storage service offers two types of blobs, block blobs and page blobs.
- You specify the blob type when you create the blob.
- Page Blobs
- Page blobs are a collection of 512-byte pages optimized for random read and write operations.
- Writes to page blobs happen in-place and are immediately committed to the blob.
- The maximum size for a page blob is 1 TB.
- Block Blobs
- Block blobs let you upload large blobs efficiently.
- The maximum size for a block blob is 200 GB, and a block blob can include no more than 50,000 blocks.
- You can set the number of -threads used to upload the blocks in parallel using the ParallelOperationThreadCount property.
- Block Blobs are appropriate for media file serving, whereas Page Blobs are optimized for other work patterns.
- For this blog series we will use block blobs.
- You will need an Azure Account to do these 6 posts. Sign up now here.
Free 90-day trial for Windows Azure

http://www.microsoft.com/click/services/Redirect2.ashx?CR_CC=200114759Visual Studio 2012 RC For Windows 8
http://www.microsoft.com/click/services/Redirect2.ashx?CR_CC=200114760
Figure 1: The inefficient approach to uploading photos
- Figure 1 shows one approach (a bad one) to uploading images to the cloud is to create a web role (our code running inside an IIS process) that accepts a byte stream from a Windows 8 application and writes to Azure Blob Storage.
- But this is less than ideal because the Web Role will end up costing a lot of money for the bandwidth.
- It will also be less scalable because it has to manage all the potential byte streams coming from Windows 8 Applications.
- A better approach is for the Windows 8 application to directly write to blob storage.
- But to make this practical, the Windows 8 application should leverage a special kind of key (like a password of sorts).
- This special key that gives the Windows 8 application special permission is called a Shared Access Signature.
- Shared Access Signature
- A Shared Access Signature is a URL that grants access rights to blobs.
- By specifying a Shared Access Signature, you can grant users who have the URL access to a specific resource for a specified period of time.
- You can also specify what operations can be performed on a resource that's accessed via a Shared Access Signature.
- Once the Windows 8 application has the Shared Access Signature, it can write directly to blob storage.
- So the first thing the Windows 8 application need to do is to request a shared access signature.
Figure 2: Windows 8 Application Requesting and Receiving Shared Access Signature
- Figure 2 represents the steps needed to get the Shared Access Signature (SAS) to the Windows 8 Application.
- SASs have a limited amount of time that they are valid to use.
- In other words, they stop working when they expire.
- This means they should be requested only when they are ready to use.
- In short, the Windows 8 application requests an SAS from a web role.
- The web role then sends the SAS to the Windows 8 application.
- Once the Windows 8 application gets an SAS, it can start reading and writing from and to blob storage.
Figure 3 - Windows 8 Talking Directly to Blob Storage
- Once the Windows 8 application takes and uploads the photograph, it can mark it as public, meaning that anyone with the url to the photograph can view it.
- I'll show this with code.
- By specifying a Shared Access Signature, you can give the Windows 8 application access to a blob container for a specified period of time.
- Shared Access Signatures allow granular access to tables, queues, blob containers, and blobs.
- A SAS token can be configured to provide specific access rights, such as read, write, update, delete, etc. to a specific table, key range within a table, queue, blob, or blob container; for a specified time period or without any limit.
- The SAS token appears as part of the resource's URI as a series of query parameters.
5 More Posts
- We have 5 more posts to address
- We will need to sign up for an Azure Trial Account
- It will be needed to create two things at the portal
- A Hosted Service
- It will be used to host our forthcoming web service in IIS inside of one of several MS data centers
- A Storage Account
- It will be used to store pictures taken by our Windows 8 application.
- It will also be used by Internet users to view these uploaded photographs
- We will create a Web Service
- You can typically choose either of these two project types: (1) Windows Communication Foundation (WCF) ; or (2) ASP.NET Web API, which is included with MVC version 4.
- We will take the newer, more modern concepts that ASP.NET Web API brings to the table, truly embracing HTTP concepts (URIs and verbs).
- Also, the ASP.NET Web API can be used to create services that use more advanced HTTP features - such as request/response headers, hypermedia constructs.
- Once we create the web service, it will be ready to support the Windows 8 application.
- The ASP.NET Web API will return a SAS to the Windows 8 application. That is all it will do.
- Both projects can be tested on a single machine during development.
- We will deploy the ASP.NET Web API Web Service to the Hosted Service (created at the portal )indicated above.
- We will need to create a Windows 8 application that has access to either a USB or built in web cam.
- The Windows 8 application will automatically request the Shared Access Signature from the web service.
- It will then use the Shared Account Signature to upload the freshly taken photograph to the Storage Account previously created.


• John Casaretto asked Could the next Xbox be an Azure Cloud-Box? in an 8/22/2012 post to the SiliconANGLE blog:
Xbox meets cloud computing. Well, that’s hardly a stretch as it’s already happening on today’s Xbox. The Xbox is already a cloud-enabled device by virtue of having Xbox Live users able to cloud-upload their saved games for access from any Xbox 360 console. However, a quick look at some strategic factors appears to point to a more, better, always cloud enablement for a next generation Xbox.
Cloud-based gaming is relatively new on the scene of course, and there are a number of examples such as OnLive, Sony (Gaikai), and even Gamestop stepping in and rolling out their own services sometime next year. A cloud-based Xbox offering would be a strategic boon, for a number of reasons. The Xbox has been keen on service and portal based strategy for some time. The thought of applying virtualization technologies such as resource allocation based user load, game type, and network conditions can make this a very scalable and robust system. Ultimately, how these things all connect remain to be seen, but there are a number of quite open but somewhat neglected indicators that point to something big.
Some of the elements that come into play when contemplating this kind of shift really take a step back in perspective on the state of technology. For one, bandwidth has long been the bane of server-based computing. New mobile network and broadband capabilities have closed that gap considerably in the last few years. The Azure platform certainly comes to mind as another valuable property in this picture. The IaaS infrastructure service from Microsoft already is host to a number of the company’s service offerings. How that infrastructure relates to the Xbox will be an interesting thing to observe.
Another advantage point brings to mind long heard statistics of the losses that Microsoft has endured in subsidizing the hardware and technology in the Xbox. A cloud-based Xbox could alleviate the demands of hardware. But it gets more interesting than that and we are diving in to bring you how these things might be aligning in the market and for Microsoft as it continues to evolve its Xbox properties.
• Matt Tilchen described Motown: Easy JavaScript Apps for Metro (Part 1) in an 8/19/2012 post to the Vectorform blog (missed when published):
The Web has arrived. Microsoft has made a bold move with Windows 8 that makes Web technology (HTML/CSS/JS) a first class citizen for building professional and commercial grade applications. Up until now, even with the advent of HTML 5 and incredibly fast JavaScript engines, Web applications have always seemed to have limitations compared to native development stacks for creating fully integrated and cutting edge user experiences. These days are over with the arrival of Windows 8 as Microsoft blends the Chakra JS engine and the hardware accelerated rendering / DOM environment of IE 10 with the new WinRT OS-level abstractions.
The WinJS libraries and bindings to WinRT provide a solid foundation for building applications but I feel that a significant gap remains. MS rightly, and I presume intentionally, left most of this gap open for the development community to fill. I created the Motown JavaScript library for Metro-style applications (HTML/CSS/JS) to fill the gap.
Motown empowers you and your team to:
- Create apps that are easy to maintain and extend
- Be more productive, freeing you to focus on the details of your app
- Make small and simple apps easily and larger more complex apps a possibility
Motown accomplishes this by:
- Eliminating glue code and boilerplate
- Providing architectural structure and modularity, eliminating spaghetti-code
- Making application architecture implicit in the configuration
- Providing clear, thoughtful and flexible APIs
In this post I will briefly introduce you to Motown by walking you through the creation of a small application that illustrates how Motown addresses one of the largest weaknesses of what Microsoft delivers out-of-the-box with WinJS. This weakness lies in how WinJS implements page navigation with regards to what it attempts to do in addition to what it does not.
Single-Page Style Navigation
Microsoft recommends that developers use a “single-page” style of navigation instead of a “multi-page” style in their applications. The idea is to prevent the browser from navigating to a different page, as if you had entered a new URL into the location field of a regular web browser. Doing this causes the browser to unload the current document, including all the images, stylesheets and JavaScript that are part of it. In a web application, or in this case a Metro-style application in JavaScript, this is obviously problematic because the unloading of the document effectively unloads your entire app. You might be able to reestablish/reinitialize your application in the new page that you navigate to but to do so would be a waste of time and system resources.
To assist developers in implementing “single-page” style navigation Microsoft provides a control they call “PageControlNavigator” in projects you create with the “Navigation Application” project tempate. The control assumes your “pages” use Microsoft’s WinJS.UI.Pages API. The former provides integration with the WinJS.Navigation API so that calls to “navigate(), back()” etc. use the functions defined in the latter to dynamically load content from other HTML files into the main document. As you navigate to different pages the PageControlNavigator swaps in the new page for the old page.
Using the Fragment Loader
Under the hood, the calls PageControlNavigator makes to the WinJS.UI.Pages API are using the WinJS fragment loader (WinJS.UI.Fragments). The fragment loader is a clever piece of code that allows you to load the content of an arbitrary HTML file into an element in the existing document. When you call WinJS.UI.Fragments.render() the loader goes out and intelligently parses the specified HTML file and first takes everything between then <body> tags and appends it to the “target” element you passed in. Then it takes all of the stylesheet and script references it encounters during parsing and adds them to the existing document. This functionality is the key to implementing the “single-page” navigation style.
The advantages to this approach are that it allows you build your application in a modular way. You can lazily load your application a page at a time (which improves performance and memory consumption), and as mentioned before, you do not have to completely unload/load your app as you do in the “multi-page” style.
Problems with the WinJS.UI.Pages API and PageControlNavigator
The WinJS.UI.Pages API and PageControlNavigator, both new as of the Consumer Preview release of Windows 8, take some good steps towards reducing the complexity of implementing “single-page” style navigation in your application. However, I think there are some flaws in this approach and Motown presents you with a better solution.
The first problem lies in the semantics of specifying the Page control’s URI with WinJS.UI.Pages.define(uri). This feels awkward and redundant. Why do you need to specify the URI of the HTML file the Page control is supposed to work with if that HTML file is already including the script defining the Page control? If the intent is to relate the Page control to the particular HTML file with a URI then that information is already implicit due to the inclusion.
To be fair this implementation does allow you to move the inclusion of the Page control’s script to another file and still maintain the relationship. However, if you do move the inclusion of the script defining the Page control for the URI to a different file (e.g., the default.html or main page) you would sacrifice modularity and the performance advantages of lazily loading the script in the HTML file that it “belongs to”.Secondly, using WinJS.UI.Pages.define(uri) strongly couples your application’s logic to its presentation. In other words, with an MVC architecture in mind, the controller (the Page control) is strongly coupled to the view (HTML file) because of this hard-coded specification of the URI.
How would you reuse any of the logic defined in the Page control with a different view without introducing additional complexity? Ideally, you should be able to to use an arbitrary view with a particular controller and vice-versa, as long as the references the controller expects to find in the view are available using various querying functions (getElementById, queryAll, etc). If you want to share controller logic with this approach you will at least need to use “WinJS.UI.Pages.define(uri)” for each view you want to reuse the controller logic with and then come up with a way to pass the rest of the controller implementation into the second parameter of “WinJS.UI.Pages.define()”.Finally, PageControlNavigator as implemented does not allow your pages to maintain their state in between navigations. Every time you navigate to a page, whether you have previously loaded the page or not, the PageControlNavigator implementation loads the page from scratch every time.
Think about a common situation in an application where you navigate to a “details” page from a “master” page. Should you really have to reload the whole master page from scratch each time you finish reviewing details and want to return to the master page? In order to give the user a seamless navigation experience where the master page is exactly the same as it was when he or she left you end up having to write code to save your page’s state and then “reset” it once the page is loaded to its initial state. This may be a good technique for situations where you want to be conservative with pages that consume a lot of memory, but it should be the exception and not the norm. Typical pages are most likely quite simple and do not significantly impact memory consumption. The other problem with this approach is that it invites memory leaks. Loading and then throwing away the page contents on every navigation has a tendency to produce a lot of DOM turnover. Developers will need to be careful with referencing DOM objects from closures and other be aware of other structural subtleties. In many ways this issue is a smaller version of the problem that PageControlNavigator and WinJS.UI.Pages is trying to solve in the first place, which is to keep you from having to reinitialize your application’s state across page navigations.
Using Motown to Avoid Pitfalls and Accelerate Application Development
Motown addresses all of these problems, keeps all of the benefits and goes even further with additional bells and whistles to help you create “Fast & Fluid™” navigations between pages without requiring redundant configuration or introducing coupling into your application. Let’s take a look at a basic Motown application and see how all of this is realized.
If you want to follow along with a real project download or clone the most recent version of Motown from my GitHub repository and install the Visual Studio template plugin before creating a new project. Follow these steps to do so:
- Download or clone Motown using the links above and unzip if you download a release archive.
- Copy the “MotownAppTemplate” folder from the root Motown directory into %HOMEPATH%\Documents\Visual Studio 2012\Templates\ProjectTemplates\JavaScript.
- Open Visual Studio and create a “New Project”.
- In the “New Project” dialog select: “Templates -> JavaScript” and then “Motown App” from the list on the right.
- Enter a name for your project and click “OK”.
When you create a new Motown application with the VS template you begin with a project that looks like this on disk:
+ Project Root
|--+ views
|      |-- home.html
|--+ controllers
|--+ models
|--+ images
|--+ css
|     |--motown.css
|     |--home.css
|--+ js
|    |-- motown.js
|    |-- application.js
|-- default.html
Following typical Visual Studio project conventions for Metro-style JavaScript apps, the new application is configured to load the “default.html” file as the “Start Page”. However this page does not really have any content of its own and you will rarely need to edit it. You use it to bootstrap your application and it becomes the place in the DOM into which Motown loads your pages and displays them during navigation. In short, this is your “single page” in your “single-page” style navigation app.
The default.html file loads the motown.css stylesheet and the motown.js script first. Then it loads the “application.js” file, which is the place where you configure your application. Open this file and you will find the following:
'use strict';
MT.configApp({
name:'Application Name',
namespace:/* Your Namespace Her e */'',
pages: [
'home'
]
});Calling ‘MT.configApp()’ is all the code you need to start your application and load it’s home page. By default, Motown loads the page named “home”, and as you can see in the configuration, it is the only page we are currently defining in the ‘pages’ configuration property array. You will also notice that we have a view in the “views” folder named “home.html”. When you navigate to the “home” page Motown will automatically locate the view for the page in the “views” folder based on the naming convention: views/<pagename>.html
Go ahead and build/run the app. You will see the contents of the “home” page after your app launches. …

Matt continues with detailed examples of Motown operations.
Himanshu Singh (@himanshuks) posted Cross-post: Windows Azure Node.js Developer Center Homepage Redesign to the Windows Azure blog on 8/23/2012:
The Node.js Developer Center is designed to provide you with the resources and tools you need so you can develop Node.js apps on Windows Azure. A new post by Windows Azure Program Manager Yavor Georgiev discusses the newly redesigned Node.js Developer Center homepage. It’s a great read if you’re interested in learning how we base changes to our developer resources upon usability patterns and your user feedback so that its it’s easy for you to find the information and guidance you need.
As Yavor notes in the post, there are more changes to come for the Developer Center so be sure to tell the team what you think about the changes already made or if you have other suggestions by posting a comment to his post. Check out Yavor’s post here.
Himanshu Singh (@himanshuks, pictured below) reported Directions on Microsoft Publishes Report: What Windows Azure Means to Software ISVs on 8/23/2012:
Editor's Note: Today's post comes from Jamin Spitzer, Senior Director, Platform Strategy at Microsoft.

Directions on Microsoft recently published a new report entitled “What Windows Azure Means to Software ISVs”. It represents an excellent independent view on Windows Azure. The report is both an exploration of what’s in Windows Azure along with a good overview of the business issues facing ISVs who want to offer their solutions from the cloud. Sections include everything from an introduction to the services that make up Windows Azure and how we charge for the service, to an explanation of a set of paths to get from where you are, to having a live service running in the cloud. Other sections talk about various business model choices along with an exploration of why you should move to the cloud. The report can be found here.
Adam Hoffman (@stratospher_es) described how to work around an Error Creating Database in LocalDB using SQL Server Management Studio 2012 (SSMS) on 8/23/2012:
Ok, in the previous post we determined how we could attach to LocalDB using SSMS 2012. Next stop, creating a database. Turns out that it's potentially harder than it seems at first.
Now that I've gotten connected, I went to try to create a database. Right click on the connection, create new database. Fill in the name, press OK.
TITLE: Microsoft SQL Server Management Studio
------------------------------

Create failed for Database 'test'.  (Microsoft.SqlServer.Smo)

For help, click: http://go.microsoft.com/fwlink?ProdName=Microsoft+SQL+Server&ProdVer=11.0.2100.60+((SQL11_RTM).120210-1846+)&EvtSrc=Microsoft.SqlServer.Management.Smo.ExceptionTemplates.FailedOperationExceptionText&EvtID=Create+Database&LinkId=20476

------------------------------
ADDITIONAL INFORMATION:

An exception occurred while executing a Transact-SQL statement or batch. (Microsoft.SqlServer.ConnectionInfo)

------------------------------

A file activation error occurred. The physical file name 'test.mdf' may be incorrect. Diagnose and correct additional errors, and retry the operation.
CREATE DATABASE failed. Some file names listed could not be created. Check related errors. (Microsoft SQL Server, Error: 5105)

For help, click: http://go.microsoft.com/fwlink?ProdName=Microsoft%20SQL%20Server&ProdVer=11.00.2100&EvtSrc=MSSQLServer&EvtID=5105&LinkId=20476

------------------------------
BUTTONS:

OK
------------------------------
... and digging into the details, looks like the following:
===================================

Create failed for Database 'test'.  (Microsoft.SqlServer.Smo)

------------------------------
For help, click: http://go.microsoft.com/fwlink?ProdName=Microsoft+SQL+Server&ProdVer=11.0.2100.60+((SQL11_RTM).120210-1846+)&EvtSrc=Microsoft.SqlServer.Management.Smo.ExceptionTemplates.FailedOperationExceptionText&EvtID=Create+Database&LinkId=20476

------------------------------
Program Location:

   at Microsoft.SqlServer.Management.Smo.SqlSmoObject.CreateImpl()
   at Microsoft.SqlServer.Management.SqlManagerUI.CreateDatabaseData.DatabasePrototype.ApplyChanges(Control marshallingControl)
   at Microsoft.SqlServer.Management.SqlManagerUI.CreateDatabase.DoPreProcessExecution(RunType runType, ExecutionMode& executionResult)
   at Microsoft.SqlServer.Management.SqlMgmt.SqlMgmtTreeViewControl.DoPreProcessExecutionAndRunViews(RunType runType)
   at Microsoft.SqlServer.Management.SqlMgmt.SqlMgmtTreeViewControl.ExecuteForSql(PreProcessExecutionInfo executionInfo, ExecutionMode& executionResult)
   at Microsoft.SqlServer.Management.SqlMgmt.SqlMgmtTreeViewControl.Microsoft.SqlServer.Management.SqlMgmt.IExecutionAwareSqlControlCollection.PreProcessExecution(PreProcessExecutionInfo executionInfo, ExecutionMode& executionResult)
   at Microsoft.SqlServer.Management.SqlMgmt.ViewSwitcherControlsManager.RunNow(RunType runType, Object sender)

===================================

An exception occurred while executing a Transact-SQL statement or batch. (Microsoft.SqlServer.ConnectionInfo)

------------------------------
Program Location:

   at Microsoft.SqlServer.Management.Common.ServerConnection.ExecuteNonQuery(String sqlCommand, ExecutionTypes executionType)
   at Microsoft.SqlServer.Management.Common.ServerConnection.ExecuteNonQuery(StringCollection sqlCommands, ExecutionTypes executionType)
   at Microsoft.SqlServer.Management.Smo.ExecutionManager.ExecuteNonQuery(StringCollection queries)
   at Microsoft.SqlServer.Management.Smo.SqlSmoObject.ExecuteNonQuery(StringCollection queries, Boolean includeDbContext)
   at Microsoft.SqlServer.Management.Smo.SqlSmoObject.CreateImplFinish(StringCollection createQuery, ScriptingPreferences sp)
   at Microsoft.SqlServer.Management.Smo.SqlSmoObject.CreateImpl()

===================================

A file activation error occurred. The physical file name 'test.mdf' may be incorrect. Diagnose and correct additional errors, and retry the operation.
CREATE DATABASE failed. Some file names listed could not be created. Check related errors. (.Net SqlClient Data Provider)

------------------------------
For help, click: http://go.microsoft.com/fwlink?ProdName=Microsoft%20SQL%20Server&ProdVer=11.00.2100&EvtSrc=MSSQLServer&EvtID=5105&LinkId=20476

------------------------------
Server Name: (localdb)\v11.0
Error Number: 5105
Severity: 16
State: 2
Line Number: 1


------------------------------
Program Location:

   at Microsoft.SqlServer.Management.Common.ConnectionManager.ExecuteTSql(ExecuteTSqlAction action, Object execObject, DataSet fillDataSet, Boolean catchException)
   at Microsoft.SqlServer.Management.Common.ServerConnection.ExecuteNonQuery(String sqlCommand, ExecutionTypes executionType)
So what's going on here? I open up a query window, type the following and run it:
create database [test]
go
That works fine? What gives?
Rooting around the file system a bit gives the answer. When creating a database via DDL script, like this, the default output directory is "c:\users\Adam" (yours will be your name, of course), and the database files end up in that directory. Looking at my drive, I now see test.mdf and test_log.mdf in that directory. However, looking at where SSMS wants to create them reveals the problem. In the database files section of the General page in the New Database dialog, scroll over to the right and have a look at the Path location. It's set to <default path>. Now click on the dot-dot-dot (ellipsis) and take a look at what that default path is...
C:\Users\Adam\AppData\Local\Microsoft\Microsoft SQL Server Local DB\Instances\v11.0That's not gonna work, and besides, I'd never find the MDF file again if I put it in there.
So, chang[ing] that path to "c:\users\Adam" in the Create Database dialog fixes the problem, or just use the "create database" DDL instead.

Clint Edmonson (@clinted) reported (belatedly) Windows Azure Training Kit – August 2012 Released on 8/22/2012:
In this release of the training kit we have delivered 41 HOLs covering a wide variety of bug fixes and screen shot updates for Visual Studio 2012.
We now have 35 Presentations with new content surrounding Windows Azure SQL Database, SQL Federation, Reporting and Data Sync (4) as well as Security & Identity (1); and Building Scalable, Global, and Highly Available Web Apps (1).

Brian Swan (@brian_swan) described Cloud Services Management via the Windows Azure SDK for PHP in an 8/22/2012 post:
I am happy to announce that the Windows Azure team has added cloud services support to the ServiceManagement API in the Windows Azure SDK for PHP. A few weeks ago I wrote a post (Service Management with the Windows Azure SDK for PHP) that outlined the service management functionality that was available in the Windows Azure SDK for PHP at that time. Since then, the Windows Azure team has added support for cloud services management. The team has also published a tutorial on using the service management API: How to use service management from PHP. Since that tutorial contains all the information you need to get started, I will simply cover the highlights in this post.
What is service management?
The Windows Azure Service Management REST API allows you to programmatically create, modify, and delete Windows Azure services (such as storage services and cloud services). In applications that require it, the functionality available in the Windows Azure management portal can be automated with the service management API. The ServiceManagement class in the Windows Azure SDK for PHP currently wraps much of the Windows Azure Service Management REST API. Functionality that has not yet been wrapped is on the road map for the Windows Azure team.
What’s new in the ServiceManagement class?
As I wrote a few weeks ago, the ServiceManagement class in the Windows Azure SDK for PHP includes methods for managing storage services and affinity groups. With the latest release of the SDK, methods have been added to support cloud service management. The new methods include createHostedService, createDeployment, changeDeploymentConfiguration, and swapDeployment (among others). These methods will allow you to create a new cloud service (formerly called a hosted service) with createHostedService:
require_once 'vendor\autoload.php';use WindowsAzure\Common\ServicesBuilder;use WindowsAzure\ServiceManagement\Models\CreateServiceOptions;use WindowsAzure\Common\ServiceException;try{// Create REST proxy.$serviceManagementRestProxy = ServicesBuilder::getInstance()->createServiceManagementService($conn_string);$name = "myhostedservice";$label = base64_encode($name);$options = new CreateServiceOptions();$options->setLocation('West US');// Instead of setLocation, you can use setAffinityGroup// to set an affinity group.$result = $serviceManagementRestProxy->createHostedService($name, $label, $options);}catch(ServiceException $e){// Handle exception based on error codes and messages.// Error codes and messages are here:// http://msdn.microsoft.com/en-us/library/windowsazure/ee460801$code = $e->getCode();$error_message = $e->getMessage();echo $code.": ".$error_message."<br />";}After creating a new cloud service, you can deploy your code to the service with createDeployment:
require_once 'vendor\autoload.php';use WindowsAzure\Common\ServicesBuilder;use WindowsAzure\ServiceManagement\Models\DeploymentSlot;use WindowsAzure\Common\ServiceException;try{// Create REST proxy.$serviceManagementRestProxy = ServicesBuilder::getInstance()->createServiceManagementService($conn_string);$name = "myhostedservice";$deploymentName = "v1";$slot = DeploymentSlot::PRODUCTION;$packageUrl = "URL_for_.cspkg_file";$configuration = base64_encode(file_get_contents('path_to_.cscfg_file'));$label = base64_encode($name);$result = $serviceManagementRestProxy->createDeployment($name, $deploymentName, $slot, $packageUrl,$configuration, $label);$status = $serviceManagementRestProxy->getOperationStatus($result);echo "Operation status: ".$status->getStatus()."<br />";}catch(ServiceException $e){// Handle exception based on error codes and messages.// Error codes and messages are here:// http://msdn.microsoft.com/en-us/library/windowsazure/ee460801$code = $e->getCode();$error_message = $e->getMessage();echo $code.": ".$error_message."<br />";}Note: A project must be deployed to a cloud service as .cspkg file, and the file must be stored as a blob in a storage account under the same subscription as the cloud service.
Once your code is deployed, you can make changes to the deployment by uploading a new service configuration (.cscfg) file. For example, if you wanted to scale a deployment to run 3 instances of your application, you would edit the <Instances> element (<Instances count=”3” />) in a local version of the service configuration file and upload it to your service with changeDeploymentConfiguration:
require_once 'vendor\autoload.php';use WindowsAzure\Common\ServicesBuilder;use WindowsAzure\ServiceManagement\Models\ChangeDeploymentConfigurationOptions;use WindowsAzure\ServiceManagement\Models\DeploymentSlot;use WindowsAzure\Common\ServiceException;try{// Create REST proxy.$serviceManagementRestProxy = ServicesBuilder::getInstance()->createServiceManagementService($conn_string);$name = "myhostedservice";$configuration = file_get_contents('path to .cscfg file');$options = new ChangeDeploymentConfigurationOptions();$options->setSlot(DeploymentSlot::PRODUCTION);$result = $serviceManagementRestProxy->changeDeploymentConfiguration($name, $configuration, $options);$status = $serviceManagementRestProxy->getOperationStatus($result);echo "Operation status: ".$status->getStatus()."<br />";}catch(ServiceException $e){// Handle exception based on error codes and messages.// Error codes and messages are here:// http://msdn.microsoft.com/en-us/library/windowsazure/ee460801$code = $e->getCode();$error_message = $e->getMessage();echo $code.": ".$error_message."<br />";}If you want to swap deployments between the staging and production environments, you can do so with swapDeployment:
require_once 'vendor\autoload.php';use WindowsAzure\Common\ServicesBuilder;use WindowsAzure\Common\ServiceException;try{// Create REST proxy.$serviceManagementRestProxy = ServicesBuilder::getInstance()->createServiceManagementService($conn_string);$result = $serviceManagementRestProxy->swapDeployment("myhostedservice", "v2", "v1");}catch(ServiceException $e){// Handle exception based on error codes and messages.// Error codes and messages are here:// http://msdn.microsoft.com/en-us/library/windowsazure/ee460801$code = $e->getCode();$error_message = $e->getMessage();echo $code.": ".$error_message."<br />";}Note: The example above assumes that you have a deployment in staging with deployment name “v2” and a deployment in production with name “v1”. After calling swapDeployment, “v2” will be in production and “v1” will be in staging. The swapDeployment method will still work if you only have a single deployment (in staging or production). For example, suppose you had deployment “v1” in staging and wanted to promote it to production (even though you have no deployment in the production environment at the time). You can do this by calling swapDeployment(“myhostedservice, “v1”, “somename”) where “somename” is simply a placeholder deployment name.
As I mentioned earlier, there is a lot more detail (and lots more examples) about the entire ServiceManagement class in this tutorial: How to use service management from PHP. If you read the tutorial and exercise the service management API, we’d love to hear your feedback in the comments.

<Return to section navigation list>
Visual Studio LightSwitch and Entity Framework 4.1+
Andy Kung of the Visual Studio LightSwitch Team continued his series with Course Manager VS 2012 Sample Part 5 – Detail Screens on 8/24/2012:
This week I’ve been writing a series of articles on building the Course Manager Sample, if you missed them:
Course Manager VS 2012 Sample Part 1 – Introduction
Course Manager VS 2012 Sample Part 2 – Setting up Data
Course Manager VS 2012 Sample Part 3 – User Permissions & Admin Screens
Course Manager VS 2012 Sample Part 4 – Implementing the WorkflowYou can download the sample available in both VB and C# online here:
.jpg)
LightSwitch Course Manager End-to-End Application (Visual Studio 2012)
In Part 4, we identified the main workflow we want to implement. We created screens to add a student, search for a student, and register a course. In this post, we will continue and finish the rest of the workflow. Specifically, we will create detail screens for student and section records and a course catalog screen that allows user to filter sections by category.
Screens
Student Detail
Remember the Search Students screen we built in Part 4? If you click on a student link in the grid, it will take you to a student detail screen.
This is pretty cool. But wait… we didn’t really build this screen! In reality, LightSwitch recognizes that this is a common UI pattern, and therefore it generates a default detail screen for you on the fly. Of course, we can always choose to build and customize a detail screen, as we’re about to do for Student and Section.
Adding a detail screen
Create a screen using “Details Screen” template on Student table. In this screen, we want to also include student’s enrollment data, so let’s check the “Student Enrollments” box.
Make sure “Use as Default Details Screen” is checked. It means that this detail screen will be used as the detail screen for all student records by default. In other words, if you click on a student link, it will take you to this detail screen instead of the auto-generated one. As a side note, if you forget to set it as the default details screen here. You can also set the property of the Student table (in table designer).
By default, the details screen template lays out the student info on top and the related enrollment data on the bottom.
We can make similar layout tweaks to the student portion as we did for “Create New Student” screen in Part 4 (such as moving the student picture to its own column, etc).
Including data from related tables
I’d like to draw your attention to the Enrollments portion of the screen. Since Enrollment is a mapping table between Student and Section, the grid shows you a student (shown as a summary link) and a section (shown as a picker). Neither of the fields is very useful in this context. What we really want is to show more information about each section (such as title, meeting time, instructor, etc.) in the grid. Let’s delete both Enrollment and Section under Data Grid Row.
Use the “+ Add” button and select “Other Screen Data.”
It will open the “Add Screen Data” dialog. Type “Section.Course.Title”. You can use Intellisense to navigate through the properties in this dialog. Click OK.
The Title field will now appear in the grid. Follow similar steps to add some other section fields. The “Add Screen Data” dialog is a good way to follow the table relationship and include data that is many levels deep.
Making a read-only grid
Now we have an editable grid showing the sections this student is enrolled in. However, we don’t expect users to directly edit the enrollments data in this screen. Let’s make sure we don’t use editable controls (ie. TextBox) in grid columns. A quick way to do this is to select the “Data Grid Row” node. Check “Use Read-only Controls” in Properties. It will automatically selects read only controls for the grid columns (ie. TextBox to Label).
We also don’t expect users to add and delete the enrollments data directly in the data grid. Let’s delete the commands under data grid’s “Command Bar” node. In addition, data grid also shows you an “add-new” row for inline add.
We can turn it off by selecting the “Data Grid” node and uncheck “Show Add-new Row” in Properties.
Launching another screen via code
In Part 4, we’ve enabled the Register Course screen to take a student ID as an optional screen parameter. The Student picker will be automatically set when we open the Register Course screen from a Student detail screen. Therefore, we need a launch point in the student detail screen. Let’s add a button on the enrollment grid.
Right click on the Command Bar node, select Add Button.
Name the method RegisterCourse. This is the method called when the button is clicked.
Double click on the added button to navigate to the screen code editor.
Write code to launch the Register Course screen, which takes a student ID and a section ID as optional parameter.
Private Sub RegisterCourse_Execute()
    ' Write your code here.
    Application.ShowRegisterCourse(Student.Id, Nothing)
End Sub
That’s it for Student Detail screen. F5 and go to a student record to verify the behavior.
Section Detail
Now that we’ve gone through customizing the student detail screen, let’s follow the same steps for Section. Please refer to the sample project for more details.
- Create a screen using “Details Screen” template on Section table. Include section enrollments data
- Tweak the UI and make the enrollment grid read-only
- Add a button to the enrollment grid to launch Register Course screen
Course Catalog
In Course Catalog screen, we’d like to display a list of course sections. We’d also like to filter the list by the course category. In Part 2, we’ve created a custom query for exactly this purpose called SectionsByCategory. It takes a category ID as a parameter and returns a list of sections associated with the category. Let’s use it here!
Create a screen using “Search Data Screen” template. Choose SectionsByCategory as screen data.
In screen designer, you will see SectionsByCategory has a query parameter called CategoryId. It is also currently shown as a TextBox on the screen. User can enter a category ID via a text box to filter the list. This is not the most intuitive UI. We’d like to show a category dropdown menu on the screen instead.
Select SectionCategoryId (you can see it is currently bound to the query parameter) and hit DELETE to remove this data item. After it is removed, the text box will also be removed from the visual tree.
Click “Add Data Item” button in the command bar. Use the “Add Data Item” dialog to add a local property of Category type on the screen.
Select CategoryId query parameter, set the binding via property.
Drag and drop the Category property to the screen content tree (above the Data Grid). Set the “Label Position” of Category to “Top” in Properties.
Follow the Course Manager sample for some layout tweaks and show some columns as links (as we did in Search Students). Now, if you click on a section link. It will open up the Section Detail screen we customized!
Conclusion
In this post, we’ve completed the main workflow in Course Manger. We are almost done! All we need is a Home screen that provides some entry points to start the workflow.
Setting a screen as the home (or startup) screen is easy. We’ve also made it easy to lay out static images, text, and group boxes on the screen. In the next post, we will conclude the Course Manager series by finishing our app with a beautiful Home screen!
Coming up next: Course Manager Sample Part 6
5– Home Screen


Andy Kung of the Visual Studio LightSwitch Team described Course Manager VS 2012 Sample Part 4 – Implementing the Workflow on 8/23/2012:
Welcome to part 4 of the Course Manager series! If you missed the previous posts you can read them here:
Course Manager VS 2012 Sample Part 1 – Introduction
Course Manager VS 2012 Sample Part 2 – Setting up Data
Course Manager VS 2012 Sample Part 3 – User Permissions & Admin ScreensIn Part 3, we’ve set up a Desktop application with Windows authentication. We’ve created some “raw data” screens and wrote permission logic. In this post, we will dive into the main workflows of Course Manager. You can download the sample available in both VB and C# online here:
LightSwitch Course Manager End-to-End Application (Visual Studio 2012)
We will be covering quite a few screens in the remainder of the series. Some of them are fairly straightforward. In which case, I will briefly highlight the concepts and reference you to the online sample. Others are more interesting and require some explanations. I will walk through these examples step-by-step. Let’s begin!
Workflow
Course Manager is designed with 4 main entry points or workflows. From the Home screen, you can:
- Create a new student => view student detail => register a course for this student
- Search for an existing student => view student detail => register a course for this student
- Browse course catalog => view section detail => register this course for a student
- Register a course for a student
Therefore, the rest of the series will focus on creating the following screens:
- Create New Student
- Search Students
- Register Course
- Course Catalog
- Student Detail
- Section Detail
- Home
Screens
Create New Student
Create a screen using “New Data Screen” template on Student table.
By default, the screen vertically stacks up all the controls (using Rows Layout). In our case, we’d like to show the Picture on the left column and the rest of the fields on the right column.
To do this, first change “Student Property” from “Rows Layout” to “Columns Layout.” Each node under a “Columns Layout” will represent a column.
We only want 2 columns on the screen. So essentially, we need 2 group nodes under “Columns Layout.” Each group node represents a column and contains some student fields. Right click “Student Property” and select “Add Group” to add a group node under “Student Property.” Repeat and create a 2nd group node.
We’d like the picture to be in the first column, so drag and drop Picture under the first group node. Set the image’s width and height to 150 and 200 via Properties to make it bigger. We don’t want the picture to display any label, so set “Label Position” to “None.” We’d also like the first column to fit tightly with the Picture, select the first group and set its “Horizontal Alignment” to “Left” via Properties.
Drag and drop the rest of the fields under the 2nd group node to make them appear in the 2nd column.
Let’s hit F5 to see the screen. As expected, we now have 2 columns on the screen. The first column shows a big image editor and the 2nd column contains the rest of the student fields. We can also use “Address Editor” to display the address fields instead, as we did in Part 3.
Search Students
Create a screen using “Search Data Screen” template on Student table.
In screen designer, you will get a Data Grid of students showing all student fields. Let’s make the grid easier to read by removing some non-essential fields. Delete Picture, Street, City, State from Data Grid Row.
We’d also need a way for the user to drill into a record to see more details. One feature worth mentioning here is the ability to show a label-based control as links (provided the field is part of a record). When a link is clicked, the detail screen of the related record will open.
Show a label as link
Select First Name under Data Grid Row. Check “Show as Link” in Properties. It will be shown as a column of links in the running app. When a link is click, the corresponding Student detail screen will open. Notice you can also choose a target screen to launch in the Properties. This is useful if you have multiple customized details screens for Student (we will cover this in the later post).
Notice the Search Data Screen template automatically sets the first column to show as links in this case. But you can do the same thing to any other columns.
Register Course
From Part 2, we know the Enrollment table is essentially a mapping table between Student and Section table. To register a course is to create an Enrollment record in the database. Let’s create a “New Data Screen” called “RegisterCourse” on Enrollment table.
In the screen designer, you will see the EnrollmentProperty, which is the new enrollment record we are creating, on the data list. EnrollmentProperty’s Section and Student fields are represented as 2 data pickers on the screen content tree.
Using a custom query for data picker
By default, the pickers on the screen will show you all available students and sections. In our case, when a student is selected, we only want to show the sections this student has not yet enrolled in.
In Part 2, we’ve already created a custom query called AvailableSections. This query takes a StudentId as parameter and returns a list of Sections this student has not enrolled in. This is exactly what we need! Click “Add Data Item” button in the command bar. Use the “Add Data Item” dialog to add AvailableSections on the screen.
Select StudentId query parameter and bind it to EnrollmentProperty’s Student.Id field in the Properties.
Finally, select the Section picker on the screen. Set the Choices property to AvailableSections. The source of the picker is now set to the custom query instead of the default “select all.”
Adding local screen choice list properties
Now we have a Section picker that filters its list of Sections based on a Student. We’d also like to further filter it down by Academic Year and Academic Quarter. We need a choice list picker for Academic Year and a choice list picker for Academic Quarter on the screen.
LightSwitch enables the ability to add a choice list as a screen property. Use “Add Data Item” dialog, add a local property of Integer type called AcademicYear. Mark it as not required since we’d like it to be an optional filter.
Select the newly created AcademicYear. Click “Choice List” in Properties. Enter choice list options in the dialog.
Create a group node on the screen content tree using “Columns Layout.”
Use “+ Add” button to add “Academic Year.” A picker will be added to the screen.
Follow similar steps. Add an optional local property of String type called AcademicQuarter. Set its choice options to Fall/Winter/Spring/Summer. Add it below the Academic Year picker.
Applying additional filters on custom query
Now we have Academic Year and Academic Quarter pickers on the screen. We need to wire them up to the custom query. This means that we need to create 2 additional filters to the AvailableSection query. To do this, click “Edit Query” on AvailableSections to go to query editor.
Add 2 optional parameterized filters for AcademicYear and AcademicQuarter. We are marking the parameters as optional so if they are not specified, it still returns results.
Click “Back to RegisterCourse” link on top to go back to the screen designer. You will see AvailableSections now has 2 more parameters.
Select AcademicYear parameter, set parameter binding to AcademicYear, which is the local choice list property we just added.
Follow the same steps to bind AcademicQuarter.
Using optional screen parameters to pre-set screen fields
Our workflow indicates that we can also navigate to Register Course screen from a student or section screen. Wouldn’t it be nice if we could pre-populate the student or section picker in this case? To achieve this, we need to create optional screen parameters.
Use “Add Data Item” dialog, add a local property of Integer type called StudentId. Mark it as not required since it will be used as an optional parameter.
In the Properties, check “Is Parameter.” Repeat the same steps to create a local property of Integer type called SectionId. Set it as an optional parameter.
Just a side note, if a screen has required screen parameters, it will not be shown on the menu of the running application. This makes sense because the screen can only be opened with parameters. In our case, we have 2 optional screen parameters. “Register Course” screen will still show up in the menu since it can be open with or without screen parameters.
Now we write logic to handle the screen parameters if they’re available. Use the “Write Code” dropdown menu and select RegisterCourse_InitializeDataWorkspace method.
At the end of the method, add:
' StudentId is an optional screen parameter
If (StudentId.HasValue) Then
    ' If StudentId is set, run a query to get the student record, pre-set the student field on the screen
    Me.EnrollmentProperty.Student = DataWorkspace.ApplicationData.Students_Single(StudentId)
End If

' SectionId is an optional screen parameter
If (SectionId.HasValue) Then
    ' If SectionId is set, run a query to get the section record, pre-set the section field on the screen
    Me.EnrollmentProperty.Section = DataWorkspace.ApplicationData.Sections_Single(SectionId)
End If
We check if the screen is supplied with a StudentId (or SectionId) parameter. If so, we run a query to get the student (or section) record and pre-set the field of the EnrollmentProperty on the screen.
Adjusting screen layout with runtime screen designer
Let’s hit F5 to run the application and make some layout adjustments on the fly. Click “Design Screen” button in the ribbon to launch the runtime screen designer.
Select the screen root node. Make the following tweaks and Save the design.
- Label Position = Top
- Horizontal Alignment = Left
- Vertical Alignment = Top
- Move Student picker above Section picker
- Use Modal Window Picker control for both Student and Section
Ahh. Much better!
Conclusion
We have covered quite a few topics in this post! We created “Create New Student,” “Search Students,” and “Register Course” screens.
During the process, we customized screen layouts, added detail links, utilized custom queries, created screen parameters, etc. These are all very useful techniques for your own apps. We will continue the rest of the screens in Part 5.
Coming up next: Course Manager Sample Part 5 – Detail Screens


Andy Kung of the Visual Studio LightSwitch Team posted Course Manager VS 2012 Sample Part 3 – User Permissions & Admin Screens (Andy Kung) on 8/22/2012:
Welcome to part 3 of the Course Manager series! If you missed the previous posts you can read them here:
Course Manager VS 2012 Sample Part 1 – Introduction
Course Manager VS 2012 Sample Part 2 – Setting up DataIn Part 2, we created tables, relationships, queries, and learned some useful data customizations. Now we’re ready to build screens. One of the first things I usually like to do (as a LightSwitch developer) is to build some basic screens to enter and manipulate test data. They can also be useful end-user screens for a data admin. I call them the “raw data screens.” Obviously we don’t want to give all users access to these special screens. They need to be permission based.
In this post, we will set up permissions, create raw data screens, write permission logic, and learn some screen customization techniques. Let’s continue our “SimpleCourseManager” project from Part 2! You can download the full sample application here:
LightSwitch Course Manager End-to-End Application (Visual Studio 2012)
Setting up the App
Course Manager is a Desktop application using Windows authentication. Let’s go ahead a set that up. Double click on Properties in the Solution Explorer to open the application designer.
Application Type
Under “Application Type” tab, make sure Desktop is selected (this is the default).
Application Logo
We can also specify a logo for the application. Under “General Properties” tab, select a logo image from your computer.
Authentication
Under the “Access Control” tab, select “Use Windows authentication” and “Allow any authenticated Windows user.” Any authenticated Windows user has access to the application. We are going to define special permissions on top of this general permission.
User Permissions
You will find a built-in SecruityAdministration in the list of permissions. LightSwitch uses this permission to show or hide the built-in screens that define Users and Roles. As the developer, I want to make sure that I have all the permissions under debug mode (so I can see all the screens). Check “Granted for debug” box for SecurityAdministration.
Let’s add another permission called “ViewAdminScreen” to the list. We will use it to show or hide our raw data screens later. Again, check “Granted for debug” box.
At this point, if you hit F5 to launch the running app, you will see a Desktop application with your Windows credential at the upper right corner. You will also see the Administration menu group with the built-in Roles and Users screens (because we’ve enabled SecurityAdministration permission for debug mode).
Raw Data Screens
Now let’s create our first screen. Create a list-details screen on Students called “ManageStudents.”
In the screen designer, use the “Write Code” dropdown menu to select ManageStudents_CanRun. This method defines the condition ManageStudents screen will show up in the running application.
We only want to show this raw data screen for users with ViewAdminScreen permission (that we defined in earlier steps). In the code editor, write:
Private Sub ManageStudents_CanRun(ByRef result As Boolean)
    ' Only show this screen to admin user
    result = User.HasPermission(Permissions.ViewAdminScreen)
End Sub
Let’s hit F5 again. We will see the Manage Students screen we just created. By default, it is place under Tasks menu group. Let’s organize all the raw data screens under Administration menu group.
Go back in the LightSwitch IDE and open application designer. Under “Screen Navigation” tab, delete Manage Students screen from Tasks group and add it under Administration group.
Follow the same steps to add other raw data screens (with ViewAdminScreen permission):
Organize your screens to have this menu structure.
Use these screens to enter some sample data for students, instructors, categories, courses, and sections.
Screen Customizations
In the Course Manager sample project, we’ve also made some screen customizations to improve user experience. Here are the highlights:
Manage Students
In “Manage Students” screen, we’d like to:
- Show the list items as links
- Use “Address Editor” control for the address fields
- Add time tracking fields and show them as read-only text boxes
Show list items as links
In the screen designer, select Student’s Summary control (under the List control). Check “Show as Link” in the Properties.
Use Address Editor control for the address fields
In the screen designer, right click on “Student Details” node, select “Add Group” to add a group node.
Change the group node to use “Address Editor” control.
Now, drag the Street node and drop it in (STREET LINE 1). Repeat the drag-and-drop for City, State, and Zip.
Add time tracking fields and show them as read-only text boxes
In the screen designer, select “Student Details” node. Click on “+ Add” button and select “Created Time” to add the field. Repeat and add “Updated Time” and “Updated By.”
Use the “Write Code” dropdown menu in the command bar. Select ManageStudents_Created.
<Screen>_Created is called after the UI elements on the screen have been constructed. We want to make them read-only. Write:
Private Sub ManageStudents_Created()
    ' Make some controls read only
    FindControl("CreatedTime").IsReadOnly = True
    FindControl("UpdatedTime").IsReadOnly = True
    FindControl("UpdatedBy").IsReadOnly = True
End Sub
Manage Courses
In “Manage Courses” screen, we’d like to:
- Use a multi-line text box for Description field (set Lines property for the TextBox control)
- Use a “List box mover” UI for the many-to-many relationship (see “How to Create a Many-to-Many Relationship”)
Use a multi-line text box for Description field
Select the Description TextBox control and in the Sizing section of the properties window set the Lines to 5.
Create a “List box mover” UI
You can create this control our of two lists and a couple buttons. Take a look at the “List Box Mover UI” section of the post: How to Create a Many-to-Many Relationship for details on how to create this. The same technique described in that post will work in Visual Studio 2012.
Conclusion
We now have a functional Desktop application using Windows authentication. We also defined permission logic to limit certain screens to privileged users. We also customized some of these admin screen UIs to fit our needs.
Coming up next: Course Manager Sample Part 4 - Implementing the Workflow


Return to section navigation list>
Windows Azure Infrastructure and DevOps
• Harry Yang (@Cloud_PM) explained How to Prevent Cascading Errors From Causing Outage Storms In Your Cloud Environment with Amazon Web Services and Windows Azure as examples in an 8/24/2012 post:
Last week, we talked about how shared resource pools change the way IT operates the cloud environment. We mentioned that how to avoid false positive and save the maintenance costs by measuring the pool decay. Today, I am going to explain how you can avoid another major challenge in the cloud operations – outage storm.
The Outage storm typically is caused by cascading error and the lack of mechanism to detect those errors. Chances are you are not unfamiliar with this issue. In April, 2011, Amazon AWS experienced a week-long outage on many of its AWS service offerings. I examined this incident in the article – thunderstorm from Amazon reminded us the importance of weather forecast. In a nutshell, a human error diverted major network traffic to a low bandwidth management channel. This flooded the communication between many EBS nodes. Because of the built-in automation process, these nodes started to unnecessarily replicate themselves and quickly consumed all the storage resources the availability zone. Eventually it brought down not only EBS but all other services relying on it. Almost a year later, Microsoft Azure experienced a day long outage. This time, a software glitch started to trigger unnecessary built-in automation process and brought down the server nodes. You can see the similarity between these two incidents. An error happened and triggered, not intentionally, automation processes that were built for different purpose. The outage storm, without any warning, brings your cloud down.
So how you can detect and stop the cascading as soon as possible? Let’s look at these two incidents. The environment seemed normal during the onset. The capacity in the pool seemed good. I/O was normal. The services run from these pools were not impacted. You felt everything was under control since you were monitoring the availability of each of those resources. Suddenly, you started to notice number of events showing up in your screen. While you were trying to make sense on these events, there were more and more events coming in and alerting you the availability of many devices were gone. Not long, the service help desk tickets swamped in. Customers started to complain large number of their services experiencing performance degradation. Everything happened just so fast that you didn’t get time to understand the root cause and make necessary adjustment. Sounds a nightmare to you?
How one can prevent that from happening? My suggestion is that you need to two thing. One, you need to measure the pool health. Particularly, in this case, you need to monitor the distribution of health status of its member resources. How many of them are in trouble? Do you see any trend how the trouble is propagated? What’s the rate of this propagation? Case in point, the Azure incident could have lasted longer and impacted more customers if Microsoft team hadn’t implemented its “human investigate” threshold. But still it lasted more than 12 hours. The main reason was these thresholds rely on the availability monitoring through periodic pings. And it took three timeouts in a row to trigger the threshold of the pool. And this delays the alert. So if you want to detect storm at the onset, the second thing you need to do is to detect the abnormality of behavior for its member resources, not just the ping. Combining these two measurements, the device can reflect their abnormality health status and the pool can detect the changes of the health distribution among its member resources. You, as an IT operation person, can set up rules to alert you when the health distribution changes across a critical threshold.
How does this benefit you? First you can get the alerts once that threshold is crossed even if the overall performance and capacity of the pool seem good. You will then have enough time to respond, for example diverting services to another pool or have the troubled devices quarantined. In addition, you won’t be swamped by massive alerts from each affected devices and try to guess which one you should look first. You can execute root cause analyses right from that alert at your pool level.
Cloud is built with the automation as the main mechanism to ensure its elasticity and agility. But occasionally, like what happened in these two incidents, errors can amplify their damages through cascading very quickly through those automation. Because of its inherited nature, the outage storm is more often than you think. If you operate a cloud environment, chances are you will face them pretty soon. You need to find a solution that can detect resource health by learning its behavior and can measure the distribution change of those health status at the pool level. The shared pool changes how you operate your cloud environment. Operation solution needs to evolve to help you better measure pool decay and detect outage storm. Cloud-wash is not going to cut it.
To see how it works in a real world, you can visit booth 701 in this year’s VMworld. You can see a demo over there and get some ideas how you would approach these problems. If you want to discuss this with me, please let the booth staff know.


Lydia Leong (@cloudpundit) asserted Servers are cheap, talent is expensive in an 8/24/2012 post:
Of late, I’ve been talking to Amazon customers who are saying, you know, AWS gives us a ton of benefits, it makes a lot of things easy and fast that used to be hard, but in the end, we could do this ourselves, and probably do it at comparable cost or a cost that isn’t too much higher. These are customers that are at some reasonable scale — a take-back would involve dozens if not hundreds of physical server deployments — but aren’t so huge that the investment would be leveraged over, say, tens of thousands of servers.
Most people don’t choose cloud IaaS for lowered costs, unless they have very bursty or unpredictable workloads. Instead, they choose it for increased business agility, which to most people means “getting applications, and thus new business capabilities, more quickly”.
But there’s another key reason to not do it yourself: The war for talent.
The really bright, forward-thinking people in your organization — the people who you would ordinarily rely upon to deploy new technologies like cloud — are valuable. The fact that they’re usually well-paid is almost inconsequential compared to the fact that these are often the people who can drive differentiated, innovative business value for your organization, and they’re rare. Even if you have open headcount, finding those “A” players can be really, really tough, especially if you want a combination of cutting-edge technical skills with the personal traits — drive, follow-through, self-starting, thinking out of the box, communication skills, and so on — that make for top-tier engineers.
Just because you can do it yourself doesn’t mean that you should. Even if your engineers think they’re just as smart as Amazon’s engineers (which they might well be), and are chomping at the bit to prove it. If you can outsource a capability that doesn’t generate competitive advantage for you, then you can free your best people to work on the things that do generate competitive advantage. You can work on the next cool thing… and challenge your engineers to prove their brilliance by dreaming up something that hasn’t been done before, solving the challenges that deliver business value to your organization. Assuming, of course, that your culture provides an environment receptive to such innovation.

David Linthicum (@DavidLinthicum) asserted “Data integration is usually an afterthought for companies moving to the cloud -- when it should be top of mind ” as a deck for his Deploying to a public cloud? Deal with data integration first article of 8/24/2012 for InfoWorld’s Cloud Computing blog:
If your organization has moved past all the excuses to use the public cloud, congratulations! But did you think through your data-integration strategy before deployment? If not, you'll find it difficult to maintain your corporate data in a public cloud.
The best bang for the cloud computing buck comes from using public cloud resources, such as Amazon Web Services, Google, Rackspace, IBM, and Microsoft. But that means you have to move some of your corporate data to the public cloud to take advantage of its cheap storage and per-use rental of compute cycles.
When you move even a smidgen of data to a public cloud, you quickly understand the need for some sort of synchronization with on-premise enterprise systems. Otherwise, users will rekey data, overnight USB drives, and take other ugly approaches to data movement -- it happens more often than most IT organizations realize.
But when IT acknowledges the data-sync problem, cloud deployments grind to a halt until IT figures out the synchronization issue.
It doesn't have to be this way, nor should it. After all, the synchronization issue can be solved easily with a bit of upfront planning. Data integration technology is in its fifth or sixth generation these days, so the technology typically has a quick ROI and, ironically, is often available on-demand like the cloud itself.
Like many architectural issues that need some face time when you move to the public cloud (such as security, governance, and performance), data integration requires upfront thinking and planning. Here's what you need to consider:
- The amount of data to be placed in the public cloud
- The kind of data moving between the enterprise and the cloud provider and the frequency of that transmission
- The content and structure changes required for cloud storage, including encryption and other security requirements
- The logging and auditing requirements
- The exception-handling needs
Unfortunately, I suspect the data-integration gotchas will not go away any time soon. Many enterprises don't like to think about data integration for the same reason we don't like to think about indoor plumbing. But if you can hold your nose and do the upfront work, your public cloud deployment will work well.

David Linthicum (@DavidLinthicum) asserted Cloud interoperability and portability remain science fiction in an article of 8/23/2012 for TechTarget’s SearchCloudComputing blog:
According to the Information Systems Audit and Control Association (ISACA), calculating the total cost of an IT service against its potential return is always a challenge, and cloud computing brings a new wrinkle to this process. An analysis of cloud computing benefits must include a short- and a long-term outlook as well as potential termination costs.
When making a hasty move to cloud computing, enterprises may fail to anticipate the costs of bringing services back into the corporate data center to comply with regulatory changes, a situation that is occurring right now in the health care vertical. Moreover, enterprises migrating from one platform to another may not understand the associated costs of cloud interoperability. Not only is the move itself into and out of a cloud environment a costly endeavor, but tasks such as redeveloping code and data introduce additional, frequently unexpected, costs.
Finally, there might be hidden lock-incosts with a specific cloud provider or proprietary service model; in many cases, the cost of moving code and data from one cloud service provider to another might be prohibitive.
Most of these issues boil down to limitations around the portability and interoperability of cloud services. And these are becoming obstacles as many enterprises consider both the costs of moving to the cloud and getting a reasonable return on investment (ROI) for the effort.
The core cloud interoperability problem is that cloud providers have not done a good job coordinating the use of languages, data, interfaces and other subsystems that are now largely proprietary. Thus, the notion that you can easily move from one provider to another without significant work and cost is largely science fiction at this point.
The notion that you can easily move from one provider to another without significant work and cost is largely science fiction at this point.
Moreover, the thought that clouds will work and play well together as a matter of practice is a leap of faith -- and one that I would not make. When one cloud service provider doesn't build its interfaces to work directly with another cloud provider, new cloud users must figure out the best way to move data between them or share core business processes.
Standards exist, of course, and many cloud computing standards organizations are emerging, such as The Green Grid, Cloud Security Alliance, the Institute of Electrical and Electronics Engineers (IEEE) Standards Association, the Distributed Management Task Force and theNational Institute of Standards and Technology. But these organizations have yet to define a set of detailed standards for all major cloud service providers to abide by to ensure interoperability and portability. Indeed, right now, it's not unreasonable to state that any relevant standard around cloud interoperability and portability is years away.
So, what can an enterprise do now to work through a lack of interoperability and portability standards? A few key points come to mind.
First, consider interoperability and portability in the cost-benefit analysis of moving to cloud computing. As the ISACA report points out, the cost of migrating resources back in-house or to another cloud may be high or add more risk than many businesses think right now.
Second, select cloud providers that can provide you the best portability and interoperability. It's not a perfect world, but many cloud service providers are doing a better job understanding the needs of their users who are migrating to their platforms, including better service, language and data compatibility. But make sure you do a proof of concept (POC) to determine the true state of interoperability and portability before making the move.
Finally, don't be afraid to hold off on the cloud migration for now. Cloud standards likely won’t be established anytime soon, so don’t hold your breath and wait. And cloud providers will only get better at portability and interoperability. Potential ROI should be clearer in the future, if that’s your primary obstacle now.

Full disclosure: I’m a paid contributor to the SearchCloudComputing.com blog.
Dhananjay Kumar (@debug_mode) described Working with github on Windows in an 8/23/2012 post:
In this post we will see step by step to configure github for windows and the way to sync the project from windows to github repository. To start with very first you need to create a repository on github. To create repository login to github and click on New repository option
Once you click on New repository button you will get prompted to fill many information’s like repository name, description etc. You can make repository public or private by selecting respective radio button. If you are starting new then it is always good to initialize the repository with a README. It allows git to clone the repository immediately. Please refer below image for more on creating new repository
Once repository is created you will be navigated to repository page and can find all the information about repository as following image
At this point you have created repository in github and now you need to download and configure Windows Client of github on your machine. On the github page in the bottom you will find link to download windows client for github
After downloading and installing github windows client you will find icon on your desktop. Click that icon. Github windows client will be launched. In the left side you see local and github account. When you click on github account you will find all the repositories from the github.
To start working with github repositories, first you need to clone that. You will get clone button next to repository.
After successful cloning you will find button changed as shown in following image.
Double click on the repository to open it. After opening the repository you can notice in top a tool menu. From there you got option
- Open in explorer
- Open a shell here
- View on github
To work with project select open in explorer. It will open the repository in windows explorer. Now suppose you have a visual studio solution you want to push on github, you need to follow below steps
Open VS project in window explorer and copy the solution.
You need to copy all files from VS solution open in windows explorer to github repository open in windows explorer.
After copying files to github repository open in windows explorer go to github for windows client and click on the refresh button
After refreshing double click on testproject repository. You may notice that a blue array next to repository name saying this repository has been modified. Click on the blue arrow or double click on the repository to navigate to detail repository page. On this screen you will find
- Details of files to be committed
- Option to commit the changes with comment
After providing comment you need to click on the commit button to commit the changes locally. After committing you will get message that one change committed locally though it is not synced.
To sync changes with github you need to click on sync button in top. If there is any locally committed change available then you will find sync button in blue else it would be in gray color. Once you click on sync button changes will get committed to github
You can verify sync in two ways. Either navigate to github and you will find all changes with comment there.
The other way is that you will see on github windows client in sync displayed.
The approach should be to put working files in local repository or cloned repository such that whenever you do any changes github for windows will detect that and you can locally commit and eventually sync with the github. In this way you can work with github and windows


Mark Russinovich (@markrussinovich) posted Windows Azure Host Updates: Why, When, and How on 8/22/2012:
Windows Azure’s compute platform, which includes Web Roles, Worker Roles, and Virtual Machines, is based on machine virtualization. It’s the deep access to the underlying operating system that makes Windows Azure’s Platform-as-a-Service (PaaS) uniquely compatible with many existing software components, runtimes and languages, and of course, without that deep access – including the ability to bring your own operating system images – Windows Azure’s Virtual Machines couldn’t be classified as Infrastructure-as-a-Service (IaaS).
The Host OS and Host Agent
The diagram below shows a simplified view of a server’s software architecture. The host partition (also called the root partition) runs the Server Core profile of Windows Server as the host OS and you can see the only difference between the diagram and a standard Hyper-V architecture diagram is the presence of the Windows Azure Fabric Controller (FC) host agent (HA) in the host partition and the Guest Agents (GA) in the guest partitions. The FC is the brain of the Windows Azure compute platform and the HA is its proxy, integrating servers into the platform so that the FC can deploy, monitor and manage the virtual machines that define Windows Azure Cloud Services. Only PaaS roles have GAs, which are the FC’s proxy for providing runtime support for and monitoring the health of the roles.
Reasons for Host Updates
Ensuring that Windows Azure provides a reliable, efficient and secure platform for applications requires patching the host OS and HA with security, reliability and performance updates. As you would guess based on how often your own installations of Windows get rebooted by Windows Update, we deploy updates to the host OS approximately once per month. The HA consists of multiple subcomponents, such as the Network Agent (NA) that manages virtual machine VLANs and the Virtual Machine virtual disk driver that connects Virtual Machine disks to the blobs containing their data in Windows Azure Storage. We therefore update the HA and its subcomponents at different intervals, depending on when a fix or new functionality is ready.
The steps we can take to deploy an update depend on the type of update. For example, almost all HA-related updates apply without rebooting the server. Windows OS updates, though, almost always have at least one patch, and usually several, that necessitate a reboot. We therefore have the FC “stage” a new version of the OS, which we deploy as a VHD, on each server and then the FC instructs the HAs to reboot their servers into the new image.
PaaS Update Orchestration
A key attribute of Windows Azure is its PaaS scale-out compute model. When you use one of the stateless virtual machine types in your Cloud Service, whether Web or Worker, you can easily scale-up and scale-down the role just by updating the instance count of the role in your Cloud Service’s configuration. The FC does all the work automatically to create new virtual machines when you scale out and to shut down virtual machines and remove when you scale down.
What makes Windows Azure’s scale-out model unique, though, is the fact that it makes high-availability a core part of the model. The FC defines a concept called Update Domains (UDs) that it uses to ensure a role is available throughout planned updates that cause instances to restart, whether they are updates to the role applied by the owner of the Cloud Service, like a role code update, or updates to the host that involve a server reboot, like a host OS update. The FC’s guarantee is that no planned update will cause instances from different UDs to be offline at the same time. A role has five UDs by default, though a Cloud Service can request up to 20 UDs in its service definition file. The figure below shows how the FC spreads the instances of a Cloud Service’s two roles across three UDs.
Role instances can call runtime APIs to determine their UD and the portal also shows the mapping of role instances to UDs. Here’s a cloud service with two roles having two instances each, so each UD has one instance from each role:
The behavior of the FC with respect to UDs differs for Cloud Service updates and host updates. When the update is one applied by a Cloud Service, the FC updates all the instances of each UD in turn. It moves to a subsequent UD only when all the instances of the previous have restarted and reported themselves healthy to the GA, or when the Cloud Service owner asks the FC via a service management API to move to the next UD.
Instead of proceeding one UD at a time, the order and number of instances of a role that get rebooted concurrently during host updates can vary. That’s because the placement of instances on servers can prevent the FC from rebooting the servers on which all instances of a UD are hosted at the same time, or even in UD-order. Consider the allocation of instances to servers depicted in the diagram below. Instance 1 of Service A’s role is on server 1 and instance 2 is on server 2, whereas Service B’s instances are placed oppositely. No matter what order the FC reboots the servers, one service will have its instances restarted in an order that’s reverse of their UDs. The allocation shown is relatively rare since the FC allocation algorithm optimizes by attempting to place instances from the same UD - regardless of what service they belong to - on the same server, but it’s a valid allocation because the FC can reboot the servers without violating the promise that it not cause instances of different UDs of the same role (of the a single service) to be offline at the same time.
Another difference between host updates and Cloud Service updates is that when the update is to the host, however, the FC must ensure that one instance doesn’t indefinitely stall the forward progress of server updates across the datacenter. The FC therefore allots instances at most five minutes to shut down before proceeding with a reboot of the server into a new host OS and at most fifteen minutes for a role instance to report that it’s healthy from when it restarts. It takes a few minutes to reboot the host, then restart VMs, GAs and finally the role instance code, so an instance is typically offline anywhere between fifteen and thirty minutes depending on how long it and any other instances sharing the server take to shut down, as well as how long it takes to restart. More details on the expected state changes for Web and Worker roles during a host OS update can be found here.
IaaS and Host Updates
The preceding discussion has been in the context of PaaS roles, which automatically get the benefits of UDs as they scale out. Virtual Machines, on the other hand, are essentially single-instance roles that have no scale-out capability. An important goal of the IaaS feature release was to enable Virtual Machines to be able to also achieve high availability in the face of host updates and hardware failures and the Availability Sets feature does just that. You can add Virtual Machines to Availability Sets using PowerShell commands or the Windows Azure management portal. Here’s an example cloud service with virtual machines assigned to an availability set:
Just like roles, Availability Sets have five UDs by default and support up to twenty. The FC spreads instances assigned to an Availability Set across UDs, as shown in the figure below. This allows customers to deploy Virtual Machines designed for high availability, for example two Virtual Machines configured for SQL Server mirroring, to an Availability Set, which ensures that a host update will cause a reboot of only one half of the mirror at a time as described here (I don’t discuss it here, but the FC also uses a feature called Fault Domains to automatically spread instances of roles and Availability Sets across servers so that any single hardware failure in the datacenter will affect at most half the instances).
More Information
You can find more information about Update Domains, Fault Domains and Availability Sets in my Windows Azure conference sessions, recordings of which you can find on my Mark’s Webcasts page here. Windows Azure MSDN documentation describes host OS updates here and the service definition schema for Update Domains here.


Maarten Balliauw (@maartenballiauw) posted MyGet Build Services - Join the private beta! on 8/22/2012:
Good news! Over the past 4 weeks we’ve been sending out tweets about our secret project MyGet project “wonka”. Today is the day Wonka shows his great stuff to the world… In short: MyGet Build Services enable you to add packages to your feed by just giving us your GitHub repo. We build it, we package it, we publish it.
To make it more visual, here are some screenshots. First, you have to add a build source, for example a GitHub repository (in fact, GitHub is all we currently support):
After that, you simply click “Build”. A couple of seconds or minutes later, your fresh package is available on your feed:
If you want to see what happened, the build log is available for review as well:
Enroll now!
Starting today, you can enroll for our private beta. You’ll get on a waiting list and as we improve build capacity, you will be granted access to the beta. If you’re in, tell us how it behaves. What works, what doesn’t, what would you like to see improved. Enroll for this private beta now via http://www.myget.org/buildservices. Limited seats!
Do note it’s still a beta, and as Willy Wonka would say… “Little surprises around every corner, but nothing dangerous.”
Happy packaging!


Lydia Leong (@cloudpundit) posted her Thoughts on cloud IaaS market share on 8/22/2012:
As part of our qualification survey for the cloud IaaS Magic Quadrant, we ask providers for detailed information about their revenue, provisioned capacity, and usage, under a very strict nondisclosure agreement. We treat this data with a healthy dose of skepticism (and we do our own models, channel-check, talk to contacts in the financial industry who’ve seen disclosures, and otherwise apply a filter of cynicism to it), but post-scrubbing, there are a number of very interesting data points that come out of the aggregated whole.
Three teasers:
Growth is huge, but is disproportionately concentrated on a modest number of vendors. Obviously, everyone knows that Amazon is a behemoth, but among the other vendors, there are stark differences in growth. Obviously, some small vendors post huge growth on a percentage basis (we went from $100k to $2m! yay!) so raw percentages aren’t the right way to look at this. Instead, what’s interesting is relative market share once you eliminate Amazon from the numbers. The data suggests that to succeed in this market, you have two possible routes — you have a giant sales channel with a ton of feet on the street and existing relationships, or you have excellent online marketing and instant online sign-ups. A third possible route is that you make it easy for people to white-label and resell your service.
Most vendors are still not at scale. Despite huge growth, most vendors remain under $10 million in revenue, and even the club above $20 million in revenue in pure public cloud IaaS revenue is only 20-odd vendors. Even that club is often still at a scale where Amazon could probably casually provide that as spot capacity in one AZ. By market share, Amazon is a de facto monopoly, although this market doesn’t have the characteristics of monopoly markets; the sheer number of competing vendors and the early stage of the market suggest shake-ups to come.
Customers love dedicated compute nodes. An increasing number of vendors offer dedicated compute nodes — i.e., a guarantee that a customer’s VMs won’t share a physical server with another customer’s VMs. That can be done on temporarily-dedicated hardware (like Amazon’s Dedicated Instances) or on an allocation of hardware that’s contractually the customer’s for a lengthier period of time (often a dedicated-blade option for vCloud Powered providers). For most providers who offer this option, customers seem to overwhelmingly choose it over VMs on shared hosts, even though it represents a price premium. Note that in most of these cases, the network and storage are still shared, although vendors may label this “private cloud” nevertheless. (We believe Amazon’s DI to be an exception to this, by the way, due to its very high price premium, especially for small numbers of instances; this is an effect of DIs being spread out over many servers rather than consolidated, like other providers do it.)

<Return to section navigation list>
Windows Azure Platform Appliance (WAPA), Hyper-V and Private/Hybrid Clouds
 No significant articles today.
<Return to section navigation list>
Cloud Security and Governance
 No significant articles today.
<Return to section navigation list>
Cloud Computing Events
• Himanshu Singh (@himanshuks) posted Windows Azure Community News Roundup (Edition #33) on 8/24/2012:
Welcome to the latest edition of our weekly roundup of the latest community-driven news, content and conversations about cloud computing and Windows Azure. Here are the highlights for this week.
Articles and Blog Posts
- Deploying Certificates with Windows Azure Virtual Machines by @MWashamMS (posted Aug 23)
- Autoscaling with (Windows) Azure with WASABi – Part 2 by @pbouwer (posted Aug 22)
- Updates to Tic-Tac-R. Now it Works with Windows Azure by @pollirrata (posted Aug 22)
- Cloud Services Management via the Windows Azure SDK for PHP by @brian_swan (posted Aug 22)
- Sending Emails Easily From your (Windows) Azure Application by @TapanilaT (posted Aug 21)
- Walkthrough: Role-based Security on a Standalone WPF App Using Windows Azure Authentication Library and ACS by @HaishiBai2010 (posted Aug 21)
- Web Deploy (MSDeploy) How to Sync a Folder by @sayedhashimi (posted Aug 20)
North America
- August 20 – October 11: Windows Azure Developer Camp – Various (20+ North American cities)
- September 5-7: Heartland Developer Conference – Omaha, NE
- September 6-October 11: Cloud OS Signature Event Series – Various (16 cities)
- September 12: (AIS & Microsoft) An Introduction to Windows Azure IaaS - Chevy Chase, MD
Europe
- August 29-September 12: Windows Azure Developer Camp – Various, Germany
- August 29: Dutch Windows Azure Group Meeting – Vianen, Netherlands
- August 30: Manchester Windows Azure User Group – Manchester, UK
- August 30: Windows Azure Developer Camp – Edinburgh, Scotland
- September 13: Windows Azure Developer Camp – Bristol, UK
- September 25: Windows Azure Web Sites Deep Dive with Brady Gaster – Mechelen, Belgium
- September 27-28: CloudBurst 2012 – Stockholm, Sweden
Rest of World/Virtual
- August 29: Windows Azure Developer Camp – Bogota, Columbia
- September 14: Hands-on Lab Online: Debugging Applications in Windows Azure - Virtual
- September 19: Hands-on Lab Online: Exploring Windows Azure Storage - Virtual
Recent Windows Azure MSDN Forums Discussion Threads
- Can’t Import a Subscription Before Deploying to (Windows) Azure – 1,026 views, 5 replies
- What’s Going Wrong With My Worker Role – 2,169 views, 32 replies
- Large Amount of Data from Files to SQL Azure – 646 views, 5 replies
Recent Windows Azure Discussions on Stack Overflow
- How to Create Windows (Azure) Virtual Machine with 16GB RAM – 1 answer, 3 votes
- How can I Secure Internal Roles in (Windows) Azure (SSL at a Minimum – 1 answer, 2 votes
Send us articles that you’d like us to highlight, or content of your own that you’d like to share. And let us know about any local events, groups or activities that you think we should tell the rest of the Windows Azure community about. You can use the comments section below, or talk to us on Twitter @WindowsAzure.

 Steve Plank (@plankytronixx) reported on 8/24/2012 a Free One Day Windows Azure Developer Camp Edinburgh, Thursday 30th August:
Don’t forget about the free Azure Developer Camp we have running in Edinburgh next Thursday.
Register here:
Here’a a video to give you a feel for what a camp is like.
And here is a complete synopsis.
UK Windows Azure Camps
We run 2 types of camp for Windows Azure; one aimed at the developer and one aimed at the IT Pro. The developer camp concentrates on the Platform-as-a-Service (PaaS) features of Windows Azure. Mostly this means Windows Azure Cloud Services, Windows Azure Storage, Windows Azure Active Directory Access Control Service, Windows Azure Service Bus and Windows Azure SQL DB, and Windows Azure Websites. The IT Pro camp concentrates on the Infrastructure-as-a-Service features; Virtual Machines and Virtual Networks.
Depending on the venue, there are usually between 30 and 70 attendees. As an attendee, you are expected to bring a wireless-enabled laptop with certain pre-requisite software already installed. For the developer camp this includes Visual Studio, SQL Server and the Windows Azure Tools/SDK. For the IT Pro camp, this includes Powershell. You are expected to follow this set up before you arrive on the camp. Setup details are provided below. It cannot be stressed enough how poor an experience you will have if your laptop is not correctly configured when you arrive. If you tie-up the time of an instructor with questions about your machine setup, you are denying another delegate who has arrived with a correctly configured machine the help they need. Please be respectful of the other delegates who have followed these instructions.
Have you ever turned up to a training day/presentation where every delegate except you seemed to have done certain preparatory work in advance? Did there come a point at which all the eyes in the room were on you and you had to say “…well, err, ummm, I haven’t done that stuff…”? Was that the point you wished you had read the material before you’d turned up? Don’t be the one who has to create some last-minute excuse while the eyes of all the other delegates are on you – simply make sure you read this and follow the instructions. You will be expected to have installed and configured your machine to work on a Windows Azure Camp.
You will need a working Windows Azure subscription and you need to have applied for and successfully been granted access to:
- Windows Azure Web Sites - for the developer camp.
- Windows Azure Virtual Machines and Virtual Networks - for the IT Pro camp.
There is a video that describes how to apply for these features here.
Any working subscription is suitable; paid or free. You can get a free trial subscription. This grants you access to certain resources free for 90 days. You will need a Windows Live ID and a Credit Card to register. The spending limit on the free trial account is set at £0.00. When the free trial period of 90 days has passed you will be asked if you’d like to remove the spending limit and from that point on treat it as a standard paid subscription. If you use more than the free allocation of resources in a month, you will also be asked if you’d like to remove the spending limit. There is no perpetually free subscription available for Windows Azure. There are also free trial subscriptions available to certain MSDN subscribers, BizSpark partners and MPN members.
Details of the free trial accounts are here:
- To get a free trial subscription go to http://bit.ly/azureforfree. . To register for this offer, you need a credit card to activate it, but the spending limit on the subscription is set to £0.00 so you won’t be charged.
- To add Windows Azure benefits to your existing MSDN subscription, go to http://www.windowsazure.com/en-us/pricing/member-offers/msdn-benefits/
- To add Windows Azure benefits if you are a BizSpark customer, go to http://www.windowsazure.com/en-us/pricing/member-offers/bizspark-benefits/
- To add Windows Azure benefits if you are an MPN member go to http://www.windowsazure.com/en-us/offers/ms-azr-0002p
It can’t be stressed enough how much of a dead-end it can be if you leave it till the last minute and attempt to activate a subscription while on the camp. A common example is the BizSpark delegate who tries to activate a subscription only to find a different employee has already activated the subscription. He/she wasn’t expecting that and it means they will be unable to complete the lab work. We will be entirely unable to help in situations such as this. Another example is the delegate who has an active subscription but hasn’t yet applied for access to the preview features such as Virtual Machines or Windows Azure Web Sites. As it may take several hours for the application to be processed, they will be unable to complete lab-work until the facilities are available.
Agenda
Windows Azure Developer Camp

Note: Because you can leave your Windows Azure service deployed and you will have all the code and projects etc. on your laptop when you leave the developer camp, any unfinished labs can be completed at home/in the office.
Windows Azure IT Pro Camp

Note: Because you can leave your Windows Azure service deployed and you will have all the configuration and projects etc. on your laptop when you leave the developer camp, any unfinished labs can be completed at home/in the office.
Pre-requisites
Developer Camp pre-requisites
If you're a developer who uses a laptop, you'll almost certainly have most of these development components already installed. Please pay particular attention to the SQL Server setup - you'll need to use the same account during the labs as the account that was used to install whichever version of SQL Server you decide on from the pre-requisites list.
- A working Windows Azure subscription – see details above.
- A wireless-enabled 64-bit laptop with Windows Vista, Windows 7, Windows Server 2008 R2 or Windows 8 RTM. The camp is written with Windows Vista/Windows 7/Windows Server 2008 R2 users in mind. If you are using Windows 8 there will be variations in the way the UI is described.
- Bring the power supply: you will be using the laptop all day.
- A basic knowledge of programming concepts and familiarity with Visual Studio
- A basic knowledge of web-programming and how Internet applications work
- An understanding of the Microsoft web-stack (Windows Server, IIS, .Net, basic security etc.) …
Planky continues with details for checking the prerequisites setup.
Hortonworks posted on 8/22/2012 a pre-recorded Webinar entitled Microsoft and Hortonworks Bring Apache Hadoop to Windows Azure featuring Rohit Bakhshi, Product Manager, Hortonworks and Mike Flasko, Senior Program Manager Lead, Microsoft:
Join us in this 60-minute webcast with Rohit Bakashi, Product Management at Hortonworks, and Mike Flasko, Program Manager at Microsoft, to discuss the works being done since the announcement.
This session will cover Hortonworks Data Platform and Microsoft's end-to-end roadmap for Big Data. Get a sneak demo of HDP on both Windows Server and Windows Azure and hear real-world use cases on how you can leverage Microsoft's Big Data solution to unlock business insights from all your structured and unstructured data.
From Mike Flasko’s discussion about Apache Hadoop for Windows Azure and Windows Server, which begins at 00:14:00":

<Return to section navigation list>
Other Cloud Computing Platforms and Services
Barb Darrow (@gigabarb) listed 6 things we need to know from VMware in an 8/24/2012 post to GigaOm’s Cloud blog:
As VMware transitions from CEO Paul Maritz to CEO Pat Gelsinger and keeps pushing beyond its server virtualization roots, there are a lot of questions about where the company is headed. Here are 6 key issues the company should address at VMworld.
VMware’s annual VMworld shindig is next week, giving the company a golden opportunity to answer a lot of questions about its future and its future products. Here are five topics the company needs to address at the event where incoming CEO Pat Gelsinger [pictured at right], and out-going CEO Paul Maritz will both keynote.
1: Settle the spin out question
Will VMware spin out its Cloud Foundry platform as a service and other cloud assets or keep them in house? As GigaOM reported last month, a spinout was under consideration as a way to help the company become a bigger player in cloud computing. Packaged together, the open-source Cloud Foundry PaaS, EMC’s Greenplum data analysis expertise and an infrastructure as a platform play – all of that could make a cloud foundation that could take on rivals Amazon, Microsoft and Google.
2: Clarify the software-defined data center product vision
Folks want to hear VMware CTO Steve Herrod talk more about the company’s notion of a software defined data center, in which software and virtualization assume roles long-held by specialized hardware. VMware’s acquisition of Nicira and its software-defined networking (SDN) prowess will play a big role there and will be the subject of much debate, although the deal is still in the works.
3: Show the world who’s in charge
One question that has dogged VMware since EMC bought it in 2003 is: Who is running the show? When VMware said last month that Maritz (pictured [at right]) would move over to parent company EMC as chief strategist and would be replaced by Gelsinger, president of EMC’s Information Infrastructure Products group, reaction was all over the map. People had many theories such as:
- A. This was a move by EMC CEO Joe Tucci to tie VMware more tightly to the mother ship.
- B. Maritz was tired of day-to-day management.
- C. Gelsinger had to be appeased after Tucci said he would stay on as EMC CEO at least through the end of 2013.
- D: All of the above.
- E: None of the above.
VMware now needs to put these theories to rest with a statement of what Tucci’s role is and how he helps lead the company’s vision.
4: Lose the “memory tax.” For real, and once and for all
VMware infuriated customers last year with vSphere 5 licensing changes that amounted to a price hike (many dubbed it a “memory tax.”) With that release, VMware started charging a fee for the use of vSphere on every socket of a physical server and another fee on the amount of virtual memory used by the hypervisor. Now it’s been reported that VMware will drop the practice.
That single licensing move prompted many VMware shops to at least look at Microsoft Hyper-V or maybe XEN or KVM server virtualization alternatives. VMware needs to clean this up.
5: Address fear of a brain drain
What’s VMware doing to keep and recruit the best technical talent? As GigaOM’s Derrick Harris reported, a lot of engineers left VMware in the past year. Most recently Cloud Foundry luminary Dave McCrory took a new job at Warner Music Group. This perception of brain drain worries people like Bart Copeland, CEO of ActiveState, a Cloud Foundry partner, who wonders if VMware is doing enough to find new senior engineers to replace those who have left. Whether it’s accurate or not, there is a perception that VMware is bleeding tech talent.
6: Set priorities
Everyone knows VMware wants to be more than a server virtualization vendor, but despite lots of acquisitions, SpringSource, Zimbra, etc. — its core strength remains squarely what it’s always been: server virtualization. What does VMware want to be? And how will it pursue that expanded agenda without damaging or neglecting its core server virtualization franchise?
Gelsinger, who spent years at Intel before joining EMC, is viewed as a hardware guy, and many wonder how he will manage what is pretty clearly a software company. They would like to know what VMware’s target market really is and who its primary competition is. Microsoft? Google? IBM? HP? Positioning is important. So let’s hear about it.


Matt Wood (@mzw) reported Amazon RDS for SQL Server supports SQL Server Agent in an 8/23/2012 post:
Amazon RDS makes it easy to provision and run production databases, and customers running RDS for SQL Server will be pleased to hear they can now use SQL Server Agent to schedule and execute administrative tasks on their databases.
SQL Server Agent is a tool designed to take some of the manual heavy lifting of tuning and maintaining database services off database administrators' shoulders. For example, you could schedule regular index builds and data integrity checks as part of your regular maintenance program.
You can also schedule and run T-SQL script jobs using the tool, which is useful for a number of uses:
- Merging or transforming data as part of regular reporting runs
- Database clean ups, purging older records or converting logical deletions to physical ones
- Performance tuning
To get started, simply connect your SQL Server Management Studio to your Amazon RDS for SQL Server database. Click on 'New Job', and follow the guided instructions. Easy as that.
SQL Server Agent joins the Database Tuning Advisor as an invaluable tool in any SQL Server DBAs kit. You can learn more about viewing the logs of the SQL Server Agent and managing jobs in the 'Common DBA tasks' section of the Amazon RDS documentation.
Scheduling options in SQL Server Agent.
Let us know what jobs you're schedulding with SQL Server Agent, or jump in and spin up your production stack on Amazon EC2 with provisioned IOPS or AWS Elastic Beanstalk.
We're hiring!
If you're passionate about bringing tools such as SQL Server and SQL Server Agent to customers across the world, the Amazon RDS team has open positions for software developers, test engineers and product managers. Get in touch on rds-jobs@amazon.com.


The Amazon feature/upgrade of the week. Note that Windows Azure SQL Database (WASD, nee SQL Azure) doesn’t support SQL Server Agent.
Oren Eini (a.k.a. Ayende Rahien, @ayende) described RavenDB 1.2 Studio Features: The New Database Wizard in an 8/22/2012 post:
In the new version of the RavenDB Management Studio we wanted to enhance the options you have, one of these enhancements is the new "Create New Database" wizard.
We wanted to add the option to choose bundles for your database, configure various options and in general give you a easy way to control options that you could previously do only if you mastered the zen of RavenDB.
Now then you select the New Database option from the databases page you will get the next window:
If you check the “Advanced Settings” option you will get this window:
Now you can change the location where the data (path), logs and indexes will be stored.
In some cases putting the data, logs and the indexes in different drives can improve performance.
On the left side you have the Bundles Selection area, every bundle that you select here will be added to your database. More data about bundles: https://ravendb.net/docs/server/bundles
Some of the bundles have settings that you can (and should) configure:
Encryption:
In here you can choose you encryption key (or use the random generated on) after the database creation a pop up with the key will show you the key on last time. Make sure you have this key saved somewhere; after that window will close we will not give you the key again.
Quotas Bundle
In here you can set the limits for quotas (see http://ravendb.net/docs/server/bundles/quotas)
Replication Bundle
In here you can set the replications (and add as many as needed)
(see http://ravendb.net/docs/server/scaling-out/replication)Versioning
In here you can set the versioning (see http://ravendb.net/docs/server/bundles/versioning)
Notice that you can’t remove the default configuration or change the Collection for it but you can edit the values.
After you will press “OK” the database will be created (if you have the encryption bundles you will now see the encryption key one last time)
If in the future you want to edit the setting to the bundles (for quotas, replication and versioning) you can right-click the database in the databases view and select “edit bundles”
Note: you cannot change which bundles are part of the database after creation.


Chris Talbot (@ajaxwriter) rang in with an Amazon Launches Glacier Data Archiving and Backup Service recap for the TalkinCloud blog on 8/22/2012:
The summer heat seems to be beating down everywhere except on Amazon HQ. Amazon Web Services (AWS) has launched Amazon Glacier, a new and low-cost cloud-based storage service for data archiving and backup.
Apparently in Amazon’s (NASDAQ: AMZN) world, it’s already winter. Leaving the name aside, Amazon Glacier was designed to be a “secure, reliable and extremely low cost” data archiving and backup storage solution that’s priced as low as 1 cent per Gigabyte per month. Amazon aims to compete on price with what it deems as more costly on-premise data archiving and backup solutions.
Amazon isn’t pulling any punches as it launches Glacier either. According to the cloud provider, “companies typically overpay for data archiving” due to required upfront payments and their inability to accurately guess what their capacity requirements will be. Of course, the company has a point, and AWS is simply reiterating two of the biggest benefits of cloud computing as a whole.
“Amazon Glacier changes the game for companies requiring archiving and backup solutions because you pay nothing up front, pay a very low price for storage, are able to scale up and down whenever needed, and AWS handles all of the operational heavy lifting required to do data retention well,” said Alyssa Henry, vice president of AWS storage services, in a prepared statement.
At least upon initial inspection, it looks as if Amazon Web Services has kept pricing for Glacier fairly simple, but the AWS online calculator is still a necessity to figure out how pricing scales. Basically, it cheaper and cheaper as the total storage capacity increases (not atypical).
Upon launch Amazon Glacier is being made available through five service areas — U.S.-East (northern Virginia), U.S.-West (northern California), U.S.-West (Oregon), Asia Pacific (Tokyo) and EU-West (Ireland) regions. It’s likely there will be others available in time as the service grows.
In addition to low-cost storage, Amazon Glacier has several other features that might be of interest to businesses looking for a cloud-based data archiving solution, including:
- Customers can offload administrative burdens such as operating and scaling archival storage to AWS, which the company stated removes the need for hardware provisioning, data replication across multiple facilities and hardware failure detection and repair.
- It has an average annual durability of 99.999999999 percent for each item stored. (How Amazon came up this number for a new service is beyond me.)
- Glacier automatically replicates all data across multiple facilities and performs ongoing data integrity checks, using redundant data to perform automatic repairs if hardware failure or data corruption is discovered.
- AWS also promises a safe and secure data storage environment that requires no additional effort from customers.
Read More About This Topic


<Return to section navigation list>


0 comments:
Post a Comment